If you are getting the “No DMARC Record Found” or “DMARC Record is Missing” error, it indicates that your domain is missing one of the most crucial DNS TXT records, which protects your email from phishing and spoofing.
Without a DMARC policy, unauthorized parties can use your domain to send fraudulent emails, leading to harmful consequences like phishing attacks, email spoofing, and brand reputation damage.
Moreover, email providers are more likely to flag or reject your emails if they notice you don’t have DMARC set up, which reduces your email deliverability.
Don’t worry! In this article, we’ll break down what a DMARC record is, why you need it, and how to fix the “No DMARC Record Found” error in five simple steps.
Ready? Let’s get started!
DMARC Record: What it is and How Does it Work?
A DMARC record is a specific type of DNS (Domain Name System) record that works alongside other email authentication methods like SPF (Sender Policy Framework) and DKIM (DomainKeys Identified Mail) to protect your email domain from being exploited by cybercriminals.
DMARC allows you to define and set policies that dictate how email servers should handle messages that fail SPF and DKIM checks. Plus, it guarantees that only legitimate emails from your domain reach their intended recipients.
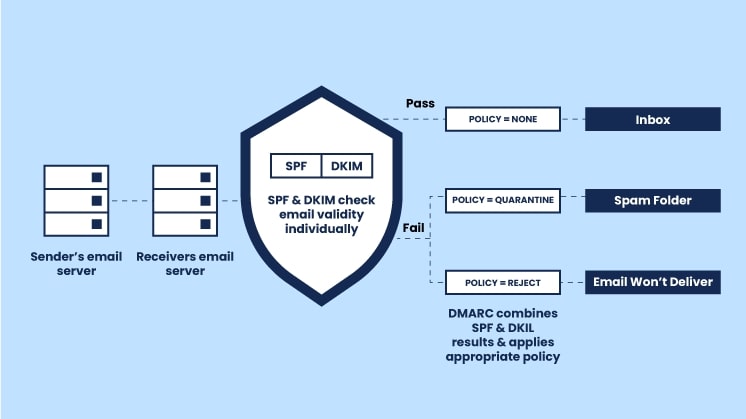
When an email is sent from your domain, the recipient’s server checks both the SPF and DKIM records to verify the authenticity of the email. SPF ensures the email was sent from an authorized server, while DKIM adds a digital signature to the message that confirms its integrity.
If either of these checks fails, the DMARC policy takes over. You can set the DMARC policy to perform one of three actions:
- None: The email is delivered as usual, but reports are generated to show authentication failures.
- Quarantine: Emails that fail authentication are sent to the recipient’s spam or junk folder.
- Reject: The email is blocked from reaching the recipient altogether.
The best part is that DMARC also provides valuable reporting capabilities. When you specify an email address to receive reports (using the ‘rua’ tag in your DMARC record), you can monitor which emails pass or fail authentication checks. These reports give you insight into potential phishing or spoofing attempts using your domain.
Example of a DMARC Record
A standard DMARC record includes several components that define how email servers handle emails that fail authentication checks. Let’s break down a typical DMARC record:
v=DMARC1; p=reject; rua=mailto:dmarc_reports@example.com; ruf=mailto:forensic_reports@example.com; pct=100
Here’s what each element means:
- v=DMARC1: This indicates the version of the DMARC protocol, which is always set to DMARC1. Including this tag is important because it lets the receiving email server know which version of DMARC is being used.
- p=reject: This is your DMARC policy, which specifies how to handle emails that fail both SPF and DKIM checks. In this example, reject means that any email failing authentication will be blocked. Other possible values for this tag are “none” (no action, just monitor) and “quarantine” (send the email to the spam folder).
- rua=mailto: The email address to which aggregate DMARC reports should be sent. These reports summarize the results of DMARC, SPF, and DKIM checks, showing you which emails passed or failed and why. Monitoring these reports helps you detect unauthorized usage of your domain.
- ruf=mailto: This tag defines where to send forensic DMARC reports. Unlike aggregate reports, forensic reports provide detailed information about individual emails that failed authentication. This can include the email’s subject, the sender’s IP address, and more. However, forensic reports are typically less common and might be subject to privacy regulations depending on the region.
- pct=100: This tag specifies the percentage of failing emails that the DMARC policy should apply to. In this case, pct=100 means the policy applies to all emails. You can adjust this value to a lower percentage if you want to roll out DMARC enforcement gradually.
A basic DMARC record looks something like this:
v=DMARC1; p=none; rua=mailto:reports@example.com
This configuration only monitors failed emails without enforcing any specific action. It’s a great starting point if you’re new to DMARC, as it allows you to gather data on how your domain is being used without immediately rejecting or quarantining emails.
Additional Optional Tags
You can further customize your DMARC record with optional tags like:
- sp: Specifies a separate policy for subdomains. For example, sp=reject would apply a stricter policy to subdomains than the parent domain.
- fo: Defines the criteria for generating forensic reports.
The flexibility of DMARC allows you to fine-tune email security based on your organization’s needs, which makes it an indispensable tool in your domain’s defense against spoofing.
Why Do You Need DMARC Policy?
You don’t want to keep your email domain vulnerable to cybercriminal activities such as phishing and spoofing easily, right? That’s where a DMARC policy can help protect your domain.
Email spoofing happens when attackers send emails using your domain to deceive recipients into thinking it’s a legitimate email. This can lead to phishing attacks, where sensitive information is stolen.
Even if you have SPF and DKIM in place, DMARC is what ties them together and enforces policies for emails that fail authentication.
Key Benefits of DMARC:
- Prevents Phishing Attacks: By using DMARC, you reduce the risk of attackers sending fake emails that appear to be from your domain.
- Improves Email Deliverability: Email service providers like Google, Amazon SES, and Zoho often reject or mark emails as spam if a domain lacks a DMARC policy. With DMARC in place, your legitimate emails are more likely to reach inboxes.
- Protects Brand Reputation: When spoofed emails are sent from your domain, it harms your brand’s reputation. Customers could lose trust if they receive phishing emails appearing to be from your company.
In short, DMARC provides the highest level of email protection by making sure that only legitimate emails from your domain are delivered.
Prerequisites for Fixing “No DMARC Record Found.”
Before you can resolve the “No DMARC Record Found” issue, there are a few prerequisites you need to take to complete the configuration smoothly.
To begin, you will need:
- Access to DNS Settings: To add or modify your DMARC record, you’ll need administrative access to your domain’s DNS settings through your domain registrar or web hosting provider.
- SPF and DKIM Records in Place: DMARC works in tandem with SPF and DKIM, so you need these two records set up for your domain. If you don’t already have SPF and DKIM records configured, you’ll need to do so before implementing DMARC.
Once these prerequisites are fulfilled, you can begin fixing the “DMARC Record Is Missing” error.
What is SPF Record —Brief Intro
SPF, short for Sender Policy Framework, is a DNS TXT record that specifies what servers can send email on behalf of your domain. The primary goal of SPF is to prevent email spoofing by verifying that emails claiming to be from your domain are indeed sent by legitimate servers.
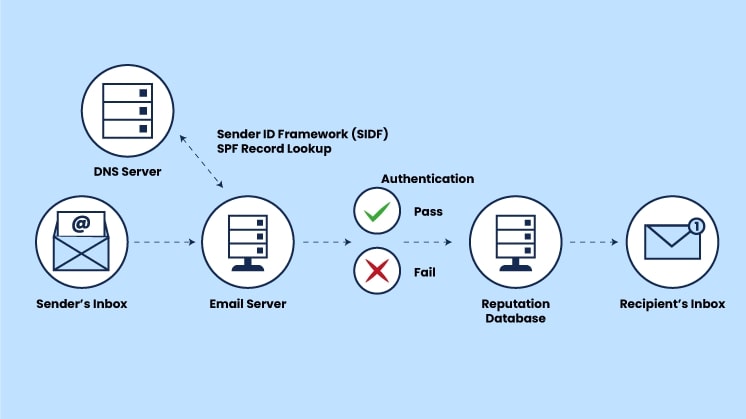
When an email is sent from your domain, the receiving email server checks the SPF record to verify that the email originated from an authorized IP address. If the IP is not listed in the SPF record, the email will fail authentication.
How to Set Up SPF Record
Setting up an SPF record is relatively simple and requires adding a TXT record to your domain’s DNS settings. Here’s how to do it step-by-step:
NOTE: The following process is not specific to any DNS provider dashboard, if you need any assistance with the configuration feel free to contact us or your DNS provider.
- Log into your domain registrar’s control panel: Access the DNS management section where you can modify DNS records.
- Create a new TXT record: In the DNS settings, add a new TXT record. The TXT record will contain your SPF rule.
- Format your SPF record: The SPF record should include the authorized IP addresses or servers allowed to send emails on behalf of your email domain. An example might look like this:
v=spf1 include:example.com -all- v=spf1: Indicates the SPF version.
- include:example.com: Specifies authorized sending sources (IPs).
- -all: Specifies that any IP not listed should be considered unauthorized.
- Save the record: Once the TXT record is configured, save the changes in your DNS settings.
- Wait for propagation: DNS changes may take some time to propagate, typically up to 48 hours.
Once your SPF record is in place, you’ll be one step closer to resolving the “No DMARC Record Found” error.
IMPORTANT: If you have multiple SPF records, you need to merge them into a single record. To learn more, check our guide on How to Merge Multiple SPF Records [The Right Way].
What is DKIM Record —Brief Intro
DKIM (DomainKeys Identified Mail) is another key component of email authentication. It works by adding a digital signature to the email header that allows the receiving server to verify that the email has not been altered in transit.
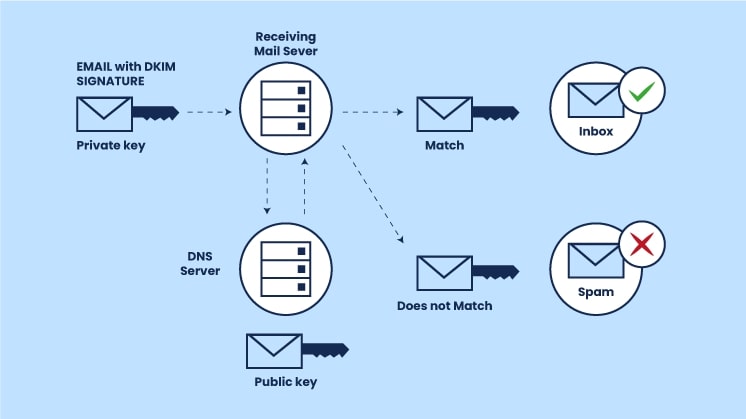
When you configure DKIM for your domain, outgoing emails are signed with a private cryptographic key. The recipient’s server uses the corresponding public key, which is stored in your domain’s DNS, to validate the email.
If the signature matches, it means the email is authentic and hasn’t been tampered with. If not, the email may be flagged or rejected.
How to Add DKIM Record
Here’s a step-by-step guide to adding a DKIM record for your domain:
- Generate a DKIM key: Many email service providers (ESPs) like Gmail (Google Workspace) or Outlook (Microsoft 365) offer built-in tools for generating DKIM keys. You’ll need both a private and a public key.
- Log into your domain’s DNS settings: Like with SPF, you’ll need access to your DNS settings to add the DKIM record.
- Add a TXT record for DKIM: Create a new TXT record in your DNS settings. The host or name field should typically be set to default._domainkey.yourdomain.com, where yourdomain.com is your domain name.
- Paste your public key: The value or data field of the TXT record should contain your DKIM public key. It might look something like this:
v=DKIM1; k=rsa; p=MIGfMA0GCSqGSIb3DQEBA…
- Save and apply changes: After adding the public key, save the changes to your DNS records.
- Enable DKIM signing in your email service: Depending on your email service provider, you may need to enable DKIM signing within their platform settings. Check their documentation for detailed instructions.
By completing this process, you will have successfully added a DKIM record.
5 Easy Steps to Fix the “No DMARC Record Found” Error
Now that you have SPF and DKIM set up, you’re ready to address the “DMARC Record Missing” error by creating a DMARC policy.
Below are five simple steps to fix the issue.
NOTE: If you are using the “AWS Route 53” for DNS then follow our step-by-step guide on How to Add DMARC Record on AWS Route 53. Also for Microsoft 365 check out this 👉 How to Set Up DMARC in Office 365 [3 Easy Ways].
Step #1: Log into Your Domain Registrar’s DNS Settings
To start, log into the control panel of your domain registrar (such as GoDaddy, Namecheap, or Bluehost). Navigate to the section where you can manage your DNS records.
Once there, you’ll need to add a new TXT record for DMARC. Most domain registrars have an intuitive interface where you can create and edit DNS records.
Step #2: Create a DMARC TXT Record
In the DNS management section, add a new TXT record. The name or host for the DMARC record should be _dmarc.yourdomain.com, where yourdomain.com is your actual domain name.
The value for the record will define your DMARC policy. For instance, a simple DMARC record could look like this:
v=DMARC1; p=none; rua=mailto:dmarc_reports@yourdomain.com
This record will monitor failed authentication attempts and send reports to the specified email address.
You can also add additional tags, as we’ve explained earlier in the guide.
Step 3: Choose Your DMARC Policy
You can set the DMARC policy (the p tag) to one of three options:
- None (p=none): No action is taken; only reports are generated.
- Quarantine (p=quarantine): Emails that fail authentication are marked as spam.
- Reject (p=reject): Rejects emails that don’t pass authentication.
For a cautious rollout, you can start with none and gather data before enforcing stricter policies like quarantine or reject.
Step 4: Configure Reporting
DMARC offers two types of reports: aggregate (rua) and forensic (ruf). Aggregate reports provide summaries of email authentication results, while forensic reports offer detailed information on individual email failures.
To receive these reports, you’ll need to add rua and ruf tags in your DMARC record like so:
rua=mailto:dmarc_aggregate@yourdomain.com; ruf=mailto:dmarc_forensic@yourdomain.com
These reports will help you monitor and adjust your DMARC policy over time.
Step 5: Save Changes and Monitor Results
After configuring your DMARC record, save the changes in your DNS settings. It may take up to 48 hours for the changes to propagate.
Once the record is active, you’ll start receiving reports. Monitor these reports regularly to determine whether your DMARC policy is working as intended and adjust the policy if necessary.
Get Expert Assistance for SPF, DKIM, and DMARC Configuration
If you’re unsure about setting up SPF, DKIM, or DMARC records on your own, don’t hesitate to seek expert help. We have a team of Technical Email Specialists who can set up these DNS records for you.
Consulting a professional can help you avoid common mistakes and make sure your email authentication methods are set up correctly. This reduces the risk of misconfigured records, which could lead to lost emails or decreased email deliverability.
Final Remarks on “No DMARC Record Found”
If you want to improve the security of your email domain, then fixing the “No DMARC Record Found” should be your top priority.
Before you set up a DMARC record, you need to have SPF and DKIM records in place. To keep it simple, simply follow the steps outlined in this guide, and you will be good to go.
Remember, monitor your DMARC reports regularly to stay on top of any potential threats and tweak your policies as needed. With the right approach, you can ensure that your email domain remains secure, reliable, and trusted by recipients.
If you need any help with the “ No DMARC record was found ” error, feel free to contact us for expert assistance.