























If WordPress is not sending password reset emails, WooCommerce order confirmations, contact form notifications, or user registration messages, an SMTP configuration issue is often the cause.
You can test your WordPress SMTP connection in just a few minutes to identify authentication failures, blocked ports, DNS issues, and server-level restrictions before they affect customer communications, lead generation, or order notifications.
In this guide, you’ll learn how to test WordPress SMTP in a few simple steps using plugins and command-line tools like Telnet and PowerShell. These methods will help you diagnose and fix email issues before they impact your users, leads, or sales.
What Is the Fastest Way to Test WordPress SMTP?
The fastest way to test WordPress SMTP is to send a test email using an SMTP plugin such as Post SMTP. If the email arrives successfully and passes SPF, DKIM, and DMARC authentication checks, your SMTP connection is working correctly.
Why You Should Test Your WordPress SMTP Connection
WordPress uses the wp_mail() function to send transactional emails such as password reset messages, contact form notifications, WooCommerce order confirmations, account registrations, and administrative alerts.
By default, wp_mail() relies on PHP’s mail() function. Many hosting providers limit, throttle, or discourage its use because it lacks authentication and often results in poor email deliverability. Configuring an SMTP server solves PHP mailer-related issues, but incorrect SMTP settings can still prevent WordPress from sending emails successfully.
Here’s why regular SMTP testing matters:
- Verify the delivery of critical emails such as user registrations, password reset requests, contact form notifications, WooCommerce order confirmations, and administrator alerts. If your SMTP configuration is incorrect, users may never receive these messages, resulting in lost leads, sales, or support requests.
- Verify the delivery of critical emails such as user registrations, password reset requests, contact form notifications, WooCommerce order confirmations, and administrator alerts. If your SMTP configuration is incorrect, users may never receive these messages, resulting in lost leads, sales, or support requests.
- Catch configuration errors. Using a port that your hosting provider blocks or your SMTP service does not support can immediately break email delivery. Most providers recommend port 587 with STARTTLS or port 465 with SSL/TLS.
- Stay out of spam folders. An unauthenticated or improperly configured email setup increases the likelihood that mailbox providers will flag messages as spam. Testing lets you verify that your domain authentication (SPF, DKIM, DMARC) is aligned with your sending credentials.
- Minimize lead loss. Contact form submissions, WooCommerce order notifications, password reset requests, membership registrations, and administrator alerts all depend on reliable email delivery. A broken SMTP connection means zero visibility into your own site’s activity.
- Identify port blocking early. ISPs and hosting providers routinely block port 25. Testing confirms whether port 465 (SSL) or port 587 (TLS/STARTTLS) is actually reachable from your server – not just open.
SMTP Connection vs Email Deliverability
A successful SMTP connection only confirms that WordPress can communicate with your mail server. It does not guarantee inbox delivery.
For example, your SMTP connection may work correctly while SPF, DKIM, or DMARC authentication fails. In that case, the email may still land in the spam folder or be rejected by the receiving mail server.
For best results, test both SMTP connectivity and email deliverability before using your website in production.
Prerequisites for SMTP Testing in WordPress
Before testing SMTP connectivity, verify that your hosting environment allows outbound SMTP connections and does not block ports required by your email provider.
- An SMTP plugin is installed and configured. We recommend using Post SMTP. It replaces the default wp_mail() function with a proper SMTP mailer and includes built-in test tools.
- Valid SMTP credentials. You’ll need an outgoing mail server hostname (e.g., smtp.gmail.com), port number (465 for SSL, 587 for TLS), your SMTP username (full email address), and your SMTP password or app password.
- A functioning inbox. Use an inbox you can check immediately – ideally different from the sending domain to avoid self-loop false positives.
- Domain authentication records in DNS. SPF and DKIM records should be configured before you go live. Testing without DNS records means you’re testing a configuration that will underperform.
Attention Gmail Users:
If you’re testing Gmail SMTP, Google no longer allows basic username-and-password authentication for most Gmail accounts. Instead, use OAuth authentication or a Google App Password with 2-Step Verification enabled. This prevents many common authentication failures.
4 Easy Ways to Test SMTP Connectivity
There are several ways to verify that WordPress can successfully connect to your SMTP server. Below are four methods you can use to test your WordPress SMTP connectivity and troubleshoot delivery problems.
Option 1: Use Post SMTP’s Built-In Testing Tool (Recommended)
Other SMTP plugins, such as WP Mail SMTP and FluentSMTP, also provide email testing tools. You don’t have to do anything related to coding or command line prompts. This guide uses Post SMTP because it includes built-in diagnostics, detailed logging, and SMTP troubleshooting features.
Step 1: Install and Activate the Post SMTP plugin
- Go to your WordPress site’s admin page and log in.
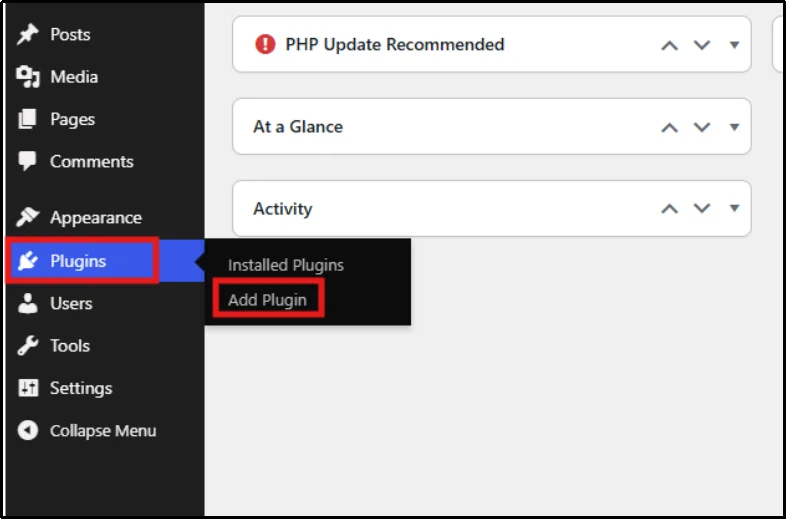
- Once inside, head to Plugins and Add Plugin.
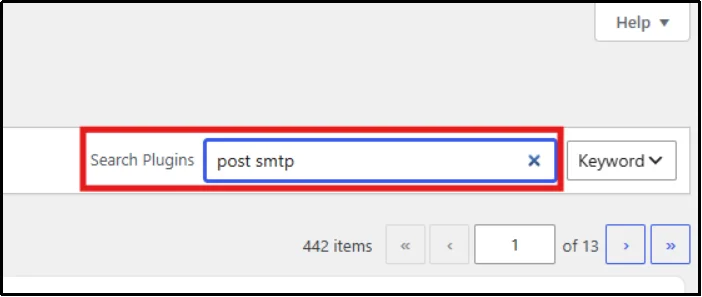
- In the search bar on the right, type “Post SMTP”.
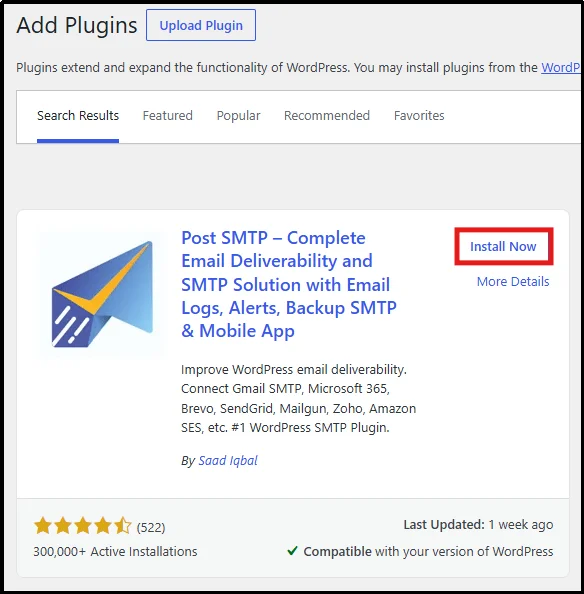
- Click Install Now on the correct Post SMTP plugin.
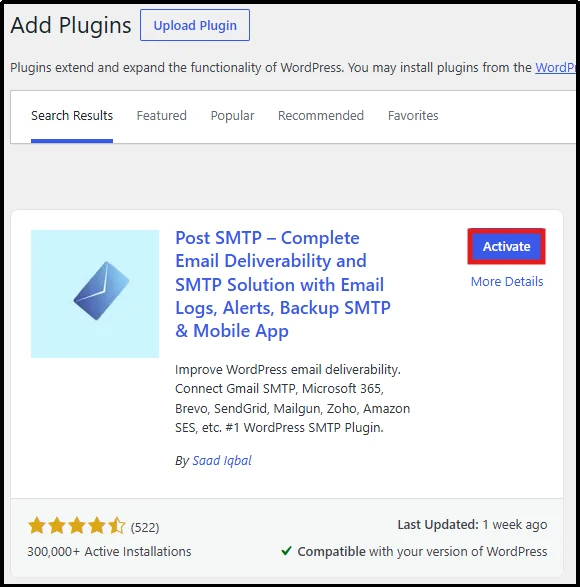
- After a few seconds, click on Activate.
Step 2: Set up SMTP Mailer
- Head to Post SMTP → Post SMTP Dashboard
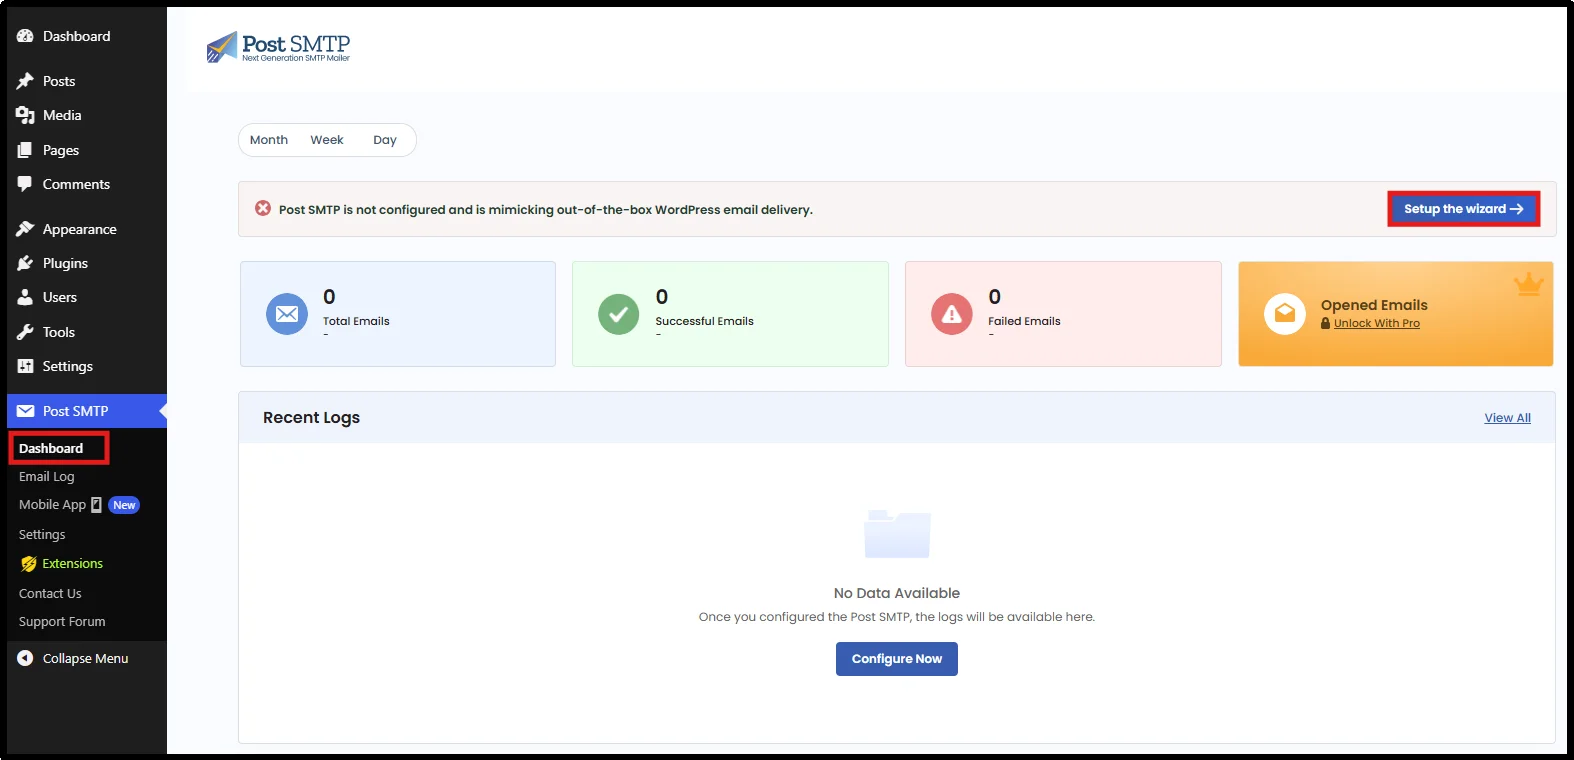
- Click on Setup the Wizard.
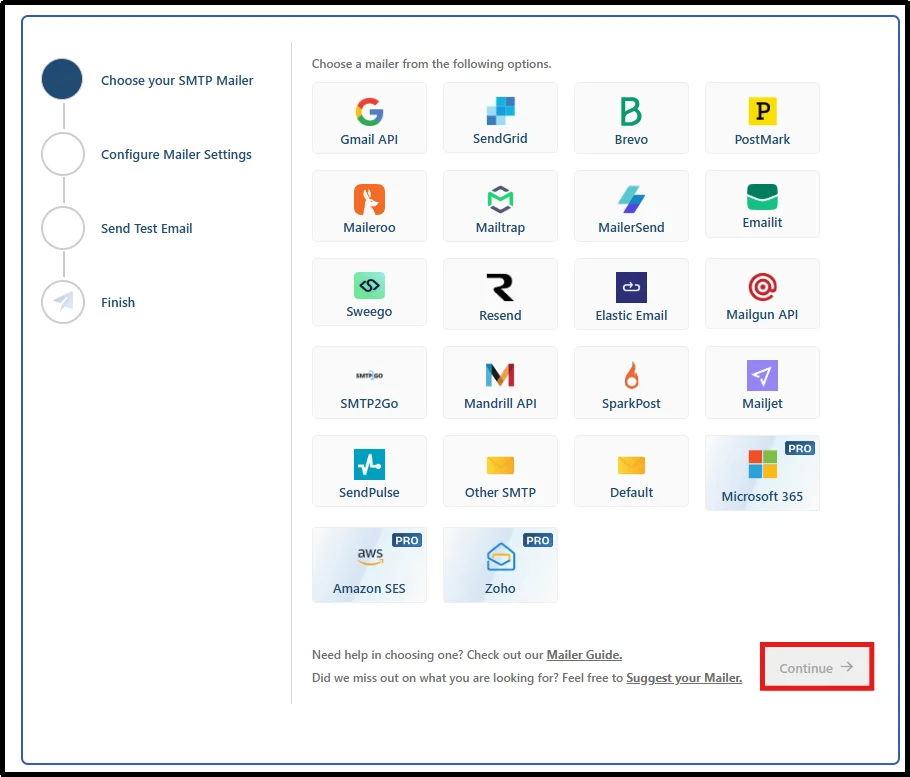
- Choose a mailer of your choice and select Continue.
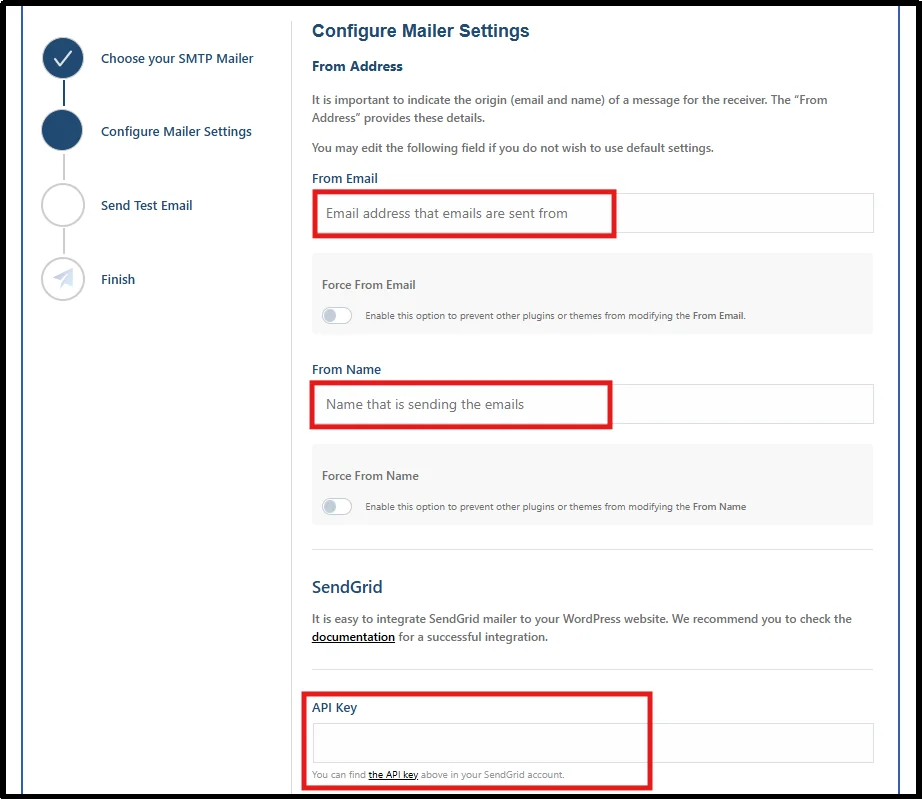
- Enter a From Email and From Name – it’s advised to Force both of them by toggling the button underneath, then enter the API key and click on Save & Continue.
Step 3: Send Test Email
Now you can send test emails in two different ways: via the 3-step wizard process or the troubleshooting section.
If you clicked Save & Continue in the previous step, follow the remaining steps to continue the 3-step wizard process.
- Enter your recipient email and click Send Test Email.
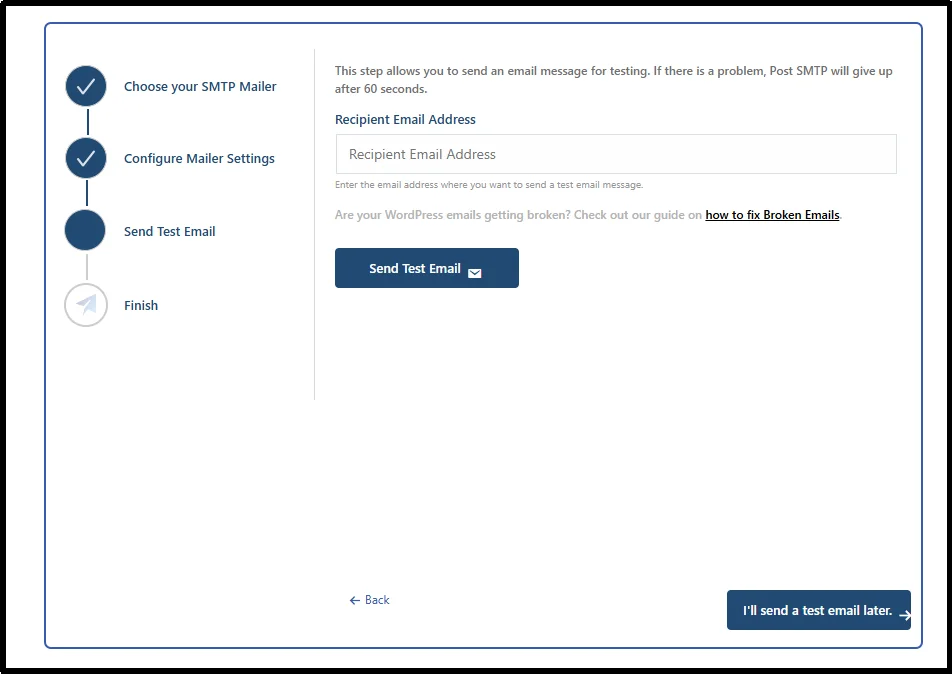
- Either a success or failure message will appear just below the button, and proceed with the email authentication records check.
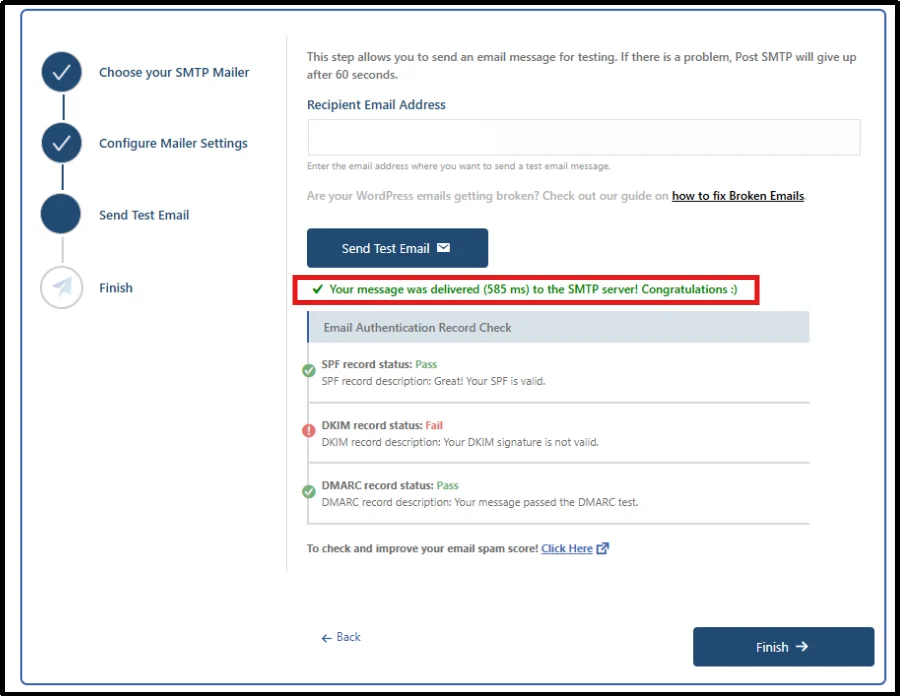
To pursue the troubleshooting section process, you can either click on “I’ll send a test email later”, or just follow the steps below at any time, regardless of whether you sent a test email before.
- Go to the Post SMTP dashboard.
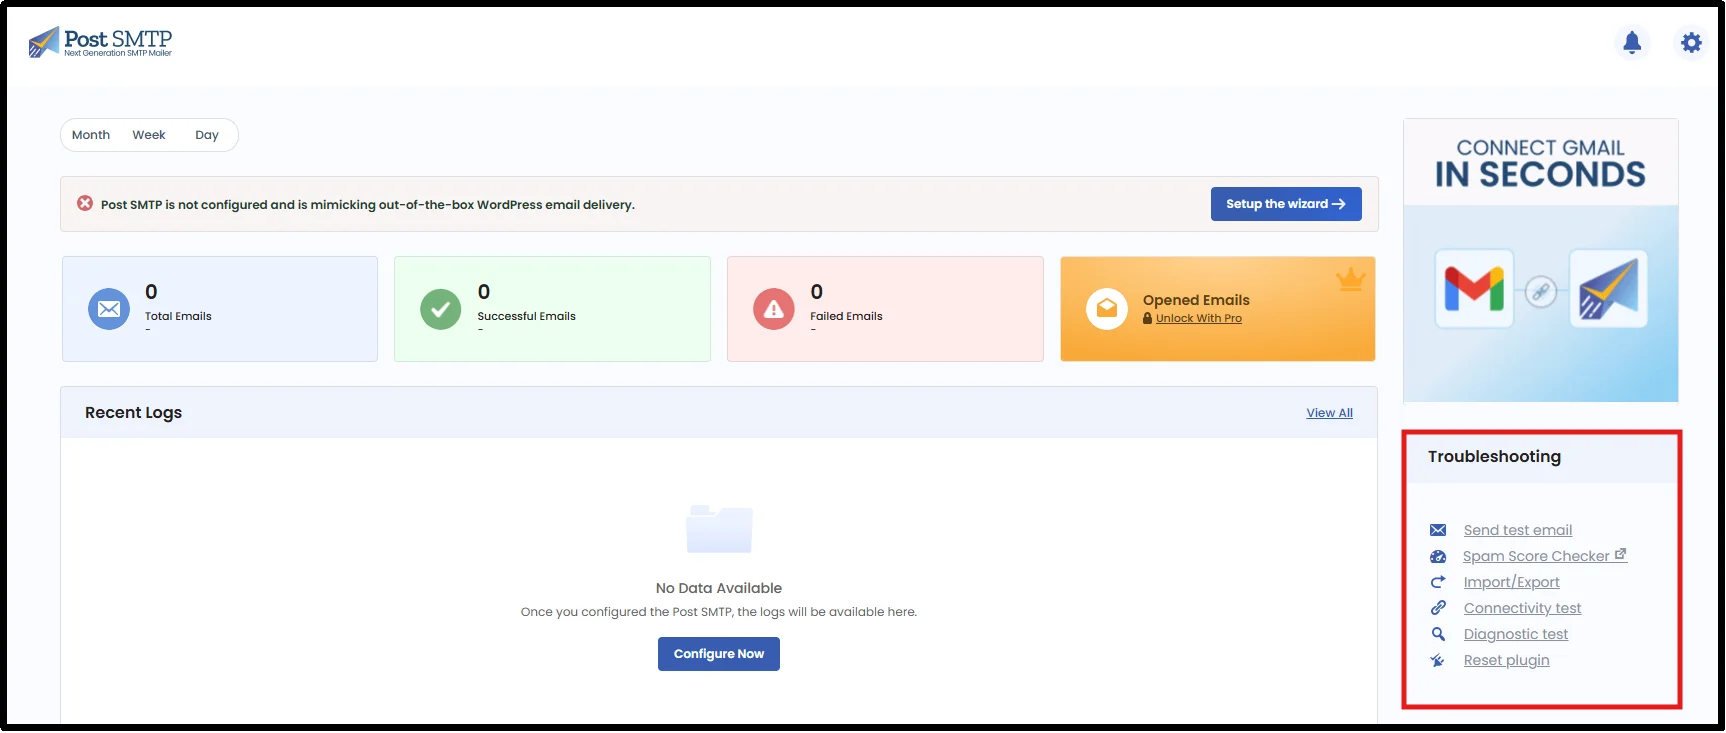
- On the right side, you will notice a Troubleshooting box. Click on Send test email.
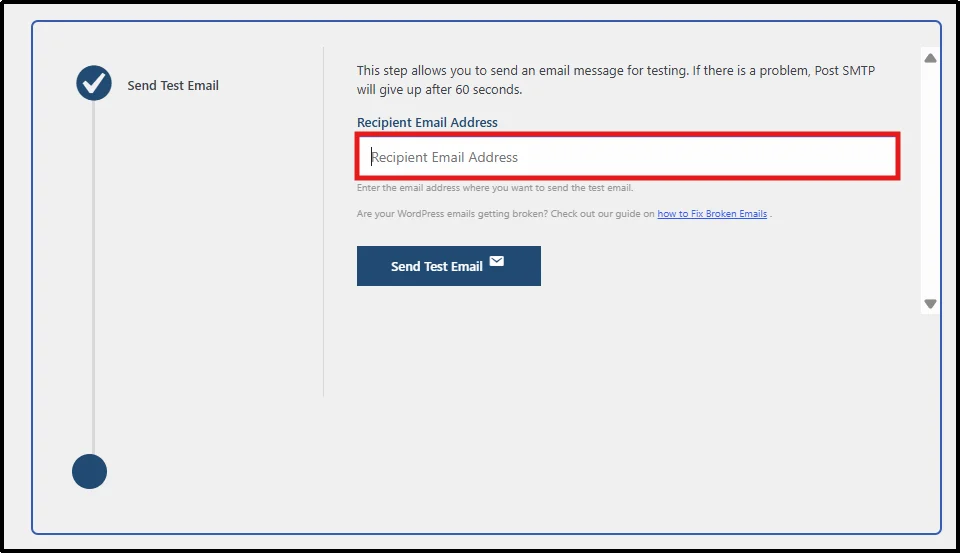
- Enter the Recipient’s email address and click on Send Test Email.
- You will see a success message if your email is successful and vice versa. Now click on Finish to exit.
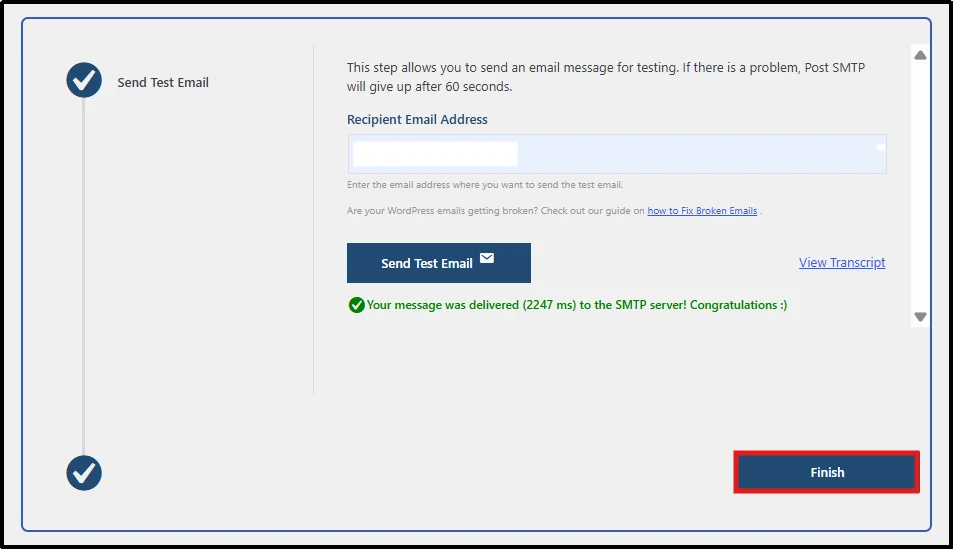
You can confirm that your WordPress SMTP connection test was successful by checking your inbox for an email.
If something went wrong, you’ll see an error message explaining what failed. These error messages help by telling you what needs fixing.
If the issue you are facing isn’t resolved, be sure to contact our Post SMTP support team.
Option 2: Test your SMTP Connection Using Telnet
This method is useful when you want to determine if the issue lies with your mail server rather than WordPress.
Step 1: Open Terminal (for Mac) or Command Prompt (for Windows)
- Open a command-line window on your computer
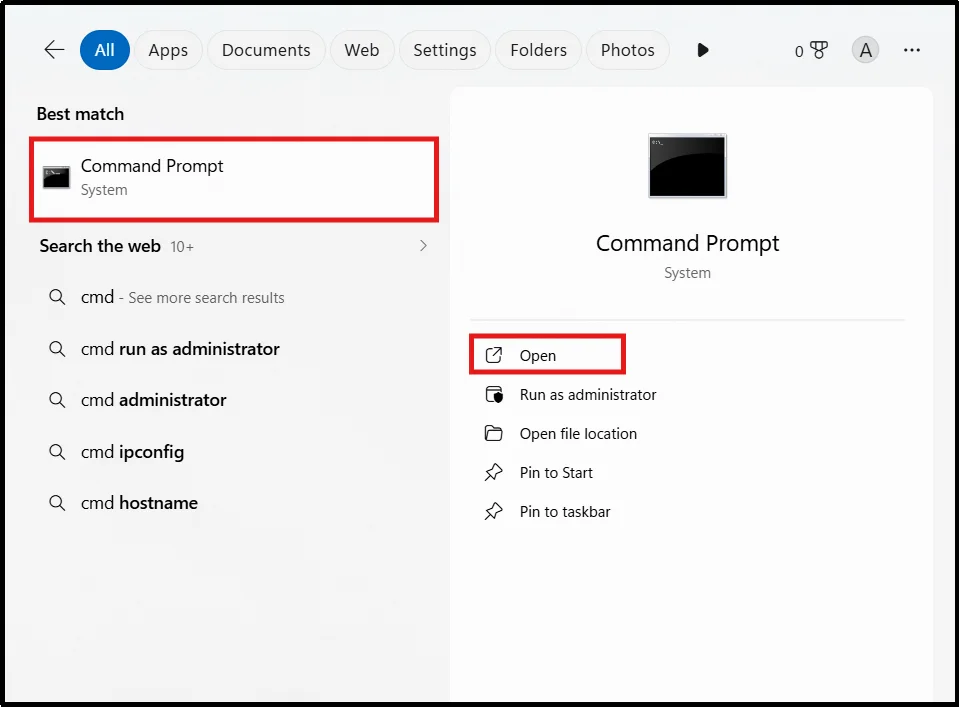
For Windows:
- Press the Windows key and type CMD in the search menu, click on Command Prompt (open as administrator), and hit Enter.
- Administrator access is typically not required unless your system administrator restricts Telnet access.
For Mac:
- Open Spotlight Search, type Terminal. Either click on Terminal or hit Enter.
Once you have opened the command line window, let’s move to the next step.
Step 2: Verify Telnet Is Installed
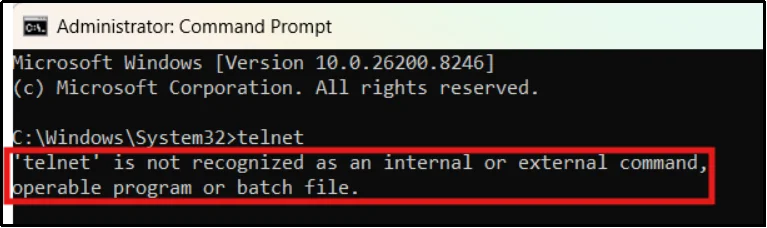
- In your command line window, type telnet and press Enter.
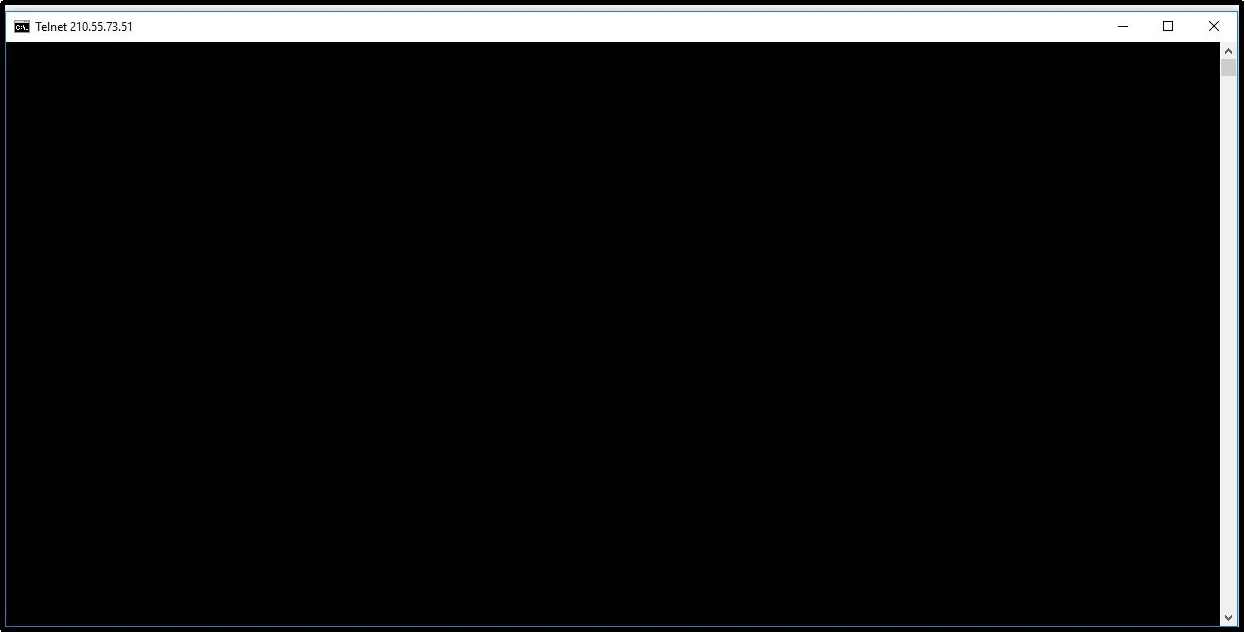
- If Telnet is installed, you’ll see a Telnet prompt or a blank screen.
- If you receive an error indicating that the command is not recognized, you’ll need to install or enable Telnet before proceeding.
Step 3: Connect to Your SMTP Server
To connect to your SMTP server, you’ll need a hostname and a port number.
- Look for a hostname and port number in your email provider’s documentation or your SMTP plugin settings.
- Run this command “telnet smtp.example.com 587”, replacing the server name and port with your own values.
- If the connection succeeds, the SMTP server usually returns a 220 response code indicating it is ready to accept SMTP commands.
Please note: A successful Telnet connection confirms that your server can reach the SMTP host and port. However, it does not verify SMTP authentication, STARTTLS negotiation, or email delivery.
Step 4: Send an EHLO Command
- Once connected, enter the command: EHLO yourdomain.com to identify your domain to the server
- Replace yourdomain.com with your actual domain name.
A successful response typically includes several lines beginning with the code 250, such as:
- 250-smtp.example.com
- 250-STARTTLS
- 250-AUTH LOGIN PLAIN
- 250 SIZE 35882577
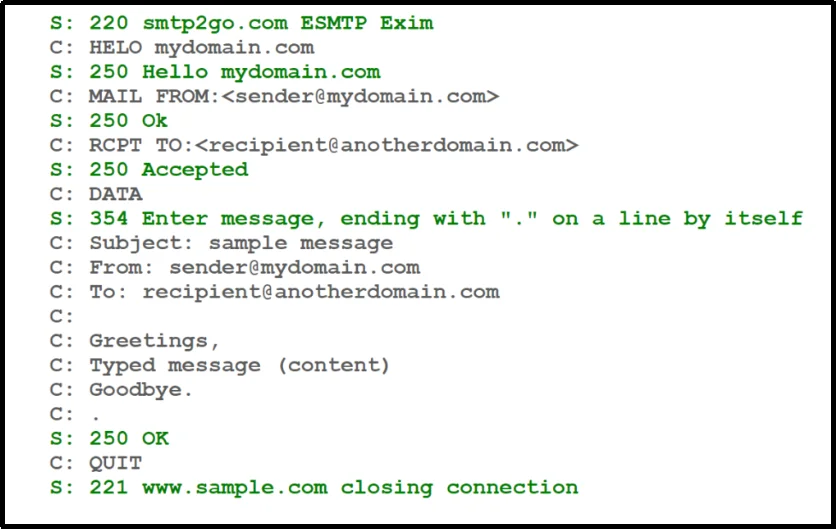
This indicates your SMTP server is reachable and ready to accept further commands.
Step 5: Close the Connection
- After confirming connectivity, exit the session by typing QUIT
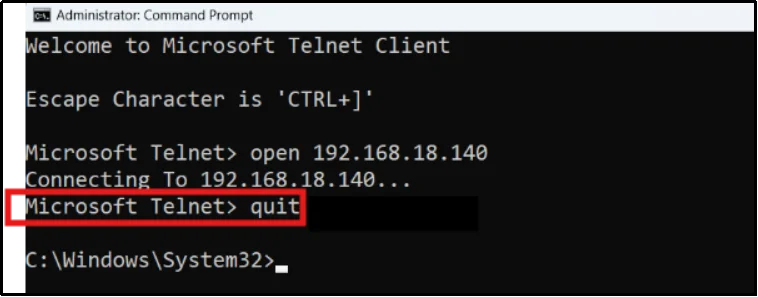
- The server should respond with a 221 status code and terminate the connection.
Option 3: Test SMTP Connectivity with PowerShell (Alternate to Windows)
If you’re using Windows, PowerShell provides a quick way to test SMTP connectivity by sending a test email directly through your mail server.
Step 1: Open PowerShell
- Search for PowerShell from the Start menu.
- Click on Run As Administrator – to run PowerShell as Administrator.
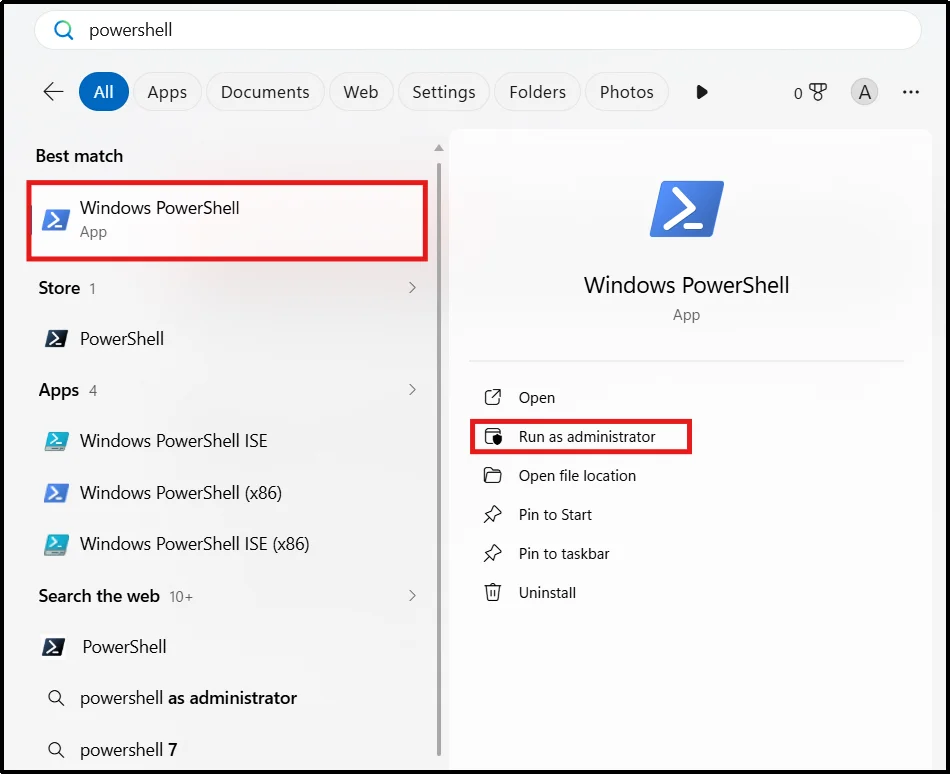
Note: Running it as Administrator is recommended but not always required.
Step 2: Send a Test Email
- Replacing the placeholder values with your SMTP settings
Command: Send-MailMessage -SmtpServer smtp.example.com -Port 587 -From sender@example.com -To recipient@example.com -Subject «SMTP Test» -Body «This is a test email.» -UseSsl
NOTE: Microsoft has deprecated Send-MailMessage for production use, but it remains useful for basic SMTP connectivity testing and troubleshooting.
- Run the command after updating it with your values.

- If your SMTP server requires authentication, use:
Send-MailMessage -SmtpServer smtp.example.com -Port 587 -From sender@example.com -To recipient@example.com -Subject «SMTP Test» -Body «This is a test email.» -UseSsl -Credential (Get-Credential)
A login prompt will appear where you can enter your SMTP username and password.
Note: Microsoft no longer recommends Send-MailMessage for production use because the cmdlet is deprecated. However, it remains useful for basic SMTP connectivity testing.
Step 3: Verify the Results
- If the command completes without errors and the email arrives in the recipient’s inbox, your SMTP configuration is working correctly.
- If PowerShell returns an error, review the message carefully. Authentication failures, incorrect ports, SSL/TLS mismatches, and firewall restrictions are among the most common causes.
Option 4: Use Reputable SMTP Testing Tools
If you prefer not to use command-line tools, online SMTP testing services provide a simple way to test and verify your WordPress SMTP configuration.
Step 1: Open an SMTP Testing Tool
- Open one of the popular SMTP testing tool options, including:
- GMass SMTP Test
- MXToolbox SMTP Test
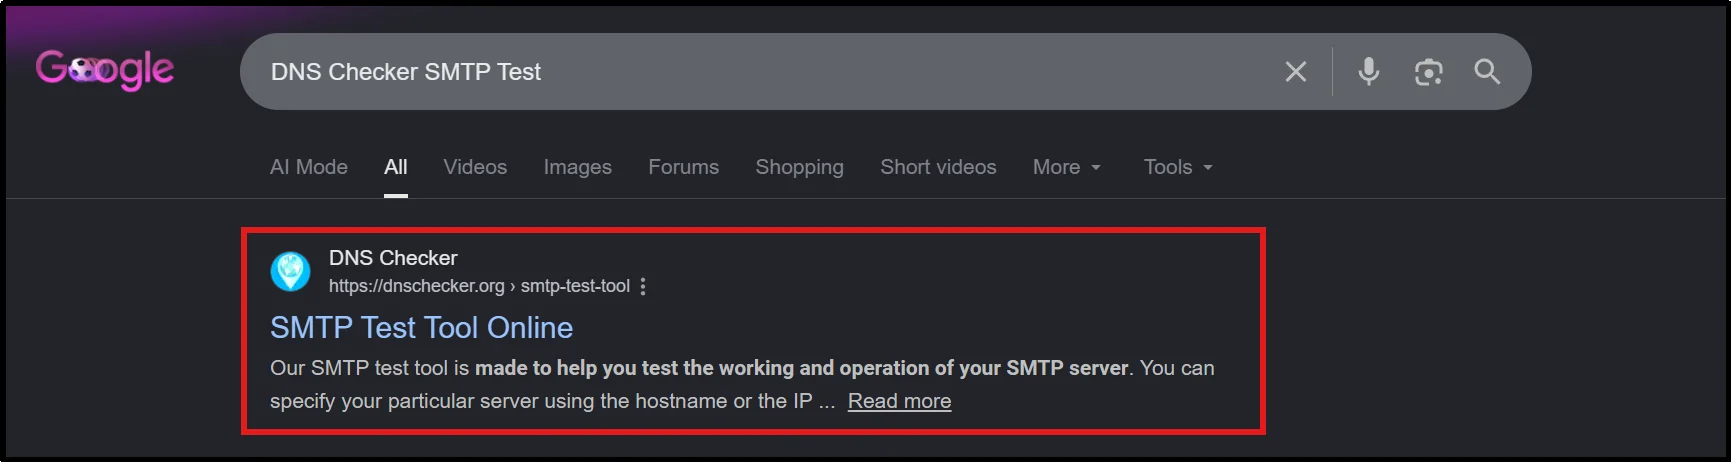
- DNS Checker SMTP Test
- Head to your browser’s search bar and enter your desired SMTP testing tool; let’s take DNS Checker SMTP.
Step 2: Enter Your SMTP Settings
Keep in mind that you should only use reputable SMTP testing tools and avoid entering production SMTP credentials unless you trust the provider. When possible, use temporary credentials or built-in SMTP testing tools within your WordPress plugin.
- Provide the following information:
- SMTP server hostname
- SMTP port (25, 465, or 587)
- Username
- Password
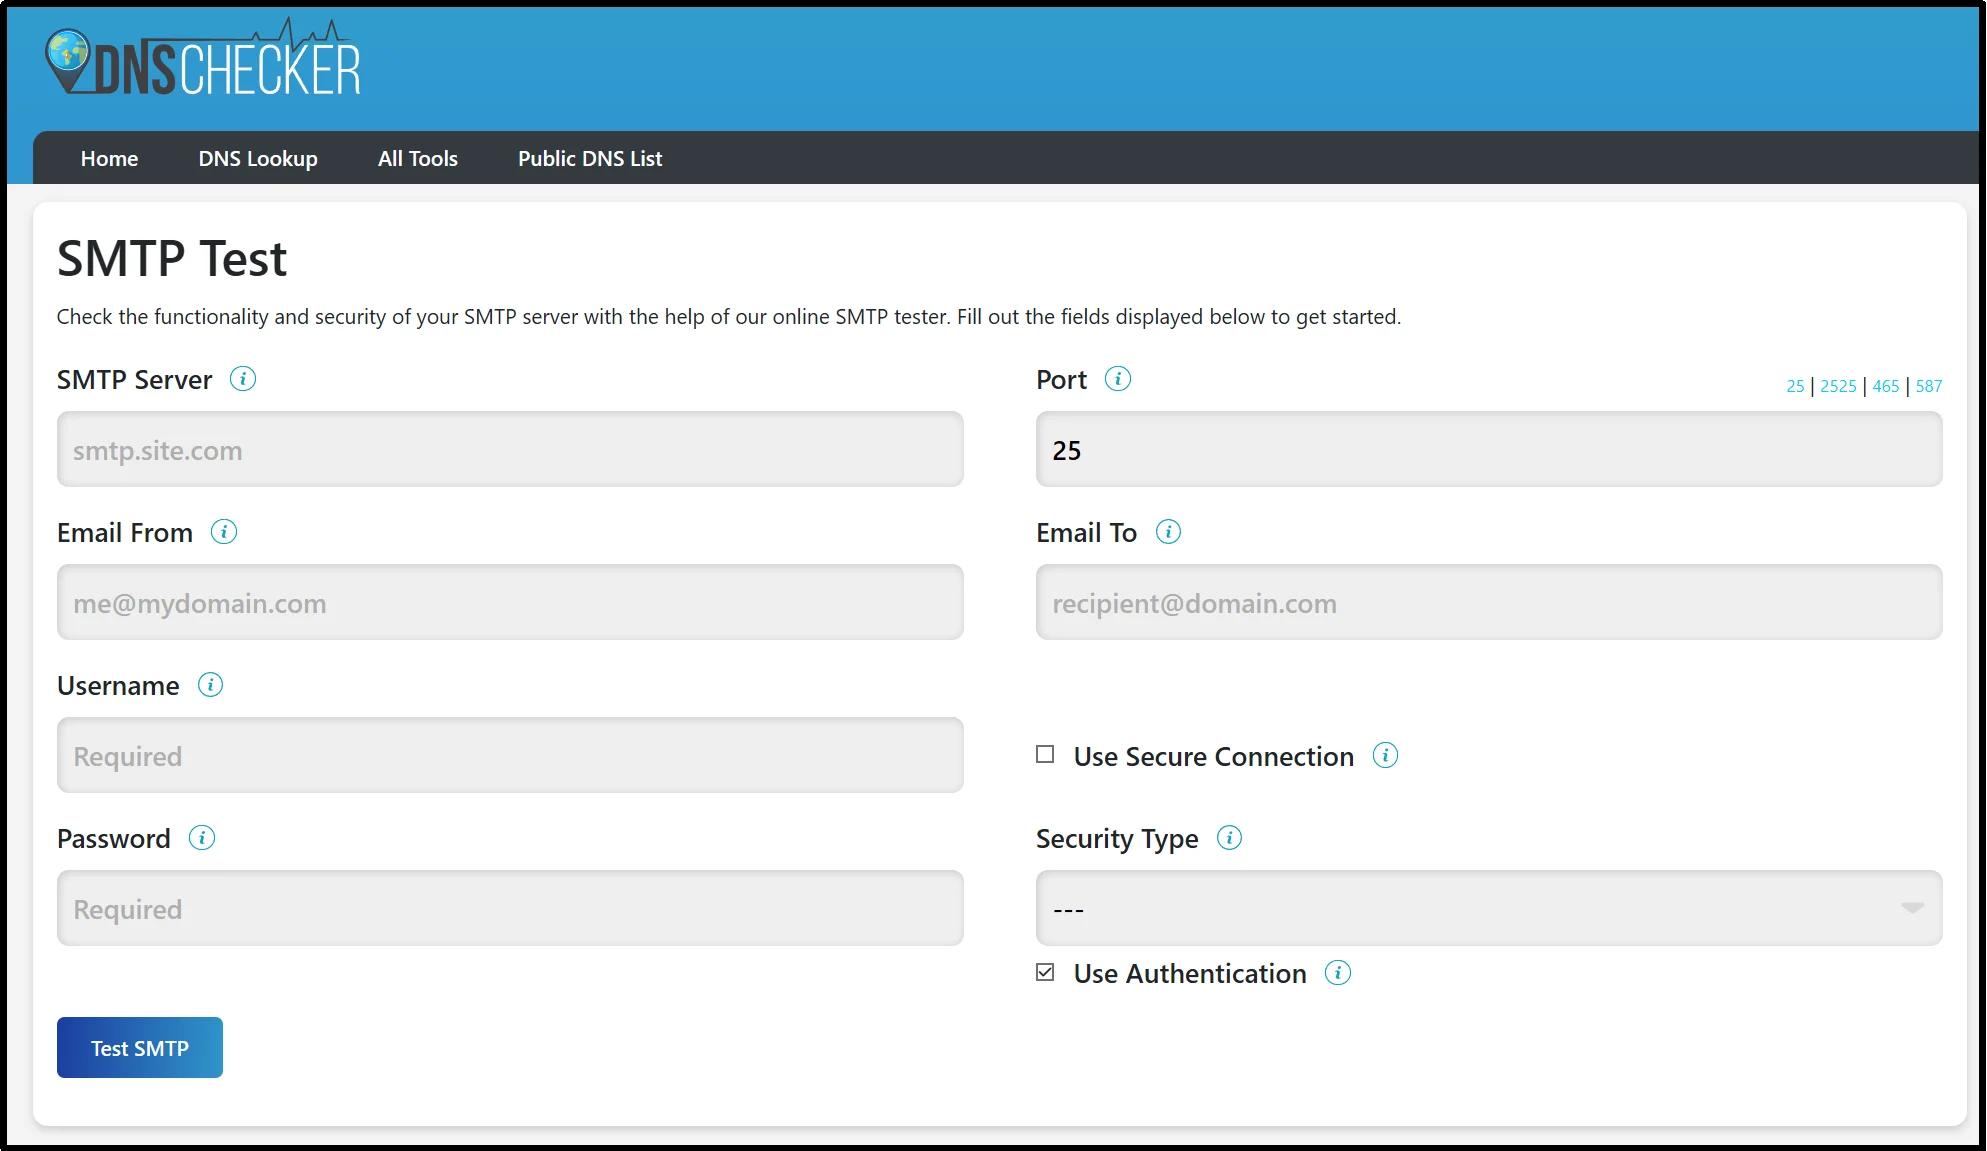
- Make sure these settings match the values configured in your WordPress SMTP plugin.
Here’s what information we used for our SMTP test:
- SMTP Server: smtp.sendgrid.net
- Port: 587
- Email From: Our designated email
- Email to: Any Email
- Username: apikey
- Password: **API KEY**
- Use Authentication: ✅
Step 3: Select the Encryption Type
Using the wrong encryption type is one of the most common causes of failed SMTP tests. We came across this issue too.
- Choose the security protocol required by your mail provider:
- SSL for port 465
- TLS/STARTTLS for port 587
- None for port 25 (rarely recommended)
Step 4: Run the Test
- Click the tool’s Test SMTP button.
- The service will attempt to connect to your SMTP server and display the results.
If the test succeeds, you’ll typically receive a confirmation message and, in some cases, a test email.

Else, on failure, you get the following message:

How to Verify Your Test Email Reached the Inbox
Sending a test email and getting a «success» message from your plugin is only half the story. The email still needs to land in the right place.
- Check the primary inbox first. If your test email arrived, check the full headers (in Gmail: three-dot menu → «Show original») to confirm the sending server, authentication results, and any warnings.
- Check the spam/junk folder. A spam result means your SMTP connection is technically working, but your domain authentication isn’t. In the full headers, look for “SPF: fail” or “DKIM: none” – these flags push email into spam.
- Check the Promotions tab. Emails from domains without proper authentication or with generic «From» names might land in Promotions even when they’re not promotional. This is a deliverability problem, not an SMTP connectivity problem.
- Verify domain alignment. Review the email headers to ensure the domains used for SPF, DKIM, and the From address align with your email provider’s recommendations. Improper alignment can affect deliverability even when authentication passes.
- Use header analysis tools. Paste the full email headers into Google’s Message Header Analyzer or MXToolbox’s Header Analyzer to see a structured breakdown of delivery path, delays, and authentication results.
SMTP Test Results and What They Mean
| Result | Meaning | Recommended Action |
| Test email received | SMTP working correctly | Verify SPF, DKIM, and DMARC |
| Authentication failed | Invalid credentials | Recheck username, password, or API key |
| Connection timeout | Server unreachable | Verify ports and firewall settings |
| SSL/TLS error | Encryption mismatch | Match encryption with port |
| SMTP refused connection | Host or port issue | Verify SMTP server settings |
| Email in spam | Deliverability problem | Configure SPF, DKIM, and DMARC |
Common SMTP Errors and Fixes
Even with a correct SMTP setup, you may encounter errors that prevent emails from being sent. Below are some of the most common SMTP errors and how to fix them.
- Authentication Failed
Errors such as 535 5.7.8 or Could not authenticate usually indicate invalid SMTP credentials. Verify the username and password, use an App Password for Gmail accounts with two-factor authentication, and check for any account security alerts or temporary login blocks.
- Connection Timed Out
Timeout errors often occur when the SMTP server cannot be reached. Try using port 587 (TLS) or 465 (SSL), confirm that your hosting provider allows outbound SMTP connections, and verify that firewall rules are not blocking the required ports.
- Server Refused Connection
Connection refused errors are commonly caused by incorrect SMTP hostnames, mismatched port and encryption settings, or a mismatch between the configured «From» address and the authenticated SMTP account.
- SSL/TLS Mismatch
TLS negotiation or certificate errors typically result from using the wrong encryption method for the selected port. Use port 465 with SSL/TLS or port 587 with STARTTLS, and ensure the SMTP server has a valid SSL certificate.
- DNS Authentication Issues (SPF, DKIM, DMARC)
Emails reaching spam folders often indicate missing or incorrect SPF, DKIM, or DMARC records. Verify that these DNS records are properly configured and aligned with your sending domain.
- SMTP Rate Limits Exceeded
Rate limit errors occur when sending volume exceeds provider restrictions. Reduce sending frequency, implement email throttling, or upgrade to a plan that supports higher sending limits.
Tips to Improve WordPress SMTP Deliverability
Getting SMTP connected is only the first step. Follow these best practices to improve inbox placement and email reliability.
Tip #1: Use a dedicated email service. Services like SendGrid, Mailgun, Amazon SES, and Postmark offer better deliverability and scalability than free email providers.
Tip #2: Configure SPF, DKIM, and DMARC. These DNS records authenticate your emails and help prevent messages from being flagged as spam.
Tip #3: Send transactional emails from a domain you own and authenticate with SPF, DKIM, and DMARC. Mailbox providers trust authenticated, domain-based sending far more than free email services do.
Tip #4: Keep WordPress and SMTP plugins updated. Updates often include security patches, compatibility fixes, and mail delivery improvements.
Tip #5: Monitor email logs. Regularly review SMTP logs and delivery reports to identify failed messages before they impact users.
Why Post SMTP Is the Smart Choice to Improve WordPress Email Deliverability
A broken SMTP connection is one of the most invisible problems in WordPress. Unlike a broken page or a failed plugin, email failures produce no visible error. They just silently cost you leads, orders, and user trust.
Regularly testing your WordPress SMTP connection helps you identify configuration errors, authentication problems, and deliverability issues before they affect your users or business operations. By combining SMTP testing with properly configured SPF, DKIM, and DMARC records, you can significantly improve inbox placement and reduce the risk of emails being blocked or bounced.
With Post SMTP, you can test your SMTP connection, track email delivery, view detailed logs, and quickly diagnose issues from a single dashboard.
Get Post SMTP today to test email delivery, monitor SMTP activity, troubleshoot sending failures, and maintain complete visibility into every email sent from your WordPress website.
Frequently Asked Questions
How do I test Gmail SMTP settings in WordPress?
Configure Gmail SMTP using an App Password or OAuth authentication, then send a test email through your SMTP plugin. Verify that the email arrives and that SPF, DKIM, and DMARC authentication pass in the email headers.
How do I know if SMTP is working?
The most reliable way to confirm that SMTP is working is to send a test email and verify that it reaches the recipient’s inbox. For a complete SMTP test, check the email headers to confirm that SPF, DKIM, and DMARC authentication pass successfully. You should also verify that the email arrives in the inbox rather than the spam folder, as successful SMTP connectivity alone does not guarantee proper email deliverability.
What SMTP port should I use: 465 or 587?
Use port 587 as your default. It’s the standard submission port, widely supported, and less likely to be blocked by hosting providers. Port 465 is the alternative, but it is appropriate when your SMTP provider recommends it. Avoid port 25 for outbound mail as it’s routinely blocked.
Why are my test emails going to spam?
In most cases, emails go to spam because of authentication or sender reputation issues. Check your email headers for SPF: fail or DKIM: none. Other common causes include your «From» domain differs from your SPF/DKIM domain, you’re not sending from your own domain, your domain has no DMARC record, or your server’s IP is on a blacklist. Check our guide on proven strategies to reduce email spam complaints.
Why is the SMTP test email not received?
If your SMTP test email isn’t received, check your Spam or Junk folder first. Common causes include incorrect SMTP settings, failed SPF, DKIM, or DMARC authentication, DNS propagation delays, spam filtering, or sender reputation issues. A successful SMTP connection doesn’t always guarantee inbox delivery.
