


When configuring SMTP on your WordPress site, you definitely want it to be easy and quick. Aren’t you?
With that in mind, we are delighted to introduce you to our new 3-Step Setup Wizard that makes it extremely easy to configure any SMTP mailer with your WordPress site.
Keep reading as we are going to show you how the new setup wizard works and what makes it special.
Ready? Let’s get started!
What Makes This New 3-Step Setup Wizard So Amazing?
We have designed this new setup wizard to make your life easier by simplifying the SMTP configuration process. Its simple and intuitive interface guides you through the entire SMTP configuration process in just three easy steps.
Here are some of the features that make this new setup wizard so special:
1. Easy-to-Use
You don’t need to be a tech-savvy person to use the new setup wizard. It has a user-friendly interface that guides you through each and every step of the configuration with clear instructions and helpful tips.
You can also access the documentation and support options from the wizard if you need any assistance.
2. Configure SMTP In No Time
With the previous wizard, you had to go through seven steps to set up SMTP on WordPress. But now, you can configure any SMTP mailer with your WordPress site in less than a minute. All you need to do is choose your SMTP mailer, provide the required details, and send a test email to verify your configuration.
That’s it! Your WordPress site is ready to send any transactional emails reliably and securely.
3. One-Click Email Verification
Once you’ve provided all the necessary details and authenticated your SMTP account, you probably want to double-check and verify before closing the setup screen.
That’s where the one-click email verification comes in. All you need is to provide a recipient email and hit the Send Test Email button. It automatically sends a verification email to your mentioned email address, which you can verify instantly.
3 Easy Steps to Set Up Any SMTP Mailer with New Setup Wizard
Now that you know what makes the new setup wizard of Post SMTP so amazing, let’s see how it works in action. In this section, we will walk you through the 3 easy steps to set up any SMTP mailer with the new setup wizard.
Step #1: Choose your SMTP Mailer
Select any SMTP mailer of your choice or Configure “Other SMTP”
In this step, you need to choose the SMTP mailer service that you want to connect to. Post SMTP supports a wide range of SMTP mailer services, such as Gmail, Microsoft 365, Mailgun, SendGrid, Amazon SES, PostMark, SparkPost, and more.
If you don’t see your SMTP mailer service in the list or you want to configure your own private SMTP server, then simply select Other SMTP and enter the SMTP details manually.
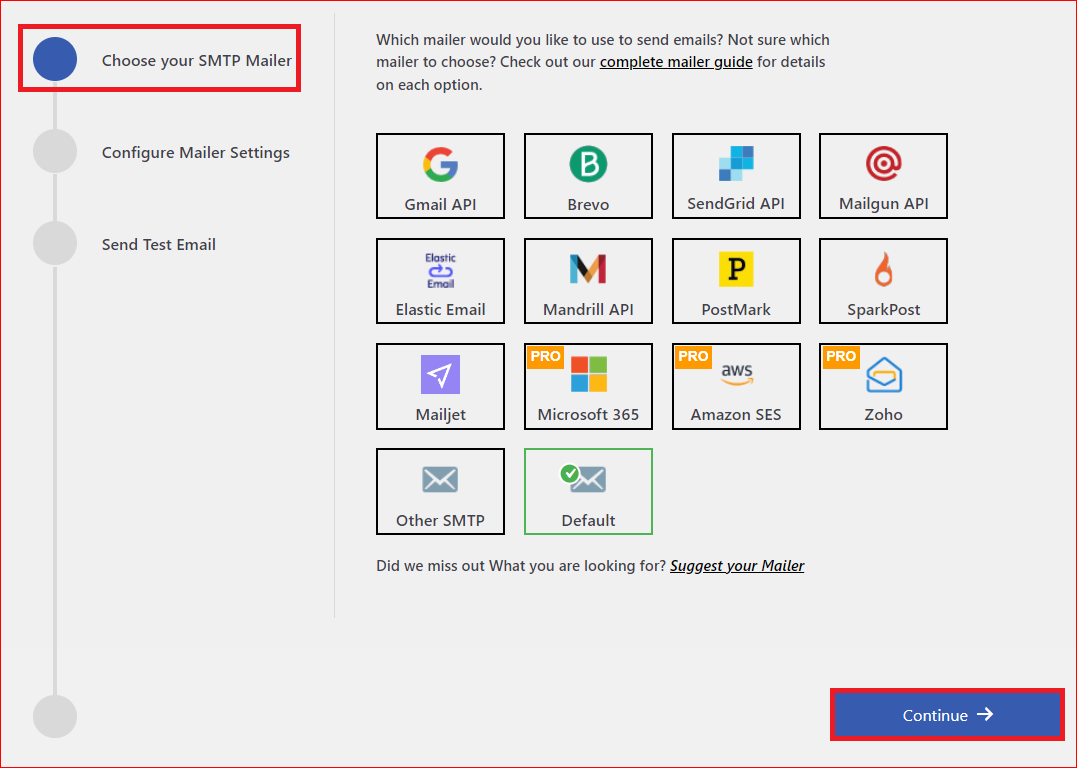
After selecting your SMTP mailer, click on the Continue button to proceed to the next step.
Step #2: Configure Mailer Settings
Provide the sending details and APIs to authenticate your SMTP server
The second step involves configuring the mailer settings for your SMTP mailer service. Depending on the SMTP mailer you choose, you will need to provide different details and APIs to authenticate the SMTP server. The new setup wizard will show you exactly what you need to enter and where to find it.
For example, if you choose Brevo (formerly Sendinblue) as your SMTP mailer, you will need to provide the API Key to authenticate your Brevo account.
Moreover, under the “From Address” section, enter the email address from which you want to send the emails and the name that will appear with the email.
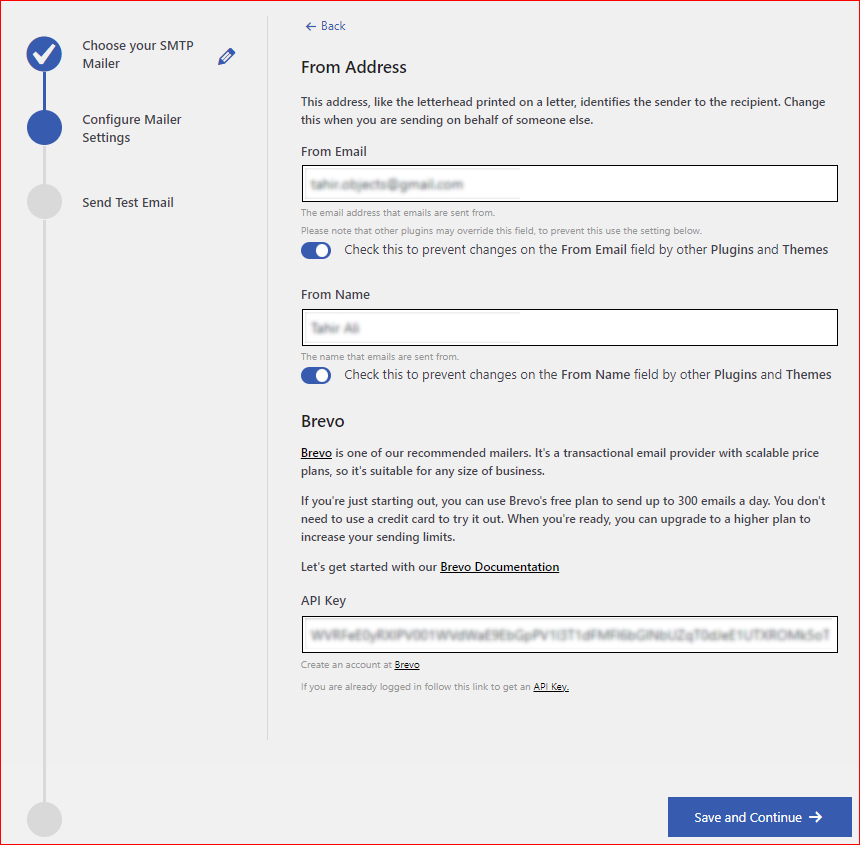
Once you’ve provided all the necessary details, simply hit “Save and Continue.”
Step #3: Send a Test Email
Verify your SMTP configuration with ease
The third and final step is to send a test email to verify your SMTP configuration. This is to make sure that everything is working fine and that you can send emails from your WordPress site without any issues.
To send a test email, you will see a screen like this:
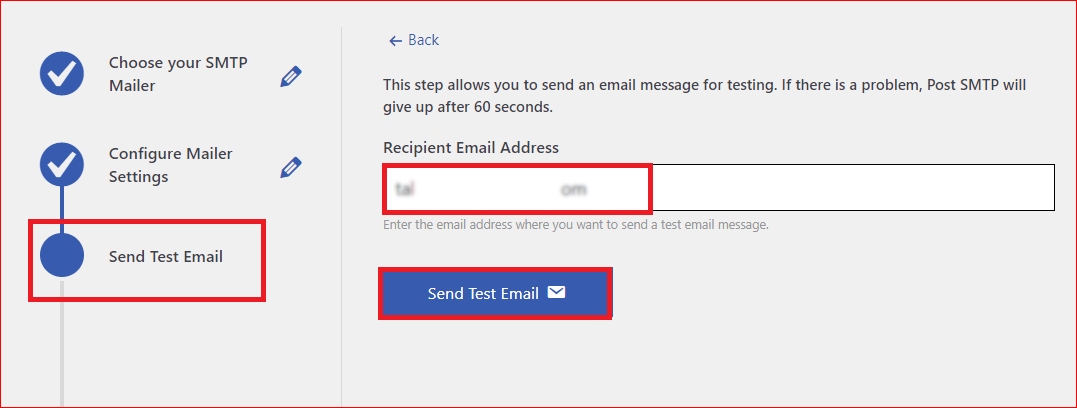
Here, enter a valid email address where you want to receive the test email. You can use your own email address or any other email address that you have access to.
After entering the email address, click on the “Send Test Email” button.
You will see a green “Success” status if you have set up everything correctly or a red “Failed” status in case of any issue.
If you’ve received the test email in your inbox, good job. You’ve now successfully configured SMTP on your WordPress site.
NOTE: Don’t forget to provide your feedback about our new 3-Step Setup Wizard via our support channels.
Download the Post SMTP Plugin and Enjoy 3 Easy Steps Configuration
If you haven’t downloaded the Post SMTP plugin yet, you can do it from the WordPress plugin repository or check out our Pro Plans to choose the right one for you.
Post SMTP is the best SMTP plugin for WordPress that offers you many features and options to optimize your email delivery. Some of the features include:
- Email logging and tracking
- Instant notifications and alerts
- Fallback/Backup SMTP support
- Email debugging and testing
- Priority customer support
- Post SMTP Mobile App
And much more!
So what’s holding you back? Download the Post SMTP plugin today and experience the power of the new 3-step setup wizard. You will never have to worry about your WordPress emails again.
For more information, click here to check the detailed documentation, and don’t forget to download the First Ever Post SMTP Mobile App and stay updated about your WordPress email delivery anytime, anywhere.
Thank you for being a valued Post SMTP user!

