Are you having trouble with email deliverability or worried about phishing attacks on your domain? Setting up a DMARC record on AWS Route 53 is likely the best solution you need.
DMARC (Domain-based Message Authentication Reporting and Conformance) helps protect your domain from malicious email activities like phishing and spoofing by giving you control over how your emails are authenticated.
Without a DMARC record, email providers such as Google, Amazon, and others are likely to reject your emails or deliver them to the spam folder.
Don’t worry! In this article, we will define what DMARC is and how it works. We will also walk you through the process of adding a DMARC record to AWS Route 53.
Let’s get started!
What is the DMARC Record? —Brief Intro
DMARC, which stands for Domain-based Message Authentication Reporting and Conformance, is a DNS TXT record that defines how an email server should handle emails failing authentication checks. DMARC works alongside SPF (Sender Policy Framework) and DKIM (DomainKeys Identified Mail), which verify whether the email sender is legitimate.
When an email passes through a server, DMARC helps the server decide whether to accept, quarantine, or reject the email based on the authentication results from SPF and DKIM. This is critical for preventing cyber threats such as phishing, email spoofing, and business email compromise (BEC), which can severely damage a business’s reputation and security.
Without a DMARC record, your domain is vulnerable to these types of attacks, making it easier for cybercriminals to misuse your domain for fraudulent activities.
To avoid this, setting up a DMARC record should be a priority for any business using email for communication.
Additionally, many email service providers automatically look for DMARC records when filtering emails, so not having one might cause your emails to be flagged or blocked entirely.
Example of a DMARC Record
A typical DMARC record is composed of various tags that define how the domain’s email should be handled if it fails SPF or DKIM authentication checks. Here’s an example of a basic DMARC record:
v=DMARC1; p=reject; rua=mailto:dmarc-reports@yourdomain.com; ruf=mailto:dmarc-failures@yourdomain.com; pct=100;
Let’s break down this DMARC record:
- v=DMARC1: This is the version of DMARC being used. Currently, the only valid version is “DMARC1.”
- p=reject: This is the policy tag. It defines what happens when an email fails DMARC, SPF, or DKIM authentication. There are three main options:
- none: No action is taken; the email is delivered regardless of the authentication result.
- quarantine: The email is treated as suspicious and will likely be sent to the recipient’s spam or junk folder.
- reject: Emails that fail authentication are completely blocked from delivery.
- rua=mailto:dmarc-reports@yourdomain.com: This tag specifies where aggregate reports should be sent. Aggregate reports summarize email activities, including authentication results and the IP addresses sending emails on behalf of your domain.
- ruf=mailto:dmarc-failures@yourdomain.com: This tag specifies where forensic (failure) reports should be sent. Forensic reports contain detailed information about individual email authentication failures, making it easier to investigate specific issues or attacks.
- pct=100: This tag specifies the percentage of emails the DMARC policy applies to. In this example, 100% of emails must comply with the DMARC policy. You can set this to a lower percentage (e.g., pct=50) if you want to test DMARC without affecting all email traffic.
Here’s another example with a less strict policy for testing purposes:
v=DMARC1; p=quarantine; rua=mailto:dmarc-reports@yourdomain.com; pct=50;
In this case, 50% of emails that fail authentication will be quarantined, meaning they will likely end up in the recipient’s spam folder. Once you are confident in your setup, you can increase the percentage to 100% and change the policy to “reject” to fully protect your domain.
How Does DMARC Policy Work?
DMARC acts as a gatekeeper for email authentication by working alongside SPF and DKIM. Here’s how the DMARC process unfolds:
- SPF and DKIM Authentication: When an email is sent from your domain, the recipient’s mail server checks the SPF record and DKIM record to verify the authenticity of the email.
- SPF: The Sender Policy Framework (SPF) ensures that the email is being sent from an IP address authorized to send emails on behalf of your domain. If the IP address doesn’t match, SPF fails.
- DKIM: DomainKeys Identified Mail (DKIM) adds a digital signature to the email. It allows the recipient’s mail server to verify that the email content has not been altered during transit. If the signature doesn’t match, DKIM fails.
- DMARC Policy Enforcement: Once SPF and DKIM checks are completed, DMARC kicks in. If the email fails both SPF and DKIM authentication, the DMARC policy you’ve specified (none, quarantine, or reject) is applied.
- If your policy is set to “none,” emails that fail authentication will still be delivered, but they will be flagged for monitoring.
- If your policy is set to “quarantine,” unauthenticated emails will be sent to the recipient’s spam folder, reducing their chance of being opened.
- If your policy is set to “reject,” emails that fail authentication are outright rejected, and the recipient never receives them.
- Reporting Mechanism: DMARC also provides detailed reports that are sent to the email addresses you specify in the `rua` and `ruf` tags of your DMARC record.
- Aggregate Reports: These are summaries of email authentication results, providing an overview of how emails are passing or failing SPF and DKIM checks. They include the sending IP addresses, the percentage of emails that failed, and the actions taken by the receiving mail server.
- Forensic Reports: These provide detailed information about individual emails that failed authentication, including the exact reasons for failure. Forensic reports are especially useful for troubleshooting and identifying potential phishing attacks.
- Fine-tuning the Policy: As you monitor these reports, you can adjust your DMARC policy over time. For example, you might start with a “p=none” policy to monitor email activity without affecting deliverability. After analyzing the reports, you can change the policy to “quarantine” or “reject” to take more stringent actions against unauthorized emails.
Step-by-Step Tutorial to Publish a DMARC Record on AWS Route 53
Now, let’s get into the specifics of how to set up a DMARC record on AWS Route 53. Here’s a detailed, step-by-step process you can follow.
Step #1: Login to AWS Management Console
- Go to the “AWS Management Console.”
- Enter your credentials and click on “Sign in.”
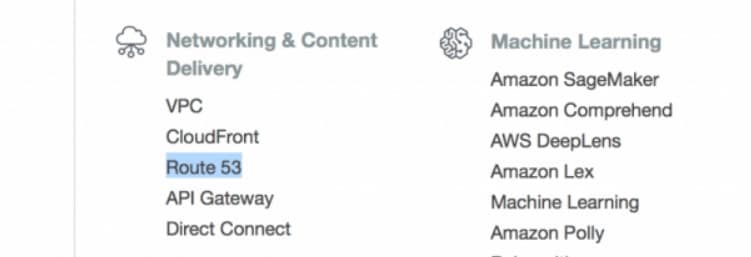
Step #2: Navigate to Route 53
- Inside the AWS dashboard, select “Route 53” from the “Networking & Content Delivery” section.
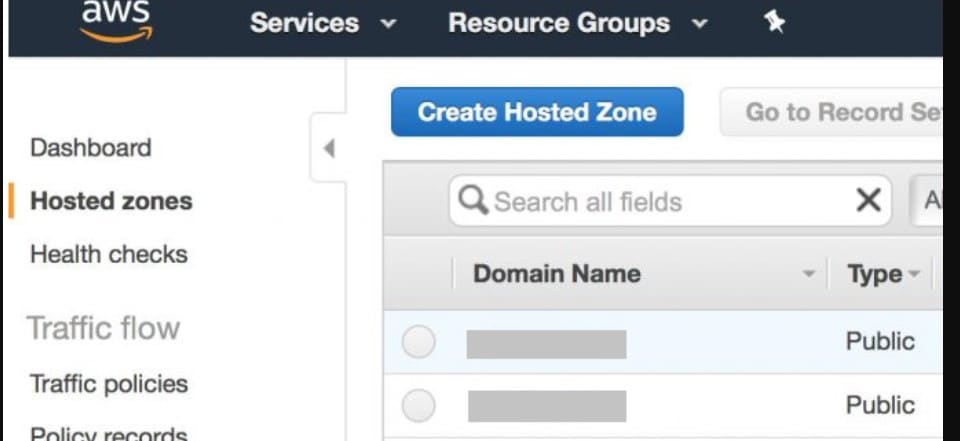
Step #3: Access Hosted Zones
- In the Route 53 dashboard, click on “Hosted Zones” on the left menu.
- Look for the domain on which you want to add the DMARC record, then click it.
Step #4: Create a New Record Set
- Select the “Create Record Set” button.
- Choose “TXT” as the record type, as DMARC is configured as a TXT record.

Step #5: Add DMARC Record Details
- Type ‘_dmarc’ in the “Name” field. The full record will appear as ‘_dmarc.yourdomain.com.’
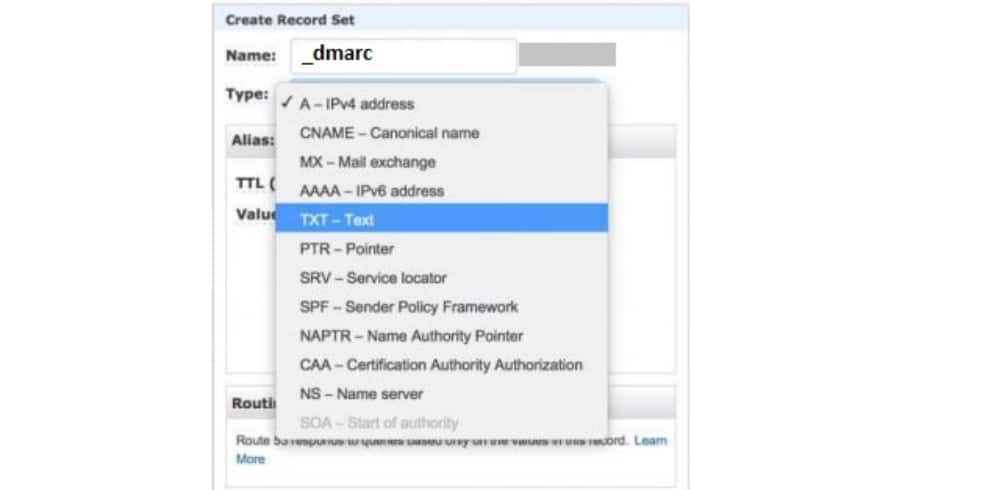
- Paste your DMARC record here in the “Value” field. As shown in the screenshot below:
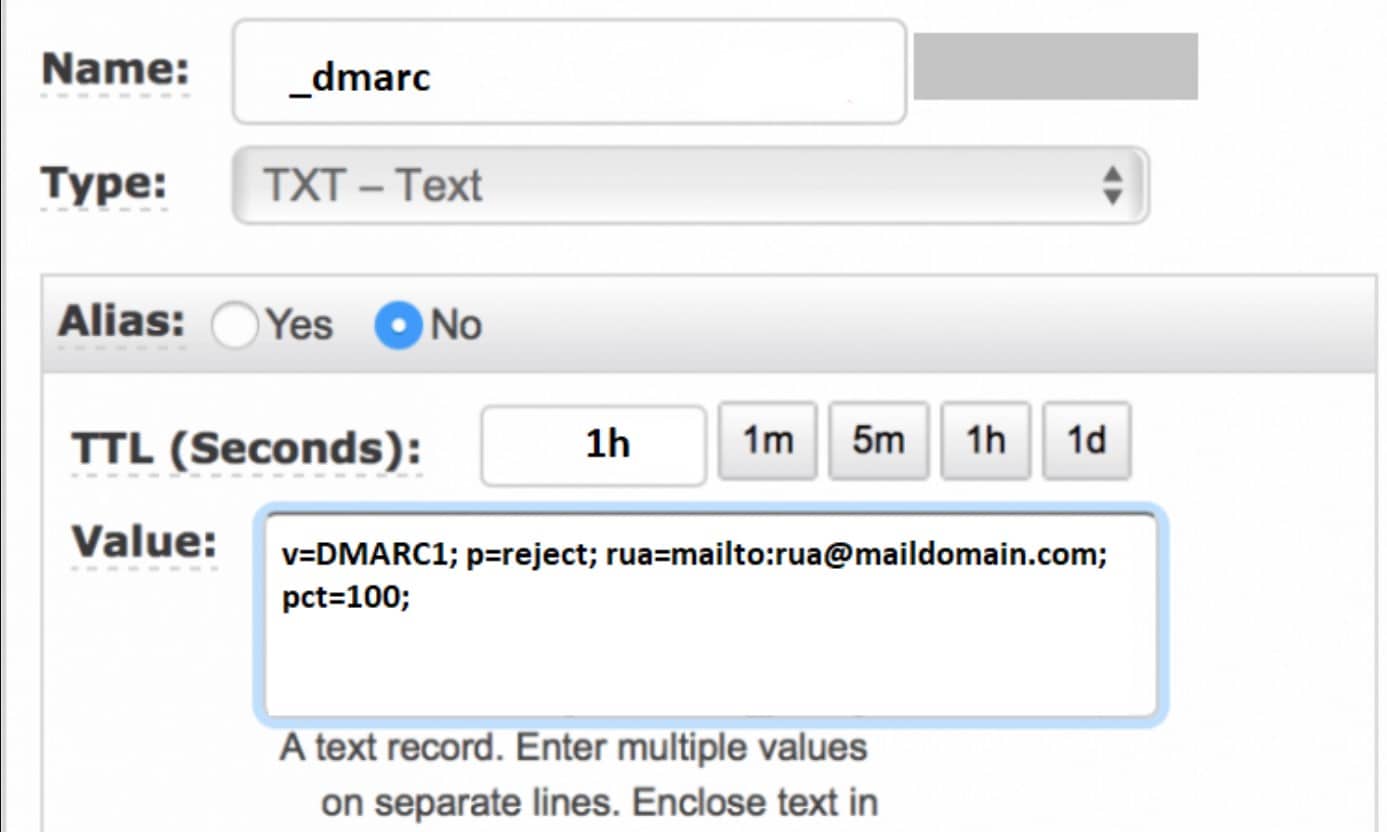
Make sure the record follows the correct syntax. Replace “yourdomain.com” with your own domain name.
Step 6: Save and Propagate
- Click “Create” to publish the record.
- DNS changes might take 24-48 hours to propagate fully.
That’s it! You have successfully published your DMARC record on AWS Route 53.
Check Spam Score For Your Email Domain
Even after setting up DMARC, it’s important to check your domain’s spam score. A high spam score might result in your emails being flagged as spam or sent directly to junk folders. Factors like improper SPF, DKIM, and DMARC configuration can contribute to this.
Use a tool like the “Spam Score Checker” to evaluate your domain’s email health. This tool provides a detailed report on factors affecting your spam score, such as missing authentication records or suspicious content.
Regularly checking this score (once a week) will help you see that your email deliverability remains optimal and let you identify potential issues before they affect your communication.
💡 You might want to read this 👉 How to Set Up DMARC in Office 365 [3 Easy Ways]
To Sum It Up
Adding a DMARC record on AWS Route 53 is important to protect your domain from email-based attacks like phishing and spoofing. With DMARC, you gain control over how unauthenticated emails are handled while also receiving valuable reports that help you monitor your domain’s email activity.
In this guide, we’ve explained DMARC and how it works with SPF and DKIM and provided a step-by-step tutorial for publishing a DMARC record on AWS Route 53.
If you still need assistance, feel free to contact the Post SMTP support team. We have a team of Technical Email Specialists that can help you with all your email related issues.