


It’s obvious that you want to improve your email deliverability so that they don’t end up in the spam folder. One way to fix this issue is to set up email domain authentication.
Email domain authentication acts as a shield, which prevents your domain from being misused for email spoofing and phishing attacks.
So, if you are experiencing the email domain authentication failed issue, keep reading. In today’s guide, we will explain everything about email domain authentication and also walk you through the step-by-step process of configuring it.
Ready? Let’s begin!
What is Email Domain Authentication, and Why is it important?
Do you know what authenticating a domain is and why you should configure it in the first place?
Let’s answer each question one by one:
Email Authentication – Brief Introduction
Email authentication is a set of techniques email servers use to verify that outgoing emails from your domain are truly from you. This verification process helps prevent spammers from sending emails that appear to come from your domain–a practice known as email spoofing.
Importance of Email Domain Authentication
You most certainly don’t want your email domain to be the prey of hackers and scammers, right?
According to the FBI, BEC (business email compromise) attacks increased 108% from 2022 to 2023, with a staggering 10.77 attacks per 1,000 mailboxes.
Here are some reasons why you should authenticate your email domain to avoid security risks in the future.
- Prevent Email Spoofing: Authentication helps stop malicious actors from impersonating your domain and sending fraudulent emails.
- Increased Deliverability: Emails that are properly authenticated have higher chances of reaching recipients’ inboxes.
- Protecting Brand Reputation: It safeguards your brand’s reputation by ensuring that only legitimate emails are sent under your domain name.
- Guarantee Email Integrity: Authentication methods like DKIM ensure that emails remain unchanged during transit so they’re not tampered with.
- Compliance Requirements: Many industries and data regulation authorities, such as GDPR, have regulations mandating email authentication for data security and privacy.
- Reducing False Positives: A proper authentication process reduces the likelihood of legitimate emails being mistaken for spam.
- Mitigate Data Breaches: Secure email authentication reduces the risk of data breaches associated with unauthorized access to email accounts.

How Does Email Authentication Work?
Email authentication involves a series of checks that email services perform to verify that the domain owner has authorized the email that claims to come from a specific domain.
- Verification of Sending Sources: Email services check the registered IP address (which you mention in your domain’s SPF record) to see if the email comes from an authorized server.
- Verify Content Authenticity: Email servers verify the digital signature hidden inside your email header using the private key, proving that the email is legitimate and hasn’t been tampered with during transit.
- Policy Enforcement: Based on the results, email services decide whether to deliver, quarantine, or reject the email, which you define in DMARC policy.
To successfully pass all the email authentication security checks and avoid spam, you must configure three primary DNS records for your email domain: SPF, DKIM, and DMARC.
Before we get into how to set them up, let’s discuss what they are and how they work.
#1: What is SPF (Sender Policy Framework)?
SPF is a protocol that allows domain owners to specify IP addresses (in the form of DNS TXT entry) that are authorized to send emails on behalf of their domain. It acts as a whitelist of approved sending sources, protecting you from unauthorized servers from sending emails using your domain name.
Suppose your domain is “example.com.” For SPF, you can create a DNS record entry that specifies the IP addresses allowed to send emails from “@example.com.”
Which is something like this:
v=spf1 ip4:192.0.2.0 -all
This record indicates that emails from IP address 192.0.2.0 are legitimate, and “-all” means block all other IP addresses.
#2: What is a DKIM Signature?
DKIM, or DomainKeys Identified Mail, is an email security standard that adds a cryptographic signature to your outgoing emails. This signature, verified by recipient servers using a public key published in your DNS records, guarantees the authenticity and integrity of your emails. It prevents tampering or modification during transit.
DKIM signature is a public key that appears as a TXT record that you add to the DNS zone settings of your email domain. The format typically looks like this:
v=DKIM1; k=rsa; t=s; p=””*******….””
Each variable represents the following:
- v = Denotes the DKIM version.
- k = Specifies the key type, which is always “rsa.”
- p = Represents the public key itself, which you can generate through your email service provider’s account settings.
#3: What is DMARC Policy?
DMARC stands for Domain-based Message Authentication, Reporting, and Conformance, a policy that relies on SPF and DKIM.
The DMARC txt record allows domain owners to define the policy for handling emails that fail authentication checks. This includes options to quarantine, reject, or monitor such emails, providing an additional layer of protection against email spoofing and fraud.
An example of a DMARC TXT record is as follows:
v=DMARC1; p=quarantine; rua=mailto:you@example.com; ruf=mailto:you@example.com; sp=reject
Here’s what each part means:
- v = DMARC1: DMARC protocol version.
- p = quarantine: Policy for rejected emails (quarantine, reject, or none).
- rua = mailto:you@example.com: Reports on DMARC activity.
- ruf = mailto:you@example.com: Forensic reports on DMARC failures.
- sp = reject: Policy for subdomains (reject, quarantine, none).
This DMARC record helps prevent email spoofing by defining actions for emails that fail SPF and DKIM checks.
How to Check Email Authentication for Your Domain
Before setting up email domain authentication, it’s crucial to check the current status of your domain’s authentication via an email authentication checker. Here’s how you can do it:
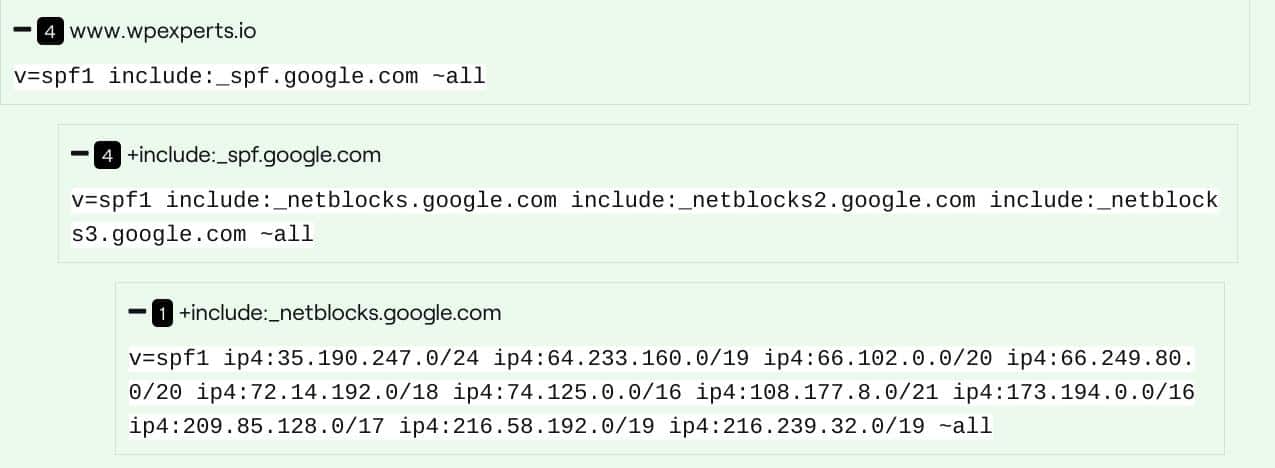
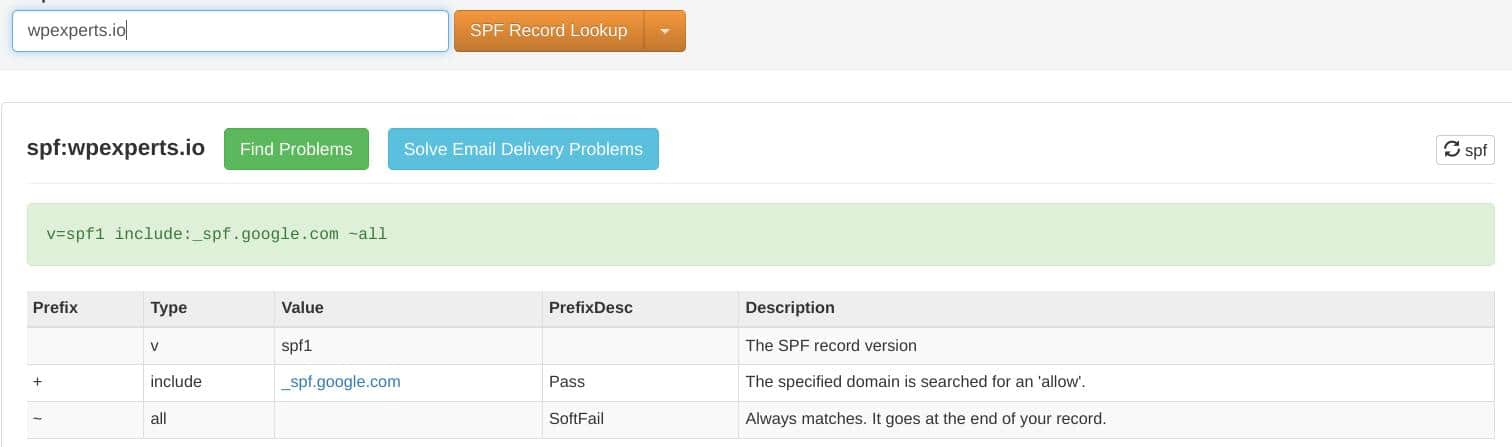
- To Check SPF: Use online SPF checkers like MXToolbox or SPF Surveyor. You need to enter your domain and verify the SPF record.
SPF Surveyor:
MXToolbox SPF Record Lookup:
If multiple SPF records exist for your email domain, you need to merge them into one. Check out our detailed guide on how to merge multiple SPF records the right way.
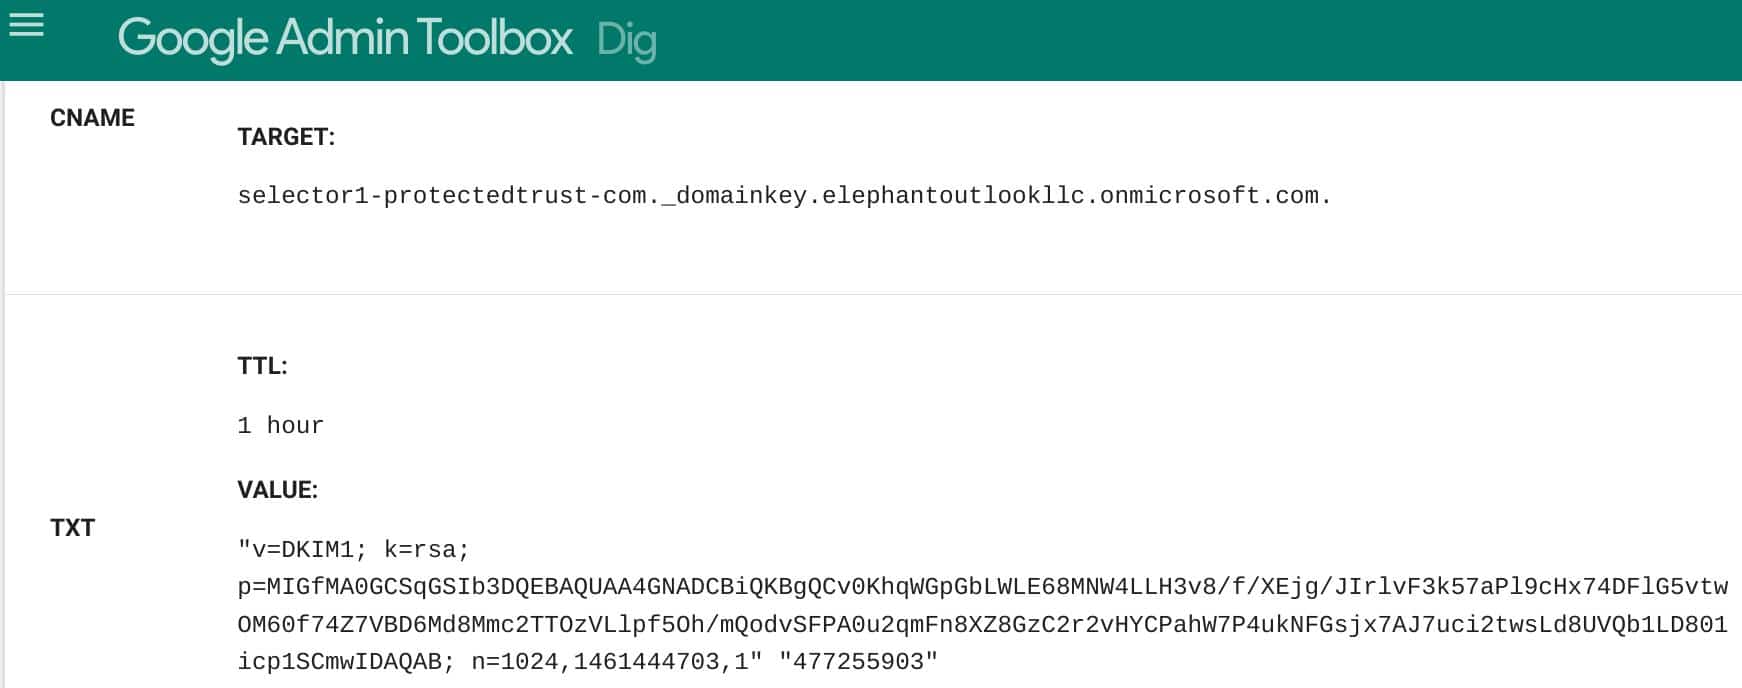
- For DKIM Check: Visit Google Admin Toolbox, select Dig from the left-hand menu, and type your domain with the selector for your DKIM records, which you have set up inside the DNS Zone of your hosting panel.
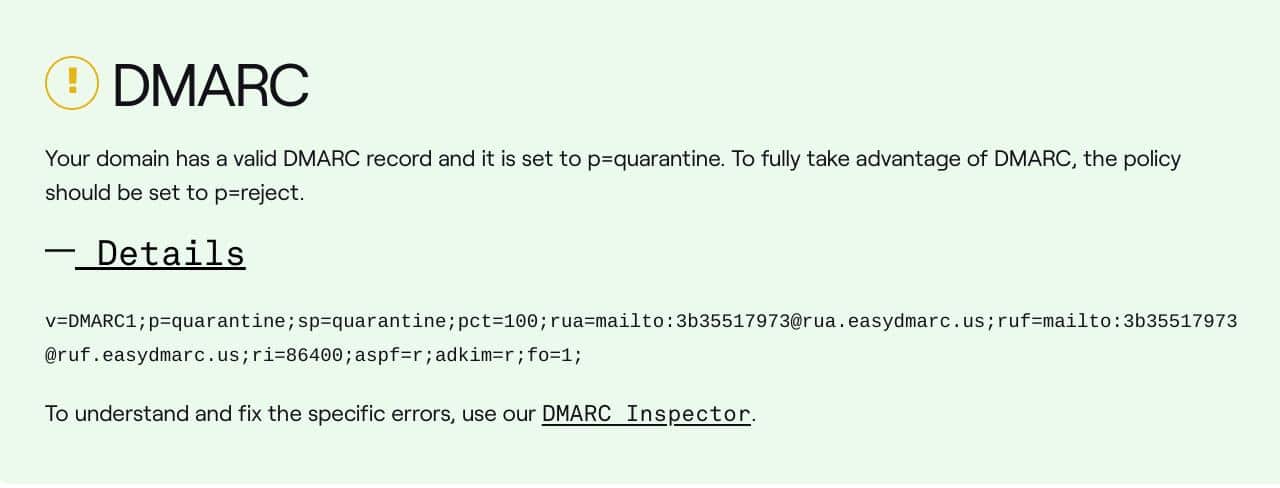
- For DMARC Txt Record: Utilize DMARC analyzers such as Dmarcian to review your DMARC policy and its alignment. After entering your domain, you will see the DMARC record (if there is one) as shown below:
IMPORTANT: Before you authenticate your email domain, it is recommended that you have a customer email domain for your business for better email deliverability. If you can’t afford one, check out a guide on getting an email domain for your business – 100% free.
How to Set Up Email Authentication for Your Domain [Step-by-Step]
Are you wondering how to set up SPF and DKIM for my domain or how to authenticate an email domain? The following steps will guide you through the process.
Now that you understand the significance and mechanisms of email domain authentication, let’s set it up for your domain.
PLEASE NOTE: To set up DNS TXT records (SPF, DKIM, and DMARC), you must have access to the control panel of your email service provider account or your web hosting account. The interface for the control panel of each hosting account will probably be different.
Step #1: Configure SPF Record to Assign IP Addresses
To set up SPF email authentication for your domain:
- Log in to your domain’s DNS management dashboard.
- Add a new TXT record with the SPF syntax as shown in the screenshot below.

- Replace “Your_IP_Address” with the actual IP address(es) of your mail servers.
- Also, you can add third-party domains by using the attribute “include:” followed by a third-party domain name, as shown in the above SPF syntax.
- Finally, save the changes, and your SPF record is now configured.
Step #2: Configure DKIM to Avoid Anti-Spam
In response to a question, how do I set up DKIM authentication? Here is the step-by-step process to configure the DKIM record for your email domain.
- Generate DKIM keys using your email provider’s settings.
- Add the generated DKIM records to your DNS settings as TXT records.
The format of your DKIM Records should look like this:

- Simply change “Selector” with your DKIM selector, “example.com” with your domain, and “Your_Public_Key” with the DKIM public key.
- Save the changes, and you have successfully set up DKIM on your domain.
Step #3: Define Your DMARC Policy
As we told you, DMARC is a policy that relies on SPF and DKIM records. Once you successfully configure SPF and DKIM now, you can follow a similar process to set up the DMARC policy for your email domain.
- Similar to SPF and DKIM TXT entries, create a DMARC TXT record in your DNS settings.
Here is the format of your DMARC policy:

- Replace “example.com” with your domain and adjust the “p” policy according to your preference (quarantine/reject/none). For “rua” and “ruf,” you can provide any email address on which you want to receive DMARC activity and forensic reports, respectively.
- Lastly, Save the changes, and your DMARC policy is set.
NOTE: After confirming your DNS TXT records, it might take 24 to 48 hours before they fully propagate. Once they have been updated, you can check them using any DNS lookup tools mentioned above.

Wrapping Up
Email Domain Authentication is crucial for ensuring your emails reach your customers’ inboxes without being marked as spam. Email authentication standards, such as SPF, DKIM, and DMARC, verify the sender’s legitimacy and boost email deliverability.
By following the steps in this guide to authenticate your emails, you will not only protect yourself from email fraud but also enhance your brand’s reputation and customer trust.
Lastly, if you do not have the time or expertise, you can get help from our team of experts at Post SMTP; with standard customer support, we also offer email authentication services to help improve your email deliverability.
So, don’t let your emails get lost in spam folders—check out our SMTP configuration and email deliverability improvement service.
Frequently Asked Questions
Can emails be authenticated using SPF or DKIM?
Yes, both SPF and DKIM are authentication methods used to validate the legitimacy of emails.
How do I authenticate my domain email?
You need to set up SPF, DKIM, and DMARC TXT inside your web hosting control panel. To do so, follow the steps outlined in this guide to configure your domain’s DNS records.
What does email domain authentication ensure?
Email domain authentication helps prevent email spoofing, enhances deliverability, and protects your brand’s reputation.
How do I authenticate my email with SPF or DKIM?
You authenticate your email by creating SPF and DKIM records in your DNS settings and configuring your email server accordingly. For step-by-step instructions, please refer to the “How to Set Up Email Authentication for Your Domain” section above.
What is SPF and DMARC?
SPF is a protocol for validating email senders, and DMARC is a policy framework that uses SPF and DKIM to enhance email security.
Should I use SPF or DKIM?
It’s recommended that you use both SPF and DKIM for the best protection against email spoofing and phishing.
What is the difference between SPF, DKIM, and SMTP?
SPF (Sender Policy Framework) defines authorized senders for a domain, DKIM (DomainKeys Identified Mail) adds digital signatures for email authenticity, and SMTP (Simple Mail Transfer Protocol) is the protocol for email transmission between servers.
SPF prevents spoofing, DKIM verifies authenticity, and SMTP handles email transfers. These protocols collectively authenticate, secure, and deliver emails effectively.

