








It’s frustrating when you install a WordPress plugin to handle your website’s emails, but those emails still don’t reach your customers.
Imagine a customer placing an order, getting charged, but never receiving a confirmation email. Or a user requesting a password reset and waiting for an email that never arrives.
These problems can affect your website’s operations and customer experience. MailPoet is no exception.
Fortunately, you can troubleshoot most email delivery problems by checking a few settings.
In this guide, we’ll explain why MailPoet emails fail, how to identify the cause, and how to improve email delivery using the right configuration.
What Is MailPoet?
MailPoet is a WordPress email marketing and newsletter plugin. It lets you create newsletters, manage subscribers, build automated email campaigns, and send transactional emails.
For example, you can use MailPoet to send:
- Newsletters and promotional emails.
- WooCommerce order notifications.
- Password reset emails.
- Account notifications.
- Automated emails and post notifications.
The plugin includes a drag-and-drop email editor, subscriber management tools, and several email delivery options.
However, the sending method you choose can affect how your website’s emails reach recipients. Let’s look at the common causes of MailPoet email delivery problems.
Why Is MailPoet Not Sending Emails?
MailPoet supports several sending methods, including its own MailPoet Sending Service (MSS), your web host, SMTP, Amazon SES, and SendGrid.
It also lets you configure how your website’s transactional emails are sent.
Depending on your configuration, MailPoet may send messages through its own sending infrastructure or WordPress’s default wp_mail() function.
Here are the most common reasons emails fail.
1. MailPoet Sending Service Issues
MailPoet monitors the quality of emails sent through its Sending Service.
If your emails generate too many bounces or spam complaints, MailPoet may temporarily suspend your sending account under its anti-spam policy.
Other problems can include:
- An inactive or incorrectly configured MailPoet account.
- Reaching your sending or subscriber limits.
- An unauthenticated sending domain.
- An invalid or role-based From address.
- Suspicious email content or links.
For example, MailPoet recommends using an email address associated with your own domain instead of a free Gmail or Yahoo address.
If MailPoet has paused your account, check your dashboard and registered email for warnings. You may need to contact MailPoet support to restore sending.
2. Problems With the WordPress Default Mailer
WordPress uses the wp_mail() function to send emails from plugins and themes.
However, the default mailer relies on your hosting server’s email configuration. Some hosting providers restrict outgoing email or have sending environments that aren’t suitable for reliable transactional email delivery.
As a result, messages may fail, get rejected, or land in spam folders.
Using a dedicated SMTP server or email API can provide a more reliable sending route.
3. Missing Email Authentication Records
Email providers use authentication mechanisms to verify incoming messages.
Three important mechanisms are:
- SPF (Sender Policy Framework): Identifies which mail servers are authorized to send emails on behalf of your domain.
- DKIM (DomainKeys Identified Mail): Adds a digital signature to outgoing emails so receiving servers can verify their authenticity and integrity.
- DMARC (Domain-based Message Authentication, Reporting, and Conformance): Tells receiving servers how to handle messages that fail SPF or DKIM alignment checks.
If these records are missing or incorrectly configured, your emails may land in spam folders or get rejected by receiving providers.
4. Cron and Sending Queue Errors
MailPoet uses background tasks to process scheduled emails and sending queues.
If its task scheduler or cron jobs stop working, newsletters, automations, and post notifications may remain stuck.
You may notice emails stuck at 0% or a sending queue that never progresses.
You can investigate these issues through MailPoet’s built-in System Status page.
6 Easy Steps to Fix MailPoet Not Sending Emails
Now that we understand the common causes, let’s troubleshoot the issue.
Step 1: Check MailPoet’s Sending Configuration
Before installing another plugin, check how MailPoet sends your website’s emails.
Go to MailPoet → Settings → Advanced and locate the Send all site’s emails with… option.
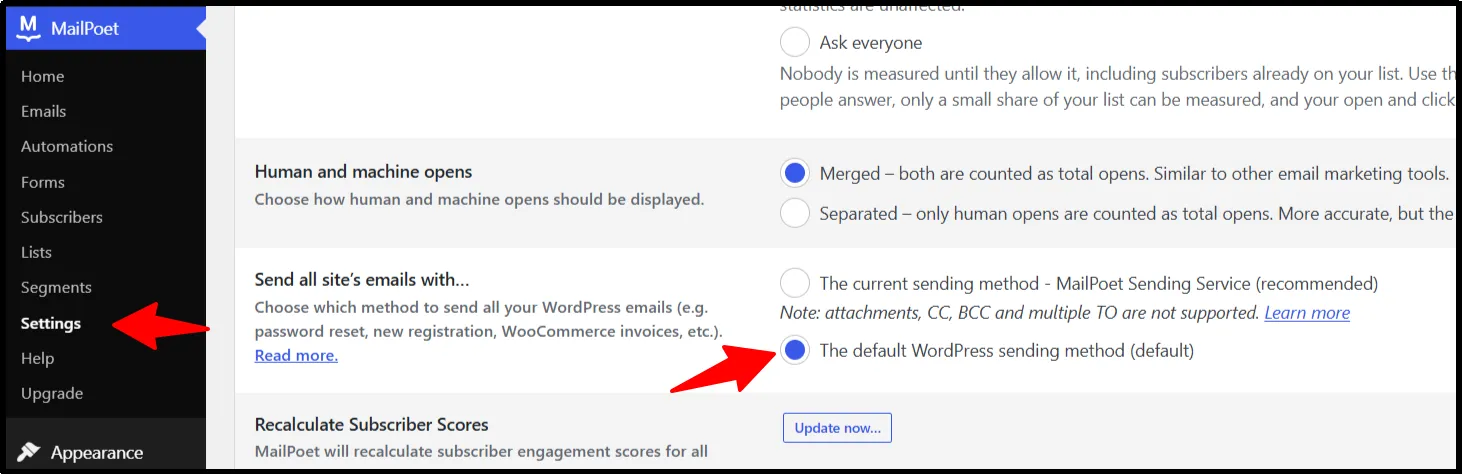
Check which sending method is selected.
If you use the WordPress default sending method, MailPoet sends transactional emails through wp_mail(). Post SMTP can handle these messages.
However, if MailPoet uses its own Sending Service or another independently configured sending method, Post SMTP won’t automatically take over those emails.
NOTE: We recommend using a dedicated SMTP plugin such as Post SMTP for this instead of using MailPoet Sending Service because with Post SMTP, all your outgoing emails will route through a reliable SMTP server of your choice.
Next, check MailPoet’s sending status.
Go to MailPoet → Help → System Status.
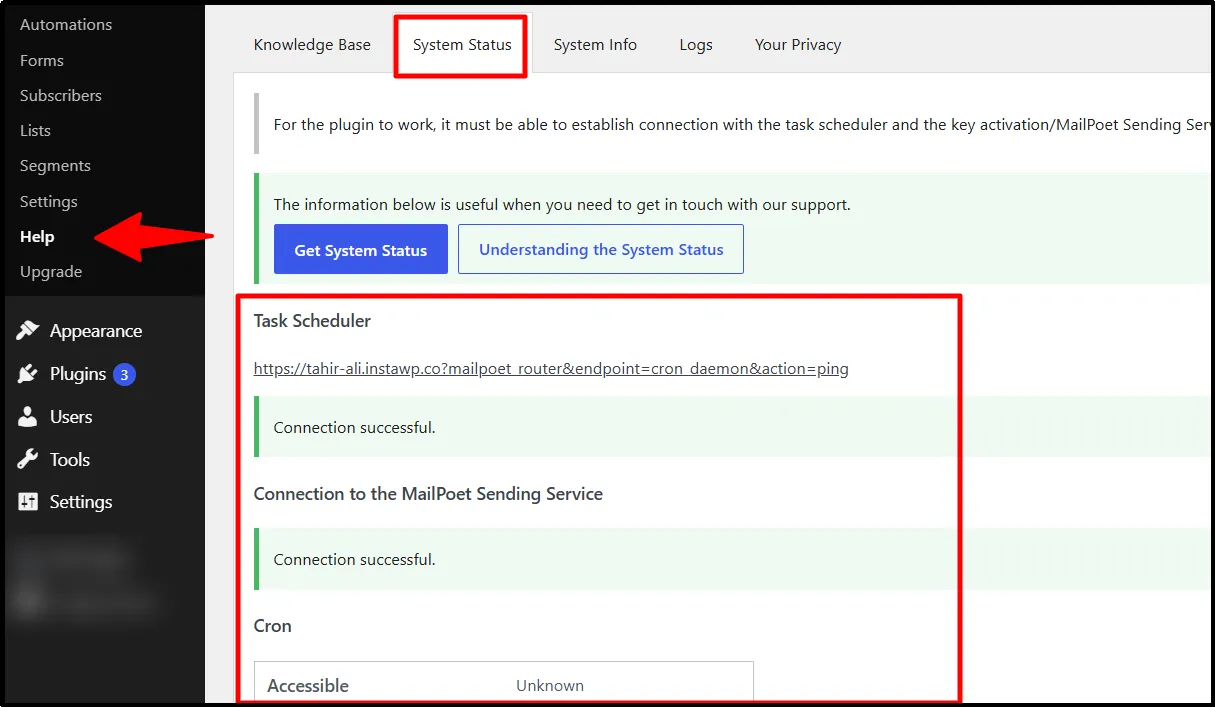
Review the following:
- Task Scheduler: Check whether MailPoet can connect to its scheduled task endpoint.
- Cron: Look for errors affecting background tasks.
- Sending Queue: Check whether emails are stuck or sending has been paused.
- MailPoet Sending Service: If you use MSS, verify that its connection is working.
If you find any errors, follow MailPoet’s troubleshooting instructions or contact its support team.
You can also check MailPoet’s account status, sending limits, and domain authentication settings.
Step 2: Install and Activate Post SMTP
If your transactional emails use WordPress’s default wp_mail() function, you can configure Post SMTP to send them through a dedicated email provider.
Post SMTP is a WordPress SMTP plugin that supports 20+ SMTP service providers, including Gmail, Microsoft 365, Amazon SES, SendGrid, Brevo, and more.
First, install the plugin.
- Go to your WordPress dashboard.
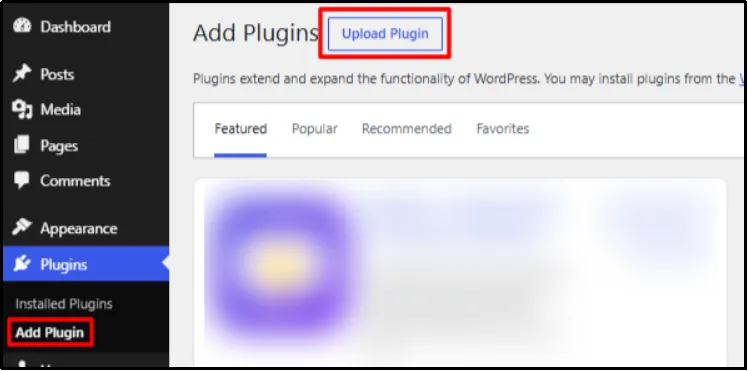
- Navigate to Plugins → Add Plugin.
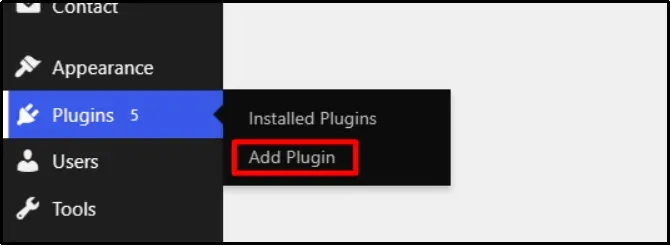
- Type Post SMTP in the Search Plugins bar.
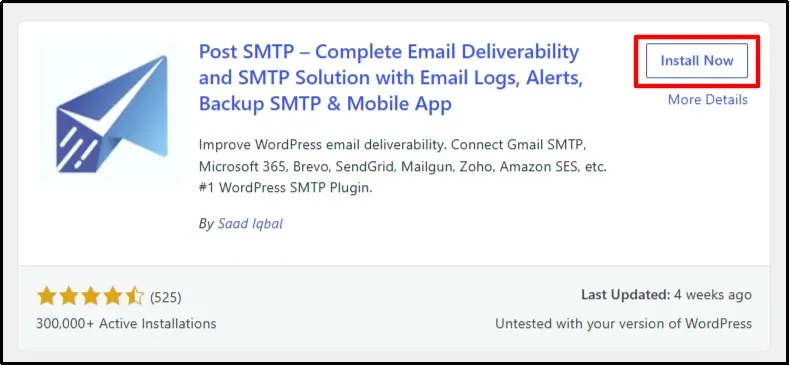
- Install Post SMTP, then activate it a few seconds later.
Note: Post SMTP is a freemium plugin that offers adequate features in the free version. However, some of the features in the following steps require Post SMTP Pro. If you’re using the free version, you’ll need to upgrade to a compatible Pro plan to access them.
- Go to the Post SMTP pricing page and purchase a plan.
- Once you receive an email containing the Post SMTP Pro ZIP File, and a license key, download the file and copy the key for later use.
- Head back to the WordPress dashboard, go to Plugins → Add Plugin, and click on Upload Plugin.
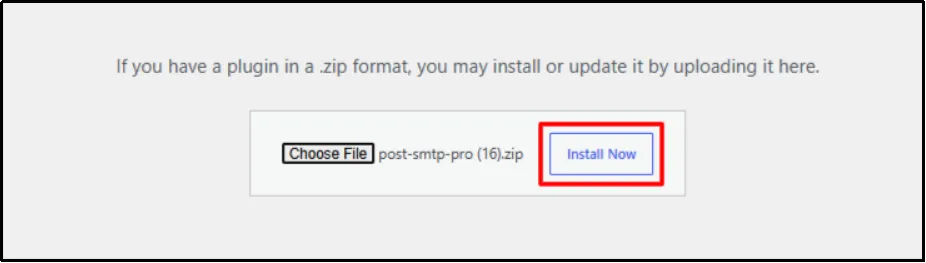
- Select the relevant ZIP file and click on Install Now.
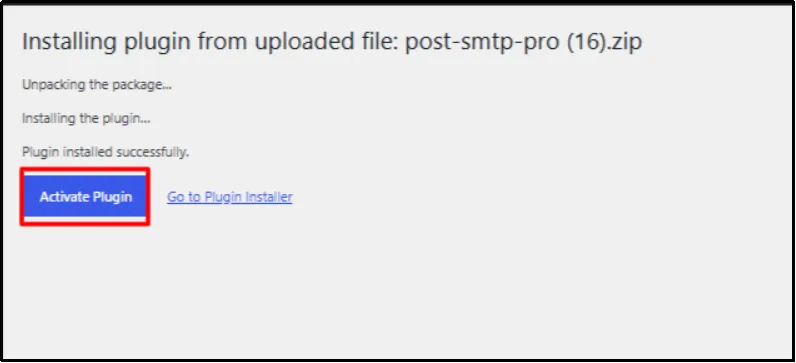
- Click on Activate Plugin.
- Enter the Post SMTP license key and click on Activate License.
Congratulations on successfully activating Post SMTP Pro.
Step 3: Set Up a Reliable Third-Party Mailer
Post SMTP replaces WordPress’s default mailer with a third-party mailer of your choice. This ensures every plugin or theme that relies on the wp_mail() function to send emails uses your new third-party mailer instead.
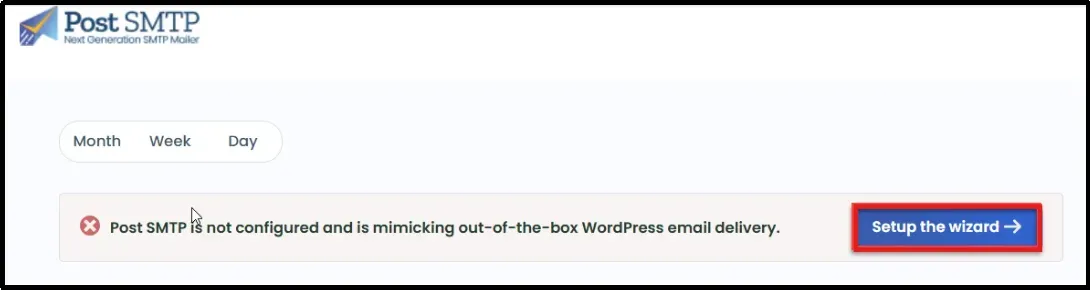
- Go to the Post SMTP dashboard or the plugin’s settings (if any other SMTP plugin).
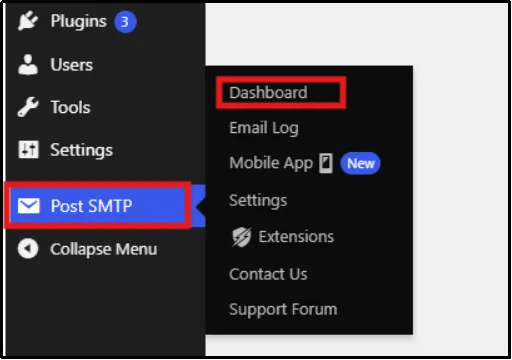
- Click “Setup the wizard →” or find any similar option in the plugin’s dashboard.
- Choose your favorite mailer to replace the wp_mail() function with. For this guide, we chose SendGrid; here is how to set up SendGrid.
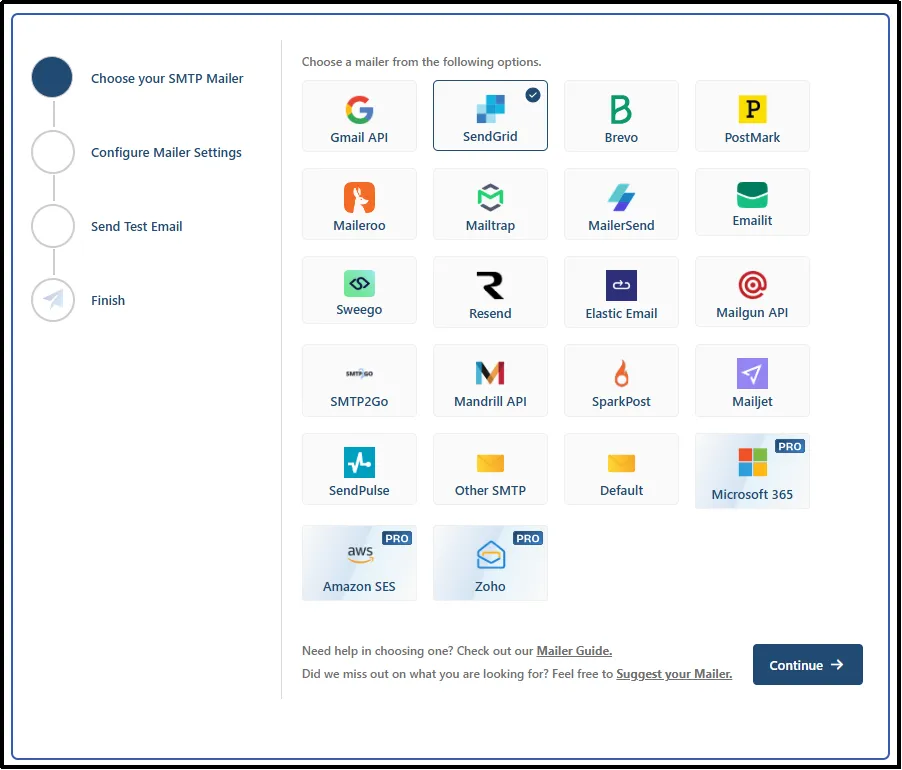
- Get your API keys, enter all the details in the wizard, and you’re done!
The exact steps differ depending on the mailer you choose. Documentation for every mailer is available here; simply use the search bar to find the mailer you wish to use.
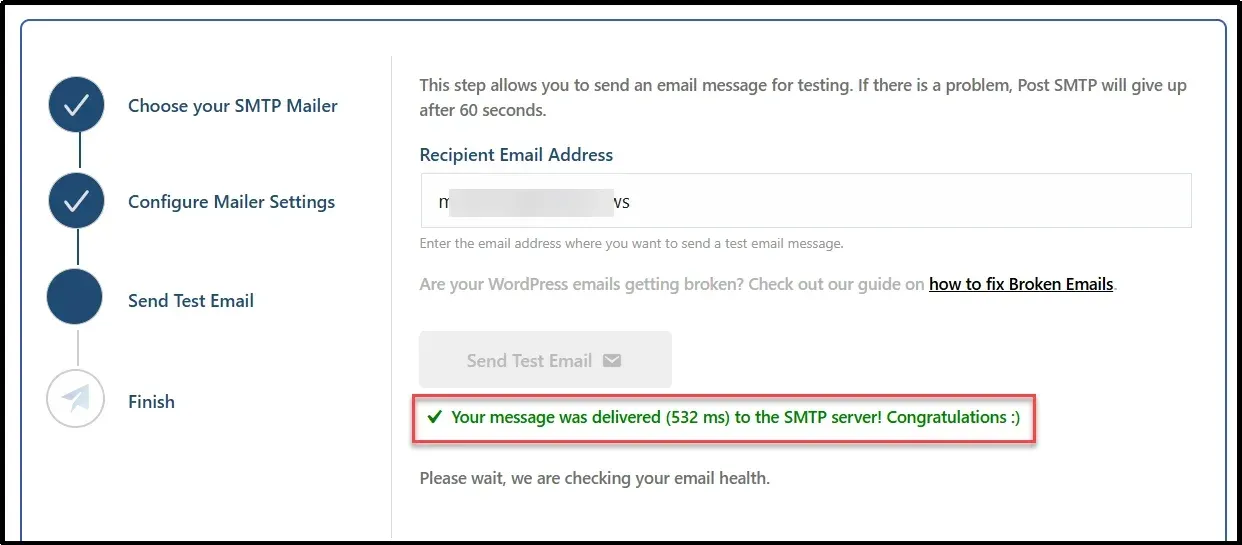
Afterward, you can send the test message to ensure the email delivers. If it does, you will see the success message shown in the image, and we can proceed to the next step.
Step 4: Use a Consistent From Name and Email Address
Every email has two important identifiers: the From Name and the From Address.
The From Name is the label that appears in your recipient’s inbox, showing who the message is from, while the From Address is the actual email address tied to your domain.
For example, an email might appear as “Sarah from MyStore” with the address hello@mystore.com. Both of these elements play a key role in how recipients recognize and trust your messages.
The problem occurs when different plugins or themes on your site use different From Names or From Addresses. This inconsistency can confuse mail servers and even trigger spam filters, leading to delivery failures.
By forcing all plugins and themes to use a single consistent From Name and From Address, you create uniformity across every email sent from your site.
There are two ways to do it using Post SMTP:
1. Via Wizard:
→ After you choose your mailer, you come across a screen where you not only insert the APIs but also the From Name and From Email.
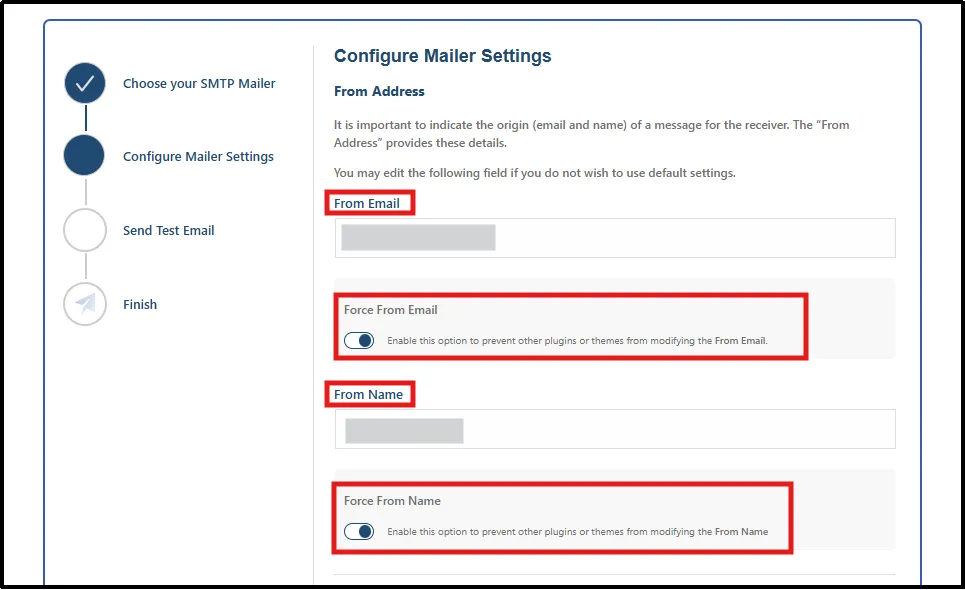
→ Insert the consistent From Email and From Name.
→ Toggle the “Force From Email” and “Force From Name” to on, and you are done.
2. Via Settings:
→ Head to Post SMTP settings
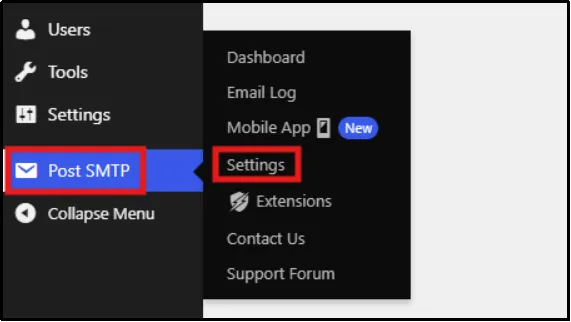
→ Now go to the Message tab, type the From Name and From Email in the respective input boxes, and check the “Prevent themes and plugins from changing this” box.
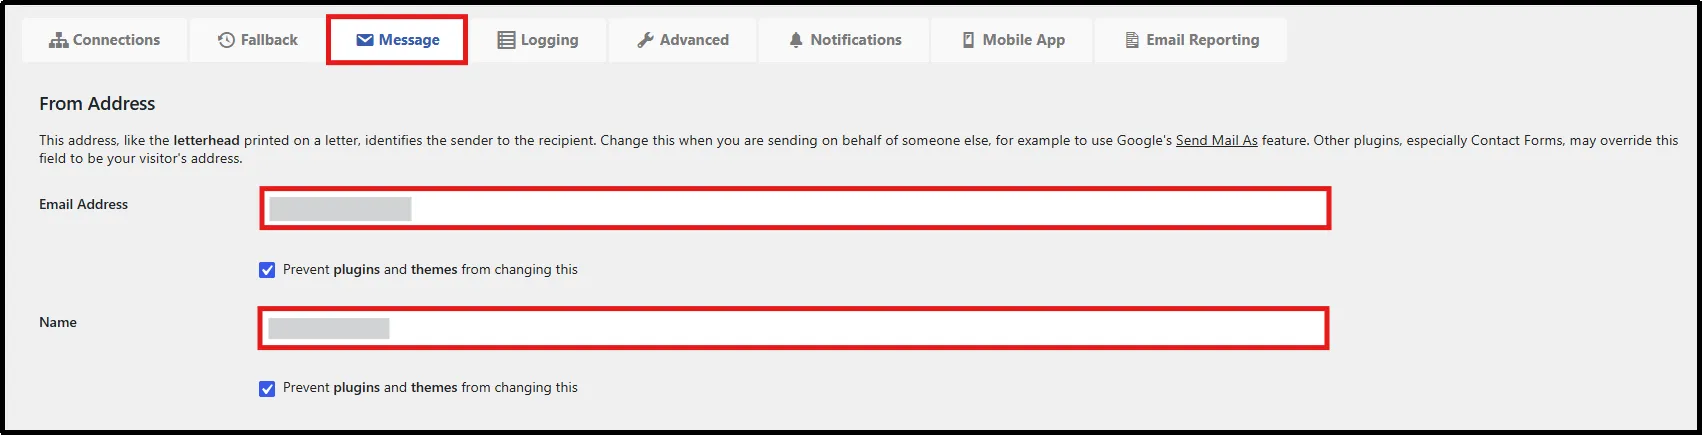
Note: If you have previously set up in the wizard, it will show those inputs in the message section.
So that’s how you can ensure every email on your site uses a consistent From name and address.
Step 5: Check Email Filtering and Authentication
While testing email delivery, search the spam or junk folder for the site’s sender address and the time of the login attempt. If the mailer accepts messages but they don’t reach inboxes, review the sending domain’s SPF, DKIM, and DMARC records.
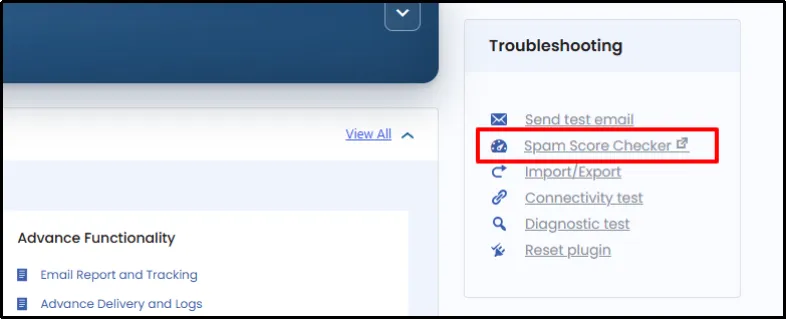
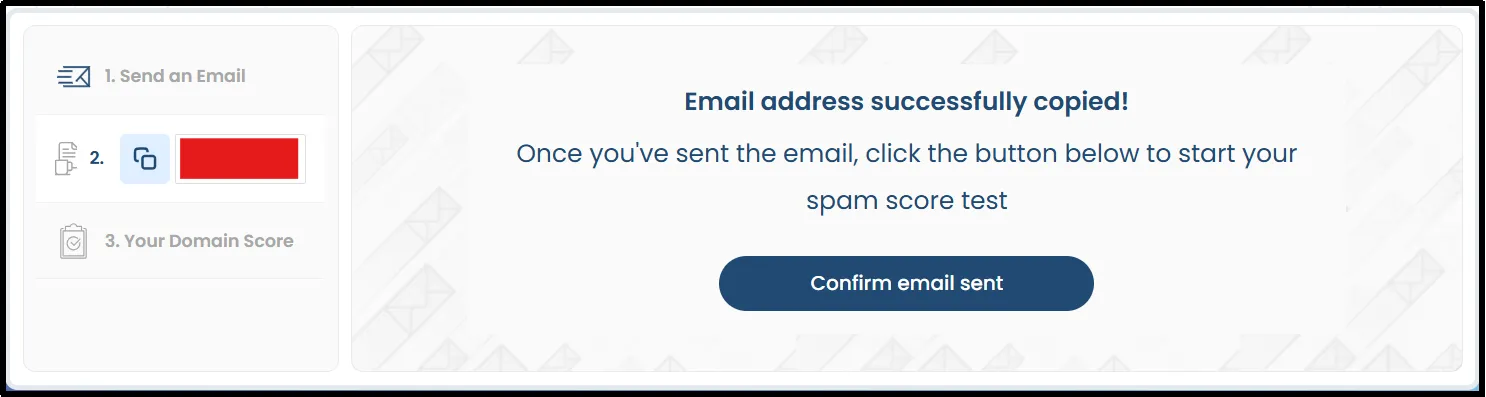
- Go to Post SMTP’s spam score checker.
- Click Copy Email Address to Clipboard.
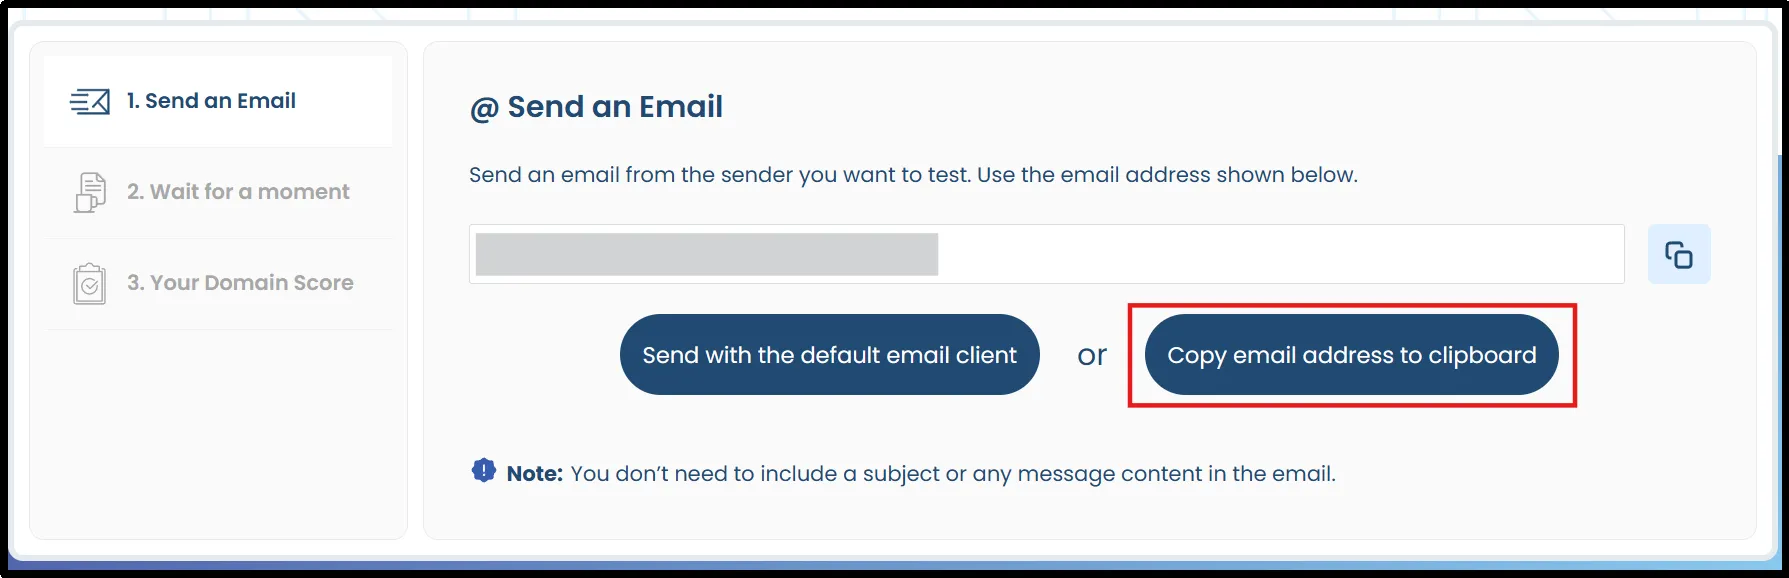
- Send a test email from your configured sending address.
- Return to Spam Score Checker and click Confirm Email Sent.
- Review the resulting checks.
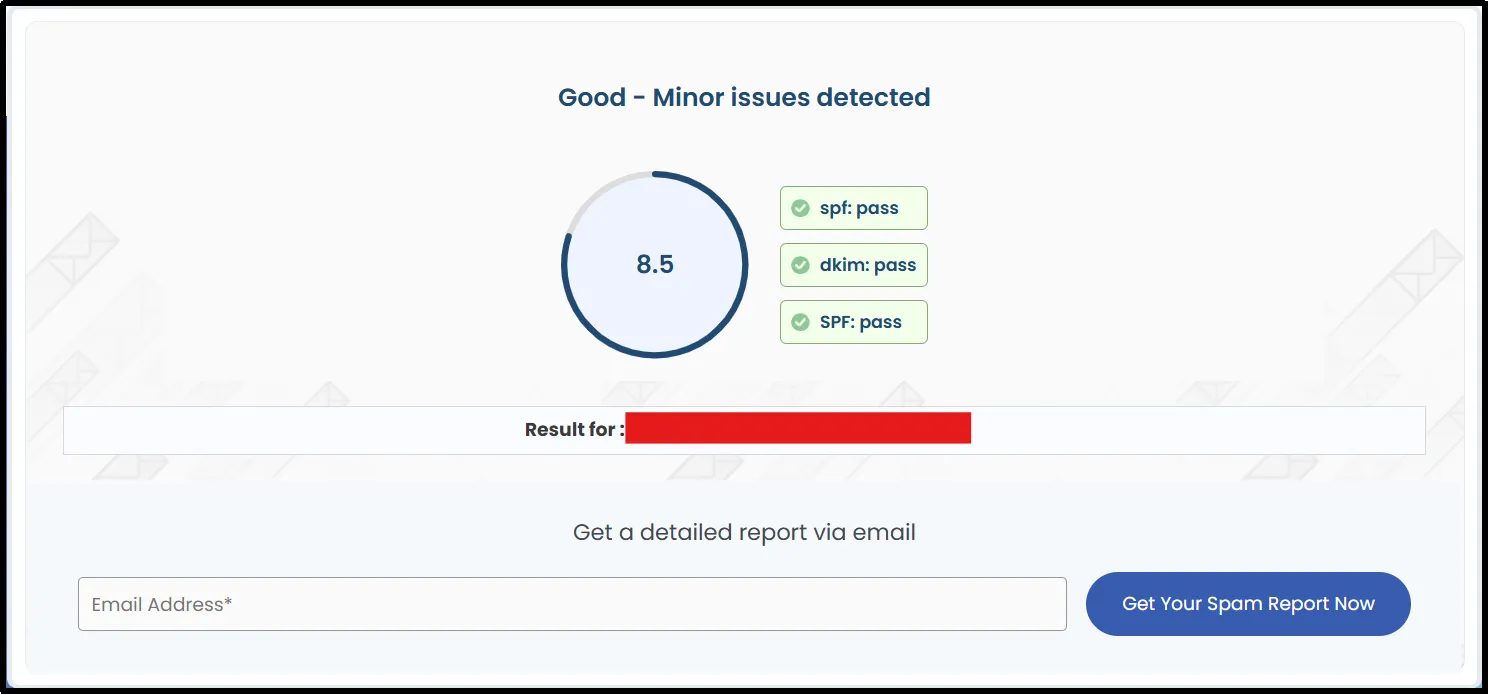
Once your authentication checks pass, test your MailPoet and check your inbox.
Step 6: Configure a Backup SMTP Connection (Fallback Mailer)
What happens if your primary email provider experiences an outage or connection failure?
With Post SMTP Pro, you can configure a Secondary SMTP Connection to give your website a backup mailer. If the primary connection fails, Post SMTP can route eligible failed messages through the secondary connection.
To configure it:
- Go to Post SMTP → Settings.
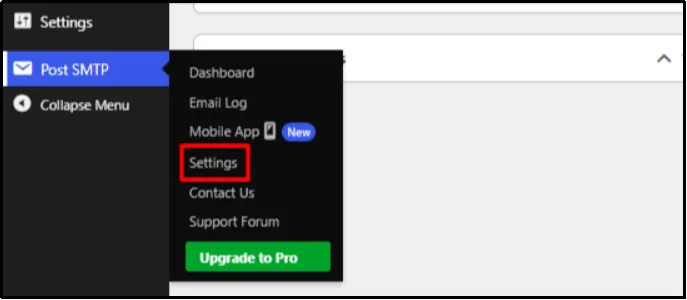
- Navigate to the Fallback tab.
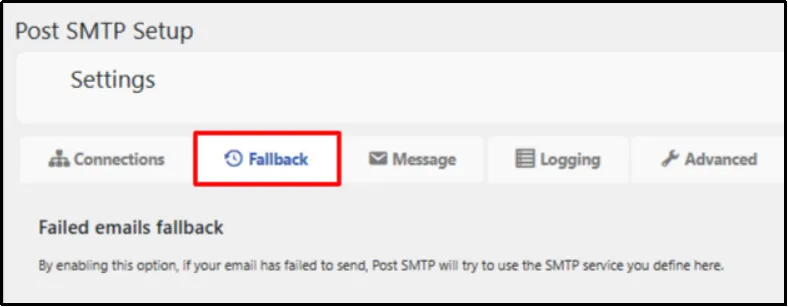
- Select Yes on Use Fallback and configure your SMTP mailer settings.
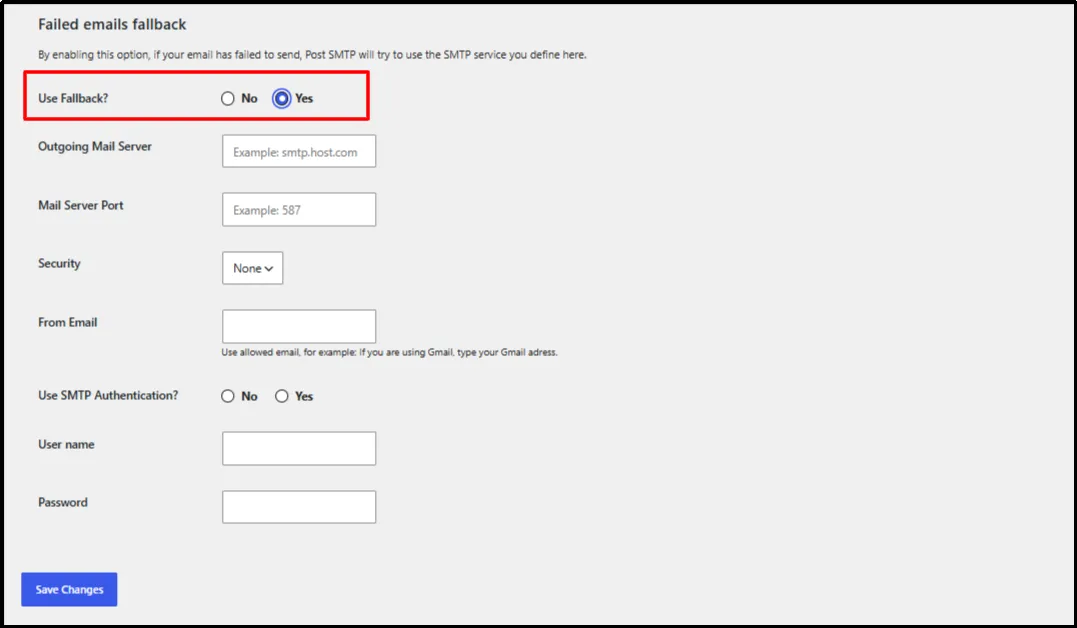
- Save your settings, and you are good to go.
This gives your WordPress website another delivery route when the primary mailer encounters problems.
Here’s detailed documentation on how to set up a Fallback connection.
Now head back to MailPoet and send emails with peace of mind that almost everyone you send to will reach the intended inbox.
Optional Steps: Get More Control Over WordPress Email Delivery
The three steps above should help you configure MailPoet’s WordPress mail delivery route. However, you can do more with Post SMTP to monitor email activity, recover failed messages, and manage high-volume sending.
These additional steps are optional. Choose the features that match your website’s email requirements.
Step 1: Monitor Emails Through the Post SMTP Mobile App (Optional)
If you manage multiple WordPress websites or need to monitor email activity away from your desk, the Post SMTP Mobile App makes it easier to track delivery.
You can use the app to:
- View email logs and check message statuses.
- Receive instant notifications when emails fail.
- Inspect error details to troubleshoot delivery problems.
- Preview emails before reviewing them further.
- Resend failed emails with one tap (Pro).
- Monitor multiple WordPress websites (Pro).
You can also resend emails with attachments directly from the email log screen using Post SMTP Pro.
Here’s a quick way to connect your WordPress to the Post SMTP mobile app.
- Go to Post SMTP → Settings.
- Click on the Mobile App tab.

- Make sure you have the mobile app installed; if not, download it from the Google Play Store or the App Store.
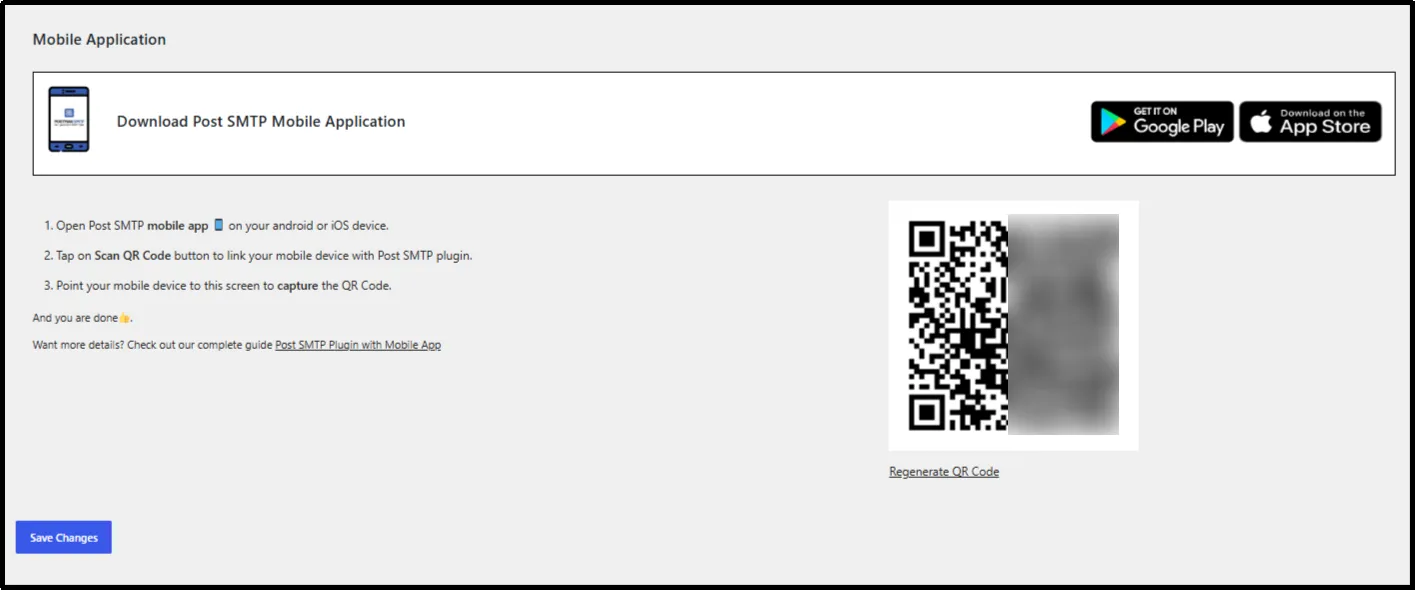
- Scan the QR code.
- Click on Save Changes.
Struggling with any step? We have published an extensive doc for the Post SMTP Mobile App.
Step 2: Enable Weekly Email Reports and Open Tracking (Optional)
Post SMTP Pro includes email reporting features that help you review your website’s sending activity without opening the WordPress dashboard every time.
Enable the Weekly Email Health Report to receive a summary of:
- Total emails sent.
- Successful email deliveries.
- Failed emails.
- Recent email logs.
You can also use Email Open Tracking to review available open-tracking data from the email log screen. This gives you another way to assess engagement with supported emails.
To enable it:
- Go to Post SMTP → Settings.
- Head to the Email Reporting Tab.
- Turn on the toggle button to enable Lite Email Reporting.
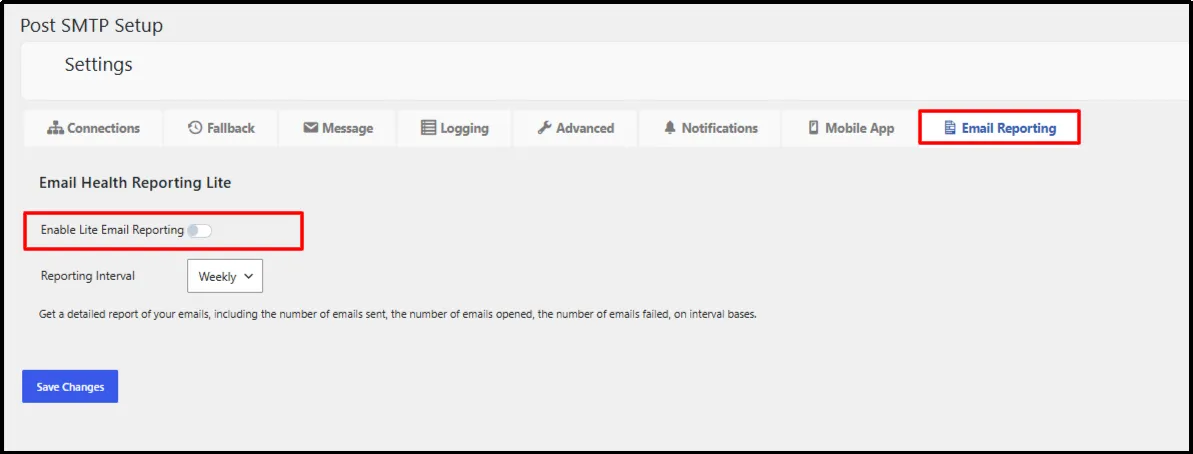
- Set a reporting interval based on your requirements.
- Click on Save Changes.
You will now receive weekly email health reports!
Fix MailPoet Email Delivery Issues With Post SMTP
MailPoet email delivery problems can have several causes, from sending service restrictions and authentication errors to problems with WordPress’s default mailer.
The first step is to identify which sending method MailPoet uses and check its internal sending status.
If your transactional emails use WordPress’s default wp_mail() function, Post SMTP can provide a dedicated SMTP or email API connection for those messages.
You can also configure consistent sender details, verify your domain authentication, and monitor email activity through detailed logs.
And with Post SMTP Pro, you get additional features such as fallback connections, email failure notifications, advanced reporting, and mobile email management.
If you want more control over your WordPress email delivery, explore Post SMTP’s available plans.
Frequently Asked Questions
Why are MailPoet emails stuck in the queue?
MailPoet emails may remain stuck in the queue because of task scheduler failures, cron errors, sending service restrictions, or problems with the email sending process.
Go to MailPoet → Help → System Status and check the Task Scheduler, Cron, and Sending Queue sections.
If you find an error, follow MailPoet’s troubleshooting instructions to resolve it.
Why do MailPoet newsletters work but transactional emails don’t?
Newsletters and transactional emails can use different sending workflows.
MailPoet lets you configure how your website’s transactional emails are sent separately from its newsletter delivery settings.
Check the sending method configured under MailPoet → Settings → Advanced → Send all site’s emails with….
Also, verify the relevant sending logs and sender configuration for each email type.
Does Post SMTP record emails sent through MailPoet Sending Service?
No. Post SMTP’s email logs cover messages handled through its own WordPress email delivery route.
Emails sent directly through MailPoet Sending Service bypass Post SMTP and won’t appear in its email logs.
Check MailPoet’s own logs and send reports to investigate those messages.
Why does MailPoet send emails to some subscribers but not others?
Several factors can affect individual email deliveries, including invalid email addresses, previous bounces, spam filters, and subscriber status.
Check MailPoet’s sending reports and confirm that affected recipients have valid addresses and the correct subscription status.
You should also ask recipients to check their spam or junk folders.
How can I check whether MailPoet has restricted my sending account?
Go to your MailPoet dashboard and look for account warnings or sending suspension notices.
You should also check the email address registered with MailPoet for any notifications about sending restrictions.
If MailPoet has suspended your account because of bounces or spam complaints, contact its support team to identify the issue and restore sending.
