


Are you having trouble with WordPress not sending emails on GoDaddy? If so, you are not alone. Many WordPress users face this issue when they host their websites on GoDaddy.
GoDaddy SMTP issues can affect your website’s functionality and user experience, as you may miss important notifications, confirmations, and feedback from your visitors.
But don’t worry; in this blog post, we will explain why WordPress not sending emails on GoDaddy is a common problem and how you can fix it in 2 easy steps.
We will also show you how the Post SMTP WordPress plugin can help you manage WordPress emails more effectively.
Ready? Let’s get started!
2 Key Reasons Why is WordPress not sending emails on GoDaddy?
The main reason why WordPress is not sending emails on GoDaddy is that, like many other hosting companies, GoDaddy blocks SMTP connections on some of their plans, especially on shared hosting.
If you are facing a similar issue, then you might see one of the following error messages:
- Connection refused (111)
- Could not access the SMTP host
- SMTP connect() failed
The second reason for this problem is that the GoDaddy hosting server is not set up for the PHP mail() function. It’s not the only hosting provider that has this issue: Users of Amazon EC2 often complain that AWS is not sending WordPress emails.
Fixing the GoDaddy WordPress email not sending issue can be tricky. But to make things easier, we will show you two easy steps to resolve this problem in the following section.
2 Easy Steps to Fix WordPress Not Sending Emails on GoDaddy
The first step is to install and configure the Post SMTP WordPress plugin. This involves replacing wp_mail with the SMTP server of your choice. Let’s see how you can do this.
Step #1: Install and Configure the Post SMTP Plugin
Post SMTP plugin is the World’s #1 WordPress SMTP plugin that lets you send email using any third-party SMTP server, such as Microsoft 365, Amazon SES, Zoho, Gmail, Mailgun, SendGrid, Elastic Mail, SparkPost, Postmark, etc.
To install the Post SMTP plugin, follow the steps below:
- Log in to your WordPress dashboard and go to Plugins → Add New Plugin.
- Search for Post SMTP and look for “POST SMTP: The #1 WordPress SMTP Plugin…” then click Install Now.
- After the installation is complete, click on Activate.
Upon activation, you will see the below screen:
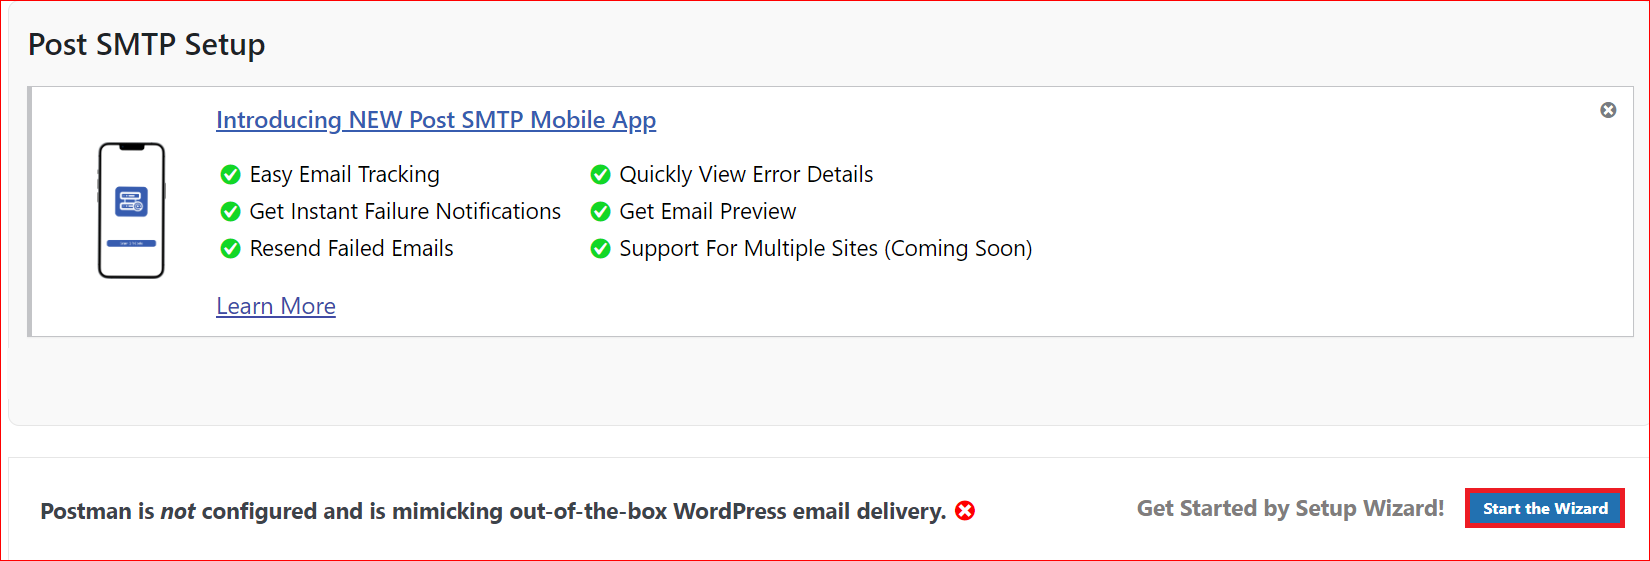
- For SMTP configuration, click “Start the Wizard.”
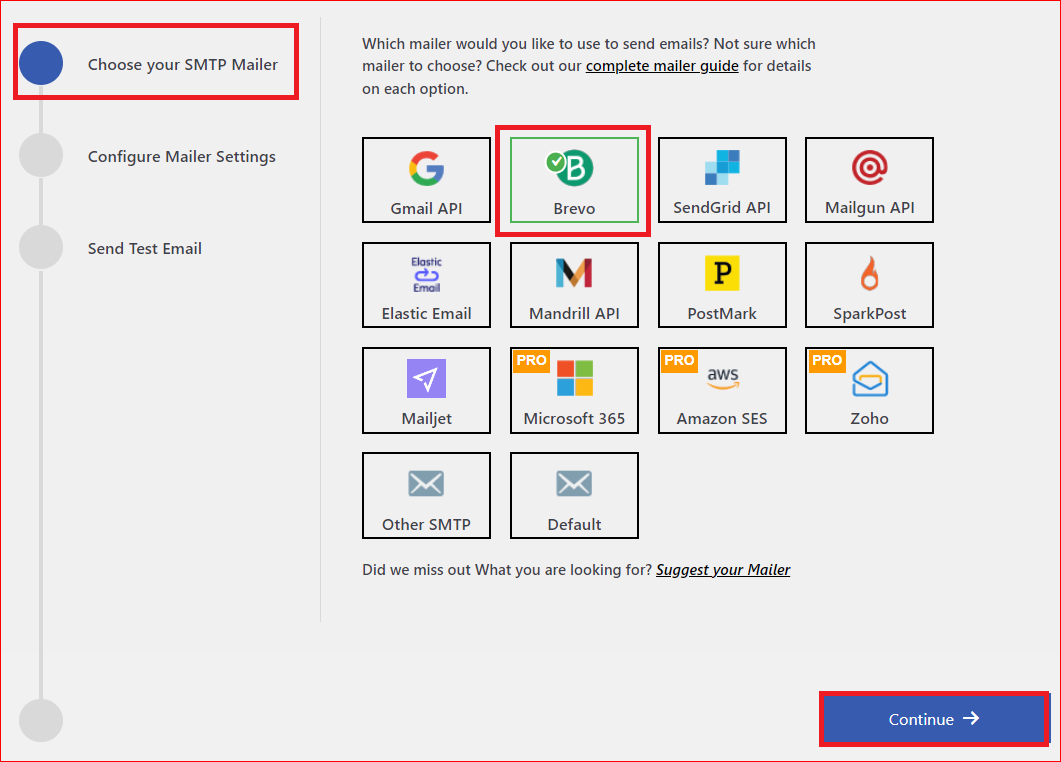
- Select the SMTP mailer you prefer (i.e., Brevo, Gmail SMTP, Microsoft 365 SMTP, Amazon SES, Mailgun SMTP, etc.) and hit Continue.
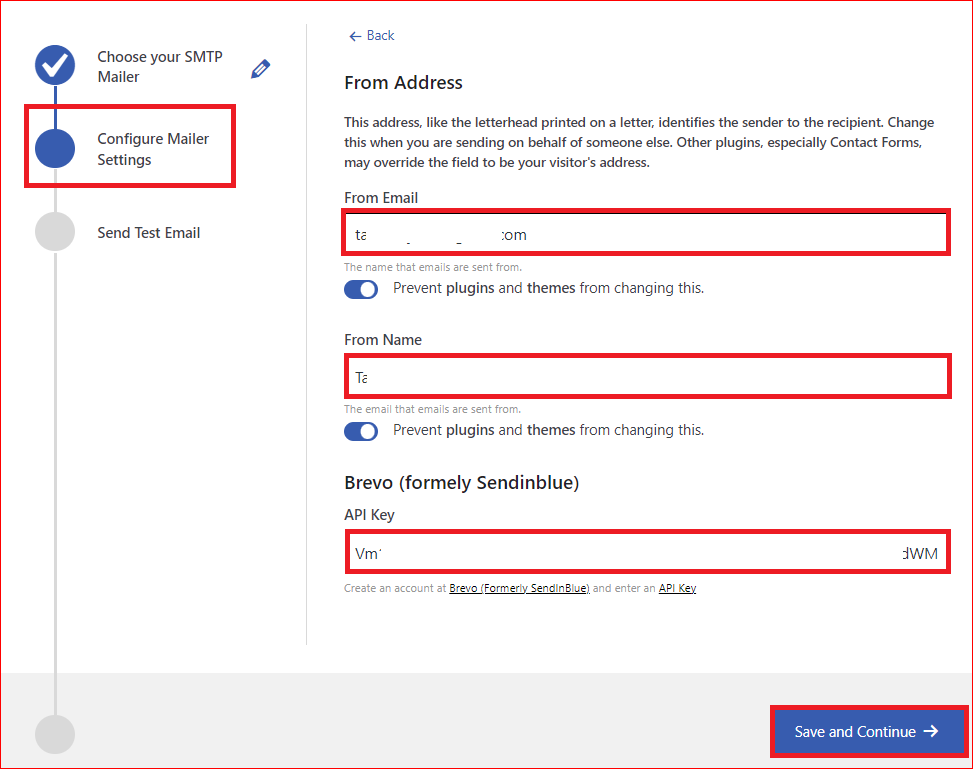
- Next, enter your email address and name in the From Email and From Name fields.
- As we’ve selected Brevo as our SMTP Mailer, go to your Brevo account, get your API Key, and paste it into the appropriate field. Then, click “Save and Continue.”
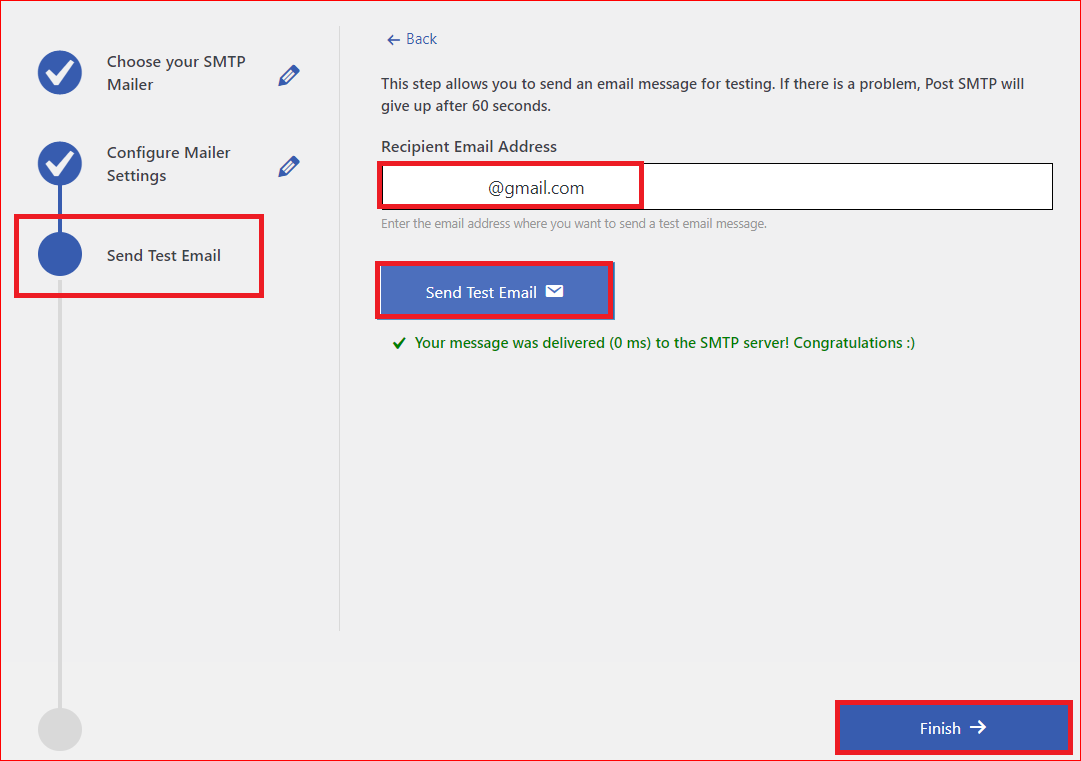
- To test your SMTP configuration, enter an email address you can access in the Recipient Email Address box and then select Send Test Email.
Upon successful email delivery, you’ll see the green Congratulations status, which means that the issue of WordPress not sending emails on GoDaddy is now fixed.
Finally, click the Finish button at the bottom to end the process.
Still can’t configure it yourself? Don’t worry! We are here to help! Feel free to contact us for expert assistance, as our team of WordPress experts is available 24/7 to solve all your WordPress email deliverability problems.
Step #2: Review and Setup Your DNS Records
If you are still experiencing problems with your WordPress GoDaddy emails not working, it’s time to review your DNS records because missing DNS records result in email domain authentication failures, thus rejecting or blocking your emails.
DNS stands for Domain Name System, and DNS records (also known as zone files) are the instructions about your domain that exist on DNS servers and provide information about how to handle any request for your domain.
SPF, DKIM, and DMARC are three DNS TXT records necessary for email authentication. To check DNS TXT records, go to any DNS Lookup Tool, such as DNS Checker, MxToolbox, etc, and enter your domain and look for all three DNS records.
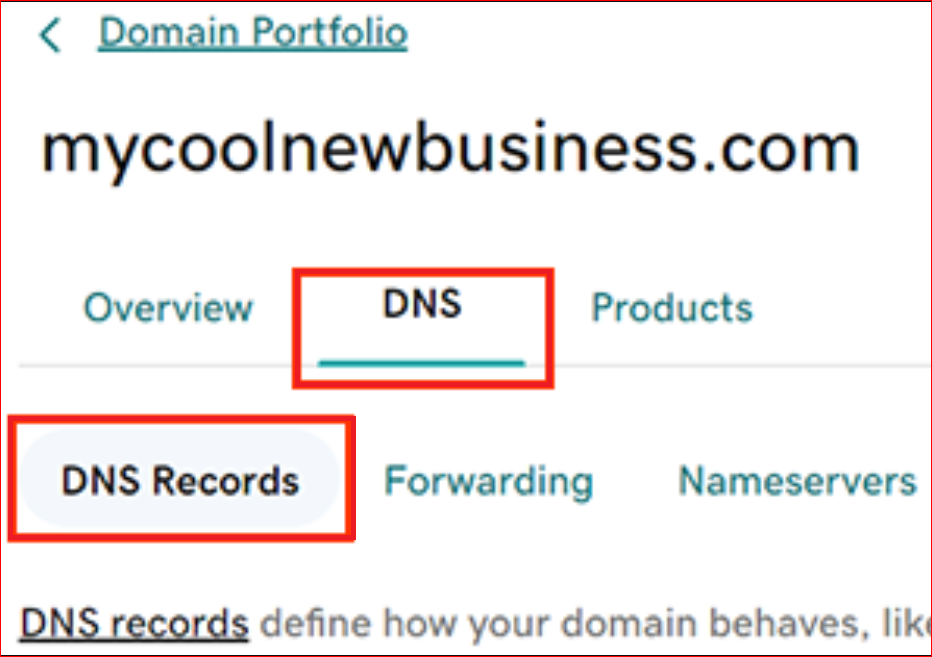
As a GoDaddy user, you can also review and set up your DNS records in the GoDaddy dashboard under DNS Zone. To do so, follow the steps below:
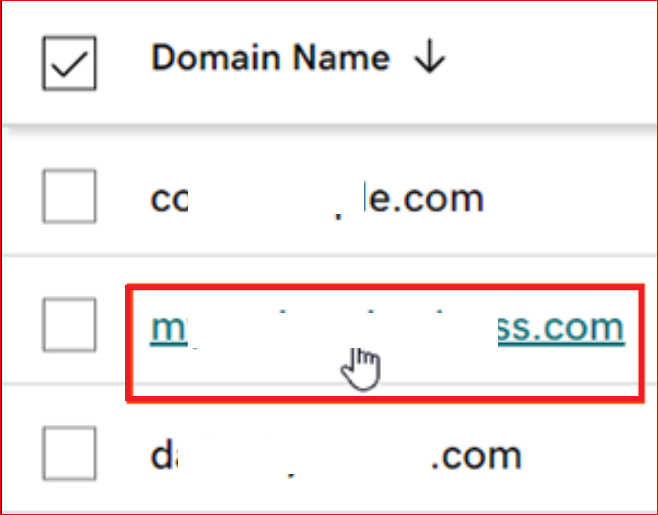
- Log in to your GoDaddy Domain Portfolio.
- Select your domain to access Domain Settings.
- Tap the DNS tab to view your DNS records.
- Then, click Add New Record and select TXT from the Type menu.
- Now, provide all the necessary information for the new TXT record. [i.e., Name, Value, and TTL (Time to Live)].
- Finally, hit the Save button to add your new record. Select Save All Records if you added multiple records at once.
NOTE: After updating your DNS TXT records, you need to wait since most DNS updates are effective within an hour, but sometimes it can take up to 48 hours.
That’s it; now you’ve successfully resolved WordPress not sending emails on GoDaddy.
Manage Your WordPress Email Effectively with Post SMTP
Now that WordPress is sending emails on GoDaddy, you can manage your WordPress email effectively with Post SMTP.

Post SMTP is more than just a plugin to send emails from your WordPress website. It also offers tons of amazing features to manage your WordPress emails in a smart and efficient way.
With Post SMTP, you can;
- Monitor and track your email delivery status with detailed logs and instant notifications.
- Troubleshoot and debug your email issues with a detailed error message.
- Optimize and improve your email deliverability and reputation with advanced features and settings. (fallback mailing, quota management, etc.)
- Integrate all major email services such as Gmail, Microsoft 365, Mailgun, SendGrid, Brevo (formerly Sendinblue), and more.
Post SMTP is the ultimate WordPress email plugin that can help you take your WordPress email deliverability and management to the next level.
Final Remarks on WordPress Not Sending Emails on GoDaddy
The GoDaddy emails not sending issue is frustrating and can negatively affect your website’s functionality and user experience. However, you can easily fix it in 2 easy steps:
- Install and configure the Post SMTP WordPress plugin to send emails from your WordPress website using any SMTP service provider.
- Review and set up your DNS records to verify the sender of your emails and prevent spam and spoofing.
By following these two easy steps, you can fix WordPress not sending emails on GoDaddy and manage your WordPress email effectively with Post SMTP.
Lastly, if you need help fixing this issue, please feel free to contact us for expert assistance. Our team of WordPress experts is always ready to help you with any email-related issue.
Happy Emailing!!!
Frequently Asked Questions
How do I fix WordPress not sending emails on GoDaddy?
You can fix WordPress not sending emails on GoDaddy by installing and configuring the Post SMTP WordPress plugin and properly setting up your TXT DNS records. This way, you can bypass the GoDaddy SMTP block and replace the PHP mail() with a more reliable and secure method (i.e., SMTP) of sending emails from your WordPress website.
What are the SMTP settings for GoDaddy?
The GoDaddy SMTP settings for WordPress are as follows:
● SMTP Host/Server: smtpout.secureserver.net
● SMTP Port: 587 (TLS) or 465 (SSL/TLS)
● SMTP Username: Your GoDaddy email address
● SMTP Password: Your GoDaddy account password
However, we recommend using any reputable SMTP service provider such as Microsoft 365, Amazon SES, Zoho, Brevo, Mailgun, etc.
How do I enable SMTP settings on GoDaddy?
To enable SMTP authentication in GoDaddy:
1. Log in to your Email & Office Dashboard.
2. Click the Manage button next to the user.
3. Then, select Advanced Settings under the Account information section.
4. Turn on the SMTP Authentication toggle.
Finally, hit Continue to enable SMTP authentication.

