For a WordPress website, email deliverability is crucial to its success. Whether it’s transactional emails, notifications, or marketing emails, having an efficient mailer can make a huge difference.
If you are using Microsoft 365 (formerly Office 365), there is good news for you! Along with email address and inbox services, Microsoft 365 offers an excellent SMTP mailer solution that integrates seamlessly with WordPress.
In this article, we’ll walk you through the three simple steps to send WordPress emails via the Microsoft 365 Exchange Online service.
Ready? Let’s get started!
Microsoft 365 SMTP Mailer —Brief Intro
Microsoft 365 provides a robust solution for sending emails called “Exchange Online.” With this mailer, you can send WordPress emails without relying on traditional web hosting email services, which often face issues like low deliverability or server restrictions.
The Microsoft 365 SMTP mailer offers a higher email sending limit than other SMTP mailers at a reasonable price. It uses an API-based method, which eliminates the need to input sensitive login details into WordPress.
Why Microsoft 365 SMTP for WordPress?
WordPress, as a content management system (CMS), is not primarily designed for email handling. While it can send emails, many users face issues with their emails not being delivered or landing in spam folders. This WordPress Not Sending Emails issue stems from how WordPress handles email delivery.
By default, WordPress uses the wp_mail() function to send emails, which relies on PHP mail to communicate with your hosting provider’s server. The server then processes the email and sends it out to recipients. However, there are significant limitations to this method.
Many hosting providers do not have dedicated email infrastructure, and in some cases, they block or restrict PHP-based email sending. This leads to emails being undelivered or marked as spam.
To resolve this, it’s better to use an SMTP (Simple Mail Transfer Protocol) server rather than relying on WordPress’s default PHP mail method. By routing your WordPress emails through an SMTP server, you significantly increase your chances of successful email delivery.
Now, the question is—why choose Microsoft 365 SMTP for your WordPress site? Here are some of the reasons:
- Reliable Email Infrastructure
Microsoft 365 is a trusted and established email service provider with a robust infrastructure designed to handle millions of emails daily. By using Microsoft 365 SMTP, you tap into their high-performance mail servers, ensuring that your emails are sent securely and reliably.
- Improved Email Deliverability
Email deliverability refers to the likelihood that your email will reach its intended recipient’s inbox rather than getting lost in transit or being flagged as spam. Microsoft 365 uses advanced spam filters and authentication protocols like SPF, DKIM, and DMARC to ensure email servers treat your emails as legitimate.
- Security and Encryption
Microsoft 365 offers strong encryption and security measures to protect your emails during transmission. When sending emails through Microsoft 365 SMTP, your messages are encrypted via TLS (Transport Layer Security), ensuring that sensitive information is not exposed to potential cyber threats.
- High Email Sending Limits
Another significant benefit of using Microsoft 365 SMTP is its generous email sending limits. Microsoft 365 allows you to send up to 10,000 emails per day, far higher than the limits set by most other email service providers. This makes it a suitable option for websites that require bulk email sending, such as eCommerce sites, membership sites, or newsletters.
- Seamless WordPress Integration
With the help of SMTP plugins like Post SMTP, integrating Microsoft 365 SMTP with WordPress is straightforward. These plugins provide easy-to-follow steps and require minimal configuration, allowing you to connect your Microsoft 365 account to WordPress in just a few clicks. Additionally, Post SMTP’s API-based integration ensures that you don’t have to input sensitive login details into WordPress, enhancing security.
- Scalable and Versatile
Whether you’re running a small blog or a large eCommerce store, Microsoft 365 SMTP is scalable and versatile enough to handle your needs. As your website grows and your email requirements increase, Microsoft 365 can accommodate larger volumes of email traffic without compromising performance or reliability.
Requirements to Send Emails From WordPress with Microsoft 365
Before setting up the integration, ensure you have the following:
- A Microsoft 365 account: You need an active Microsoft 365 subscription, or a free account such as @outlook.com or @hotmail.com can also work for lower-volume email sending.
- Azure App Registration: This allows you to create API credentials for authentication.
- Post SMTP Pro plugin: This WordPress SMTP plugin simplifies the setup process and allows you to send emails via the Microsoft 365 API.
NOTE: Below, we will show you how to get a Post SMTP Pro plan for your website.
3 Easy Steps to Send WordPress Emails via Microsoft 365
Now, let’s dive into the step-by-step guide to sending emails using Microsoft 365 on WordPress.
Step #1: Install Post SMTP Pro
First, you’ll need to install the free version of the Post SMTP plugin, which allows you to connect WordPress with external mailers like Microsoft 365. Here’s how to do it:
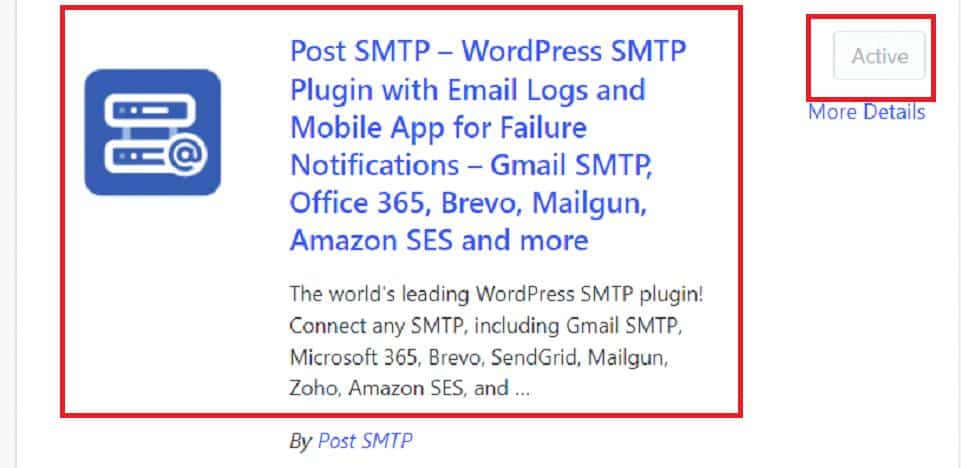
- Go to your WordPress dashboard and navigate to Plugins >> Add New Plugin.
- In the search bar, type “Post SMTP” and click Install Now when you find the plugin.
- Once installed, click Activate.
Secondly, to configure Microsoft 365 with WordPress, you must get the Post SMTP Pro plan. Post SMTP Pro offers advanced features such as built-in OAuth 2.0, email logging, and integration with popular mailers like Microsoft 365, Brevo, Amazon SES, Zoho, etc., making it an ideal choice for reliably sending WordPress emails.
Follow the steps below:
- Click here to visit the Post SMTP pricing page and get your favorite plan.
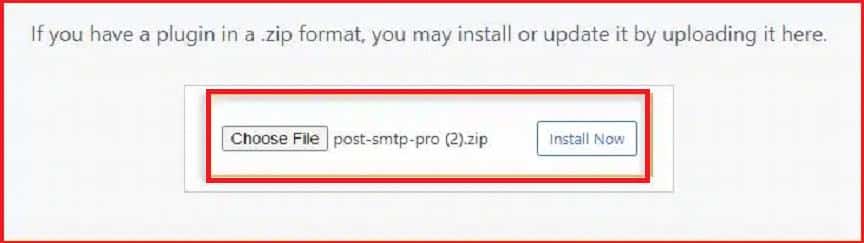
- Once you’ve received the welcome email, download the zip file to your PC.
- Access your WordPress admin area.
- Go to the Plugins menu and click on Add New Plugin.
- Click on the Upload Plugin button. Select the downloaded Post SMTP Pro add-on zip file and click Install Now.
- After installation, click Activate Plugin to enable the Pro add-on.
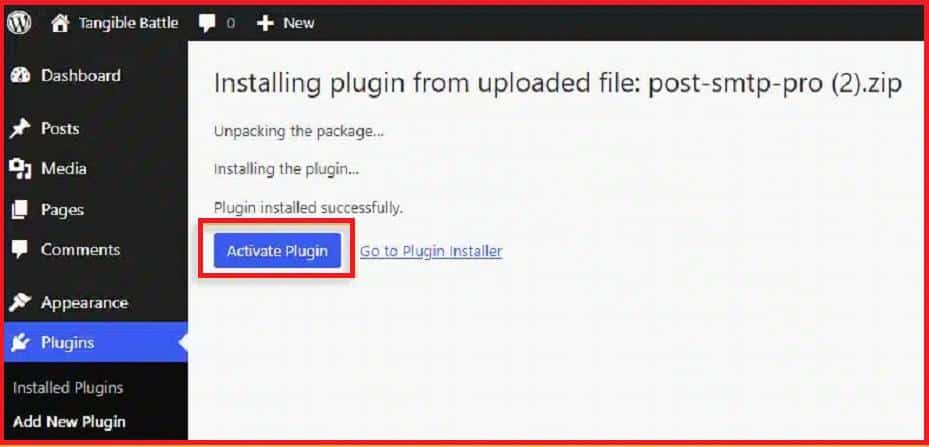
- Upon activation, you will be prompted to enter your Pro license key, which you can find in the onboarding email.
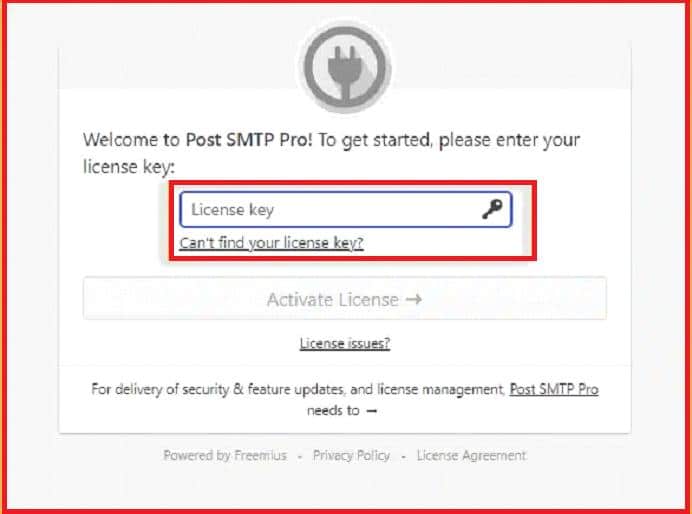
- Enter the license key in the provided field and click Activate License.
NOTE: If you missed the screen to input your license key, you can activate it later by navigating to the Installed Plugins list, locating the Post SMTP Pro Add-on, and clicking on the Activate License button.
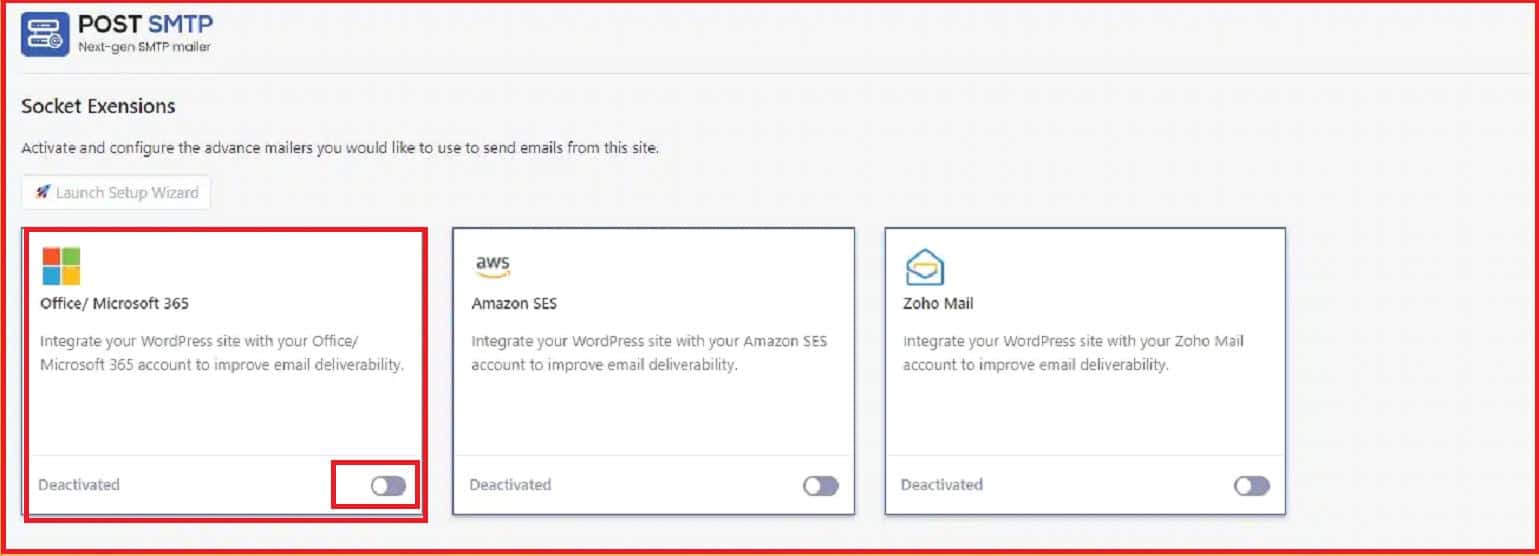
- Navigate to the Post SMTP >> Extensions submenu under Post SMTP. Here, you’ll find various extensions, including the essential socket extensions for Office 365, Amazon SES, and Zoho Mail.
- Activate the “Office / Microsoft 365” extension by toggling it on.
- Don’t forget to save the changes by clicking “Save and Continue.”
Now, move on to the second step.
Step #2: Get APIs from Your Azure Account
To use Microsoft 365 as your mailer, you’ll need to generate API credentials from your Azure account. This allows your WordPress site to send emails securely via Microsoft’s servers. Follow these steps:
- Log in to your Microsoft Azure Portal.
- Inside the Azure Portal dashboard, navigate to App Registrations >> New Registration.

- Name your application (e.g., Post SMTP Office 365) and select the appropriate tenant type.
- Set the redirect URI to your WordPress site URL (important for OAuth authentication).
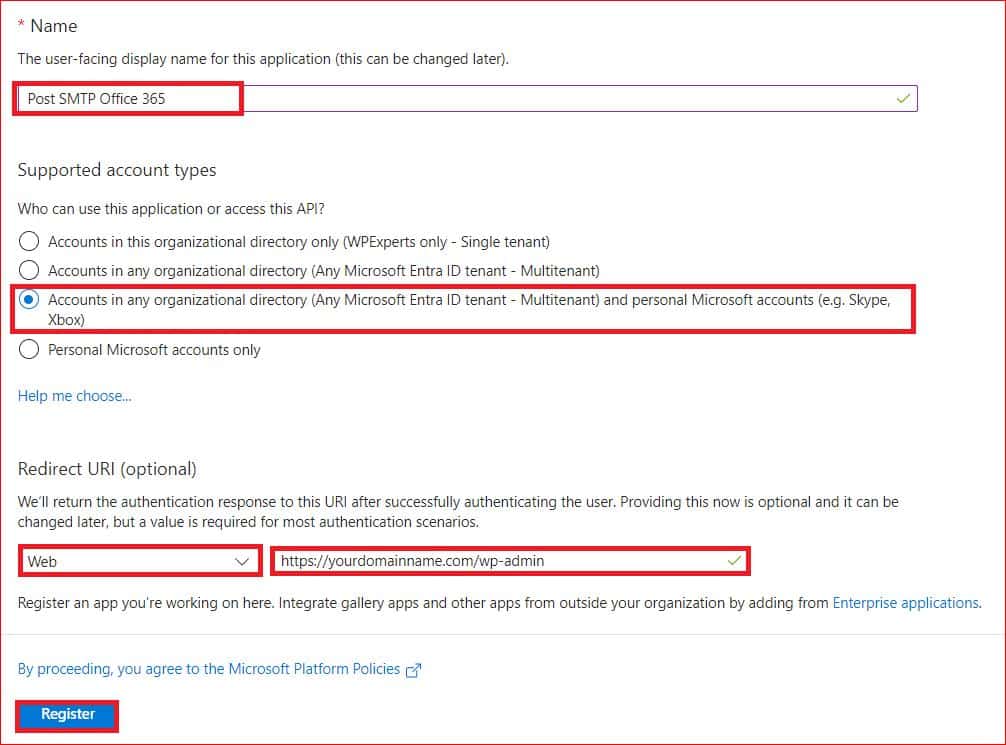
- Click Register to create the app.
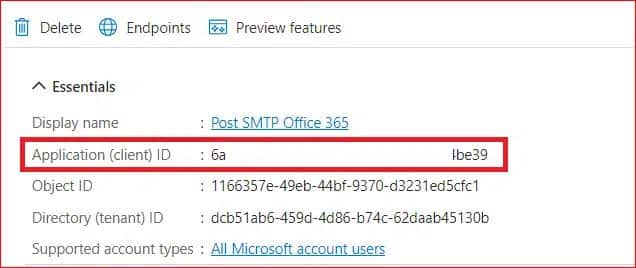
- After registering your application, copy the Application (client) ID and save it in a notepad for later use.
- In the left sidebar, click on Certificates & Secrets.
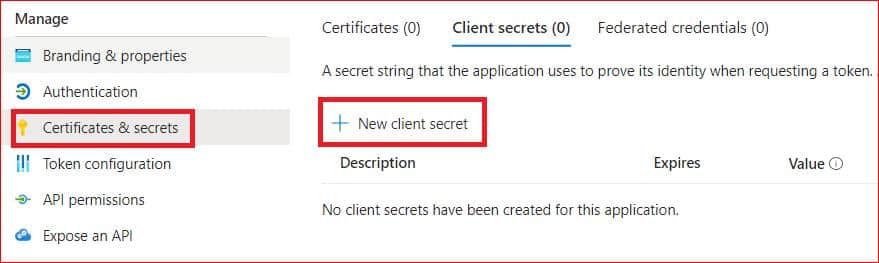
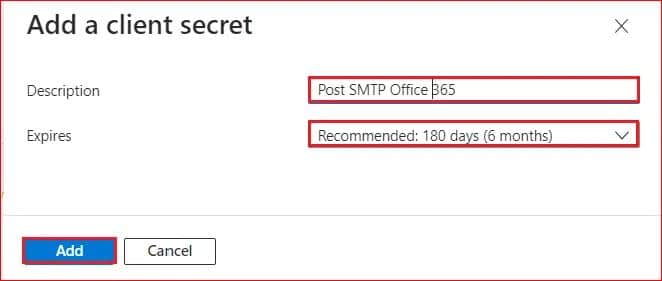
- Click on the “+ New Client Secret” button. Fill in the Description (e.g., Post SMTP Office 365) and set the Expiration Time. Click Add.
- On the next screen, locate and copy the Client Secret Value from the Value column under Client Secrets.

NOTE: Keep both the Application (client) ID and Client Secret Value handy, as you will need them during the Post SMTP setup to connect Office 365 with WordPress.
Step #3: Configure APIs in WordPress
Now that you’ve installed Post SMTP and obtained your API credentials from Azure, it’s time to configure them in WordPress.
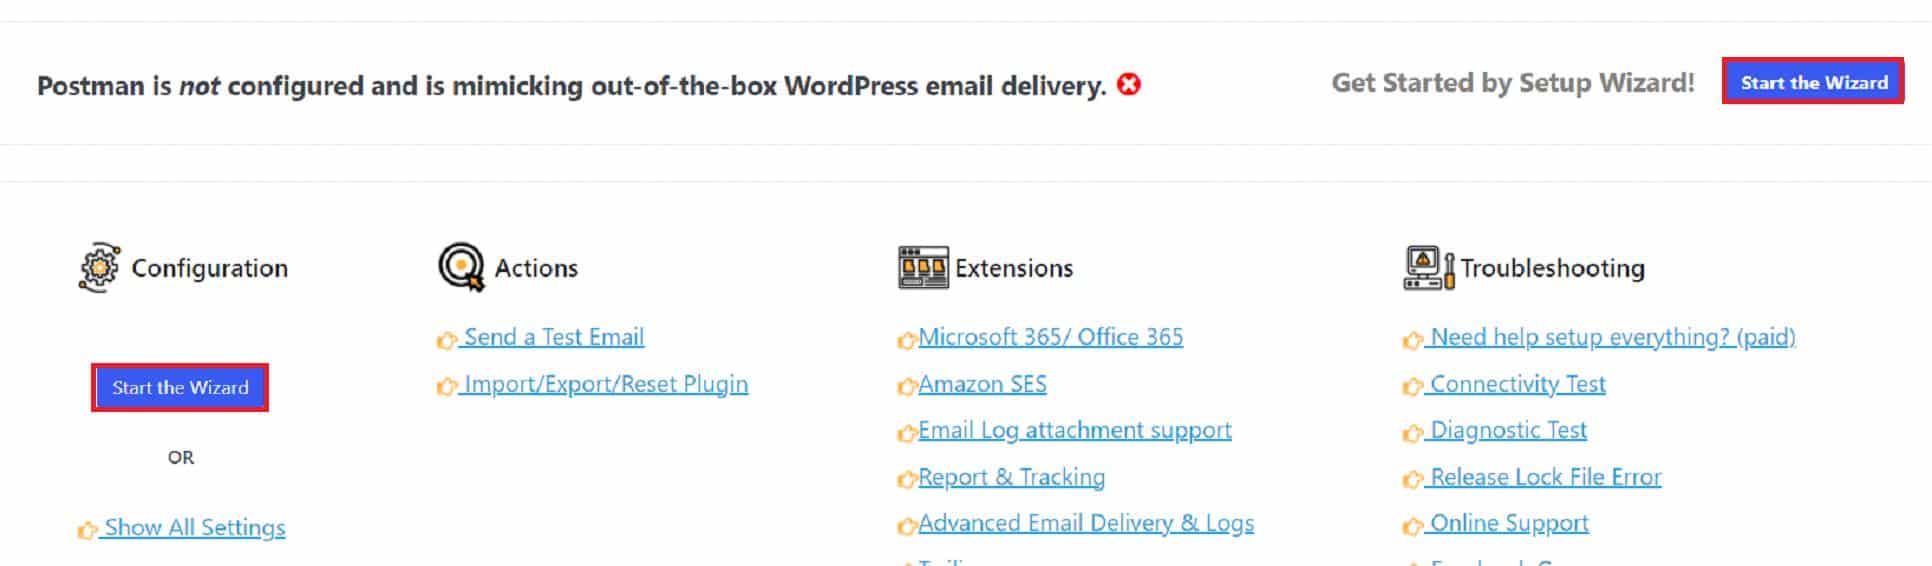
- Navigate to Post SMTP >> Dashboard.
- Click on “Start the Wizard.”
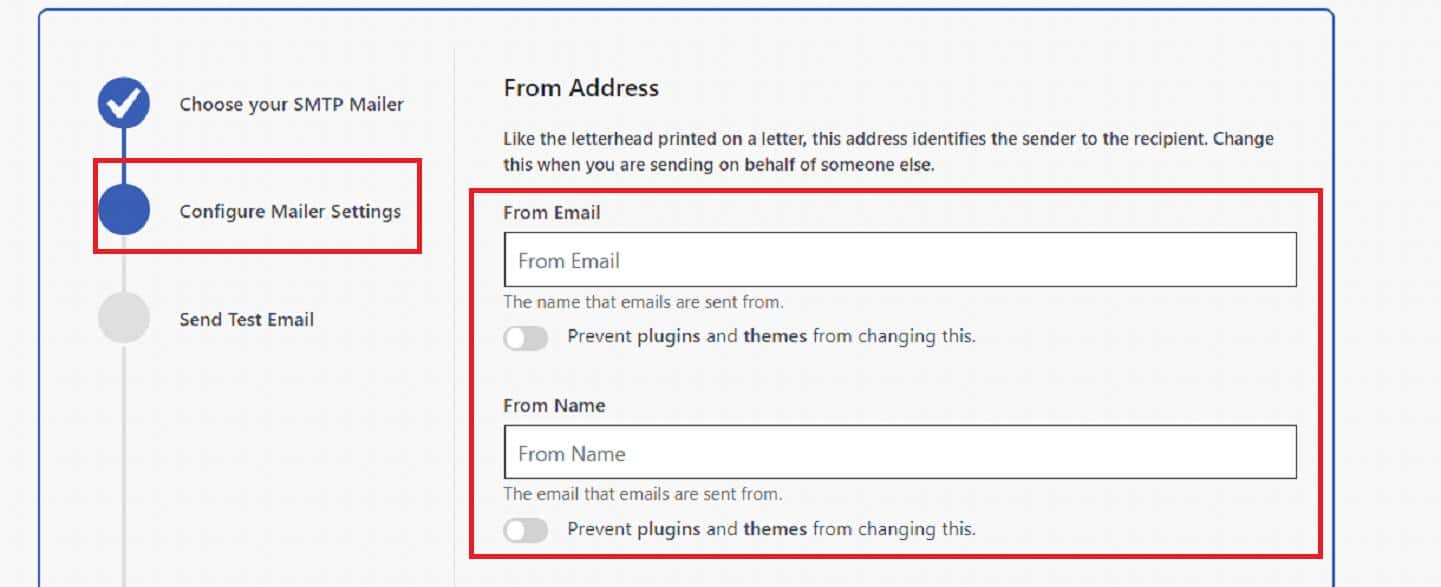
- Enter the email address and name you’ve registered with Microsoft 365 to send emails.
- Paste the Client ID and Client Secret Value you’ve generated in the earlier step.
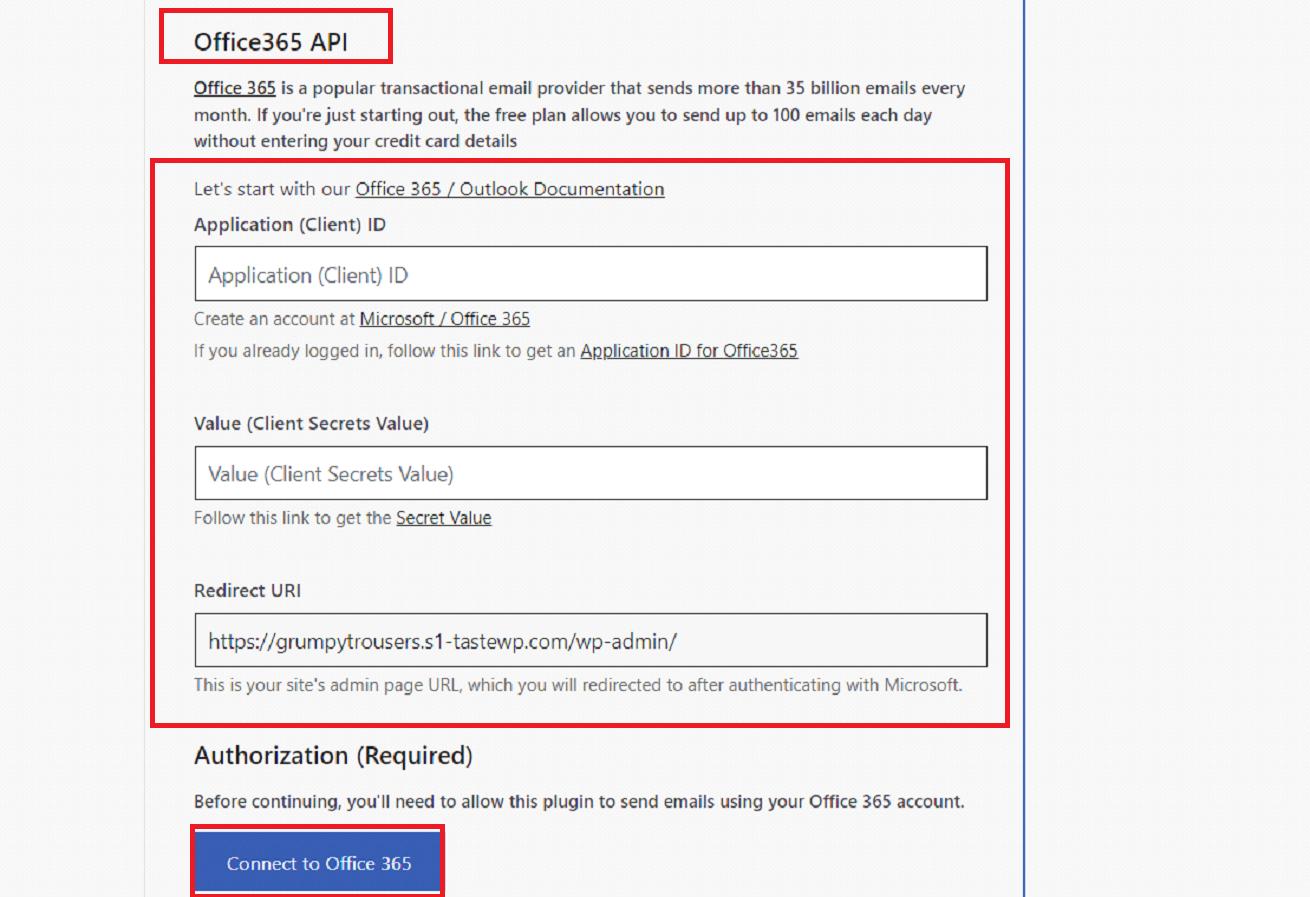
- Click the “Connect to Office 365” button to authorize the APIs.
Don’t Forget to Test Your Email Deliverability
Upon successful authorization, you will be redirected to the same page. Simply scroll down and click on the “Save and Continue” button.

On the subsequent screen, you will see the “Recipient Email Address” field. Here, enter a valid email address that you have access to.
After entering the email address, click on the “Send Test Email” below.
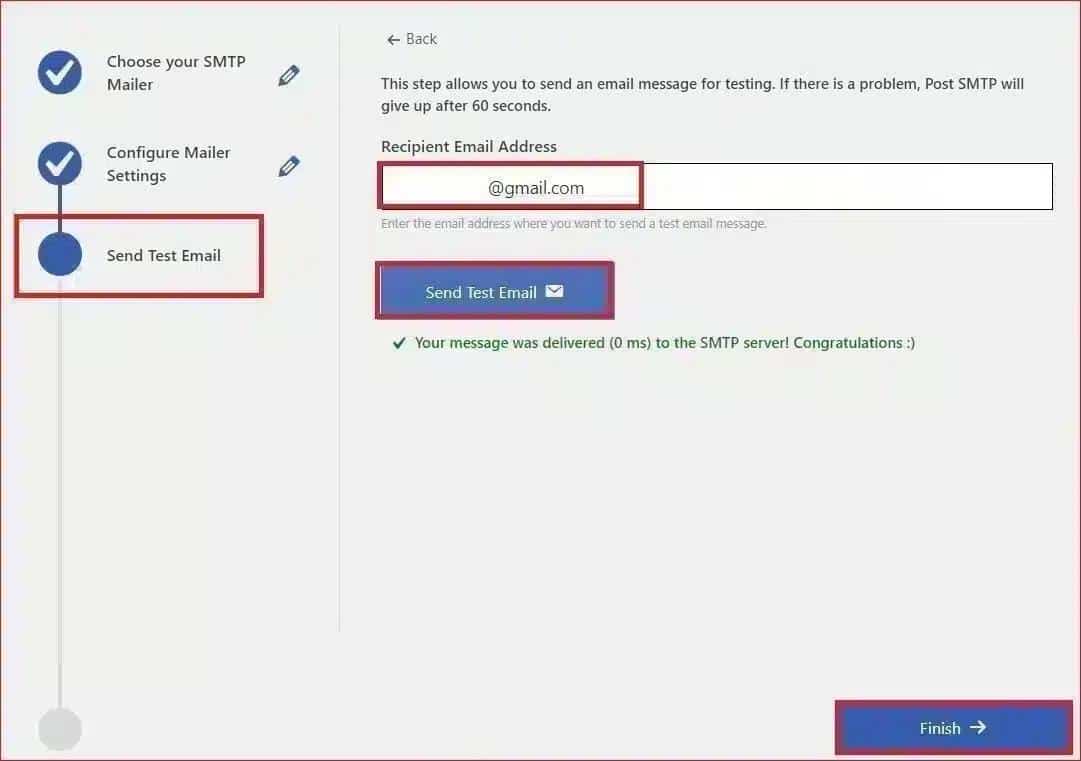
Now, check your inbox to confirm whether the email was delivered.
If the email doesn’t appear in your inbox, check your spam folder. If it’s in spam, you might need to adjust your DNS settings to improve deliverability, which we will discuss in the following section.
Lastly, Set Up SPF, DKIM, and DMARC Records for Your Domain
To further improve your email deliverability and ensure that your emails are properly authenticated and delivered in the primary inbox folder instead of spam, you’ll need to set up SPF, DKIM, and DMARC records for your domain. These records help email servers verify that your messages come from a trusted source.
- SPF (Sender Policy Framework): This tells receiving servers which IP addresses are authorized to send emails from your domain. Add an SPF record to your DNS settings that include Microsoft’s servers.
- DKIM (DomainKeys Identified Mail): This adds a digital signature to your emails, verifying that they haven’t been altered. Microsoft 365 automatically includes a DKIM signature, but you should still add the necessary records to your domain’s DNS.
- DMARC (Domain-based Message Authentication, Reporting, and Conformance): DMARC ensures that SPF and DKIM are working correctly and can instruct receiving servers on how to handle failed authentication attempts.
If you’re not comfortable setting up these DNS records, feel free to contact us for expert assistance. We have a team of Technical Email Specialists who can help you fix all your email related issues.
Final Remarks
Using Microsoft 365 SMTP for WordPress emails is a smart move for any website that relies on sending important email notifications, newsletters, or transactional emails.
By following the three easy steps to configure Microsoft 365 SMTP using the Post SMTP plugin, you can quickly get your WordPress site set up to send emails efficiently. Plus, don’t forget to test your email deliverability and set up SPF, DKIM, and DMARC records to optimize your email authentication and further enhance your sender reputation.
If you still have any issues regarding Microsoft 365 WordPress integration, please contact the Post SMTP Support Team. We will be happy to help!
Frequently Asked Questions
How do I send an email from Office 365 to WordPress?
To send emails from your WordPress site using Office 365, you need to configure an SMTP connection between your WordPress installation and Microsoft 365’s SMTP servers. You can do this by installing the Post SMTP plugin, which simplifies the setup by allowing API-based integration, ensuring secure and reliable email delivery.
How do I connect my Office 365 email to WordPress?
You can connect your Office 365 email to WordPress using an SMTP plugin like Post SMTP. Once installed, you’ll need to configure the plugin with the Client ID and Client Secret obtained from your Microsoft Azure account and then input your Microsoft 365 credentials in the plugin settings to establish the connection.
Can you send emails on Office 365?
Yes, Microsoft 365 (formerly Office 365) allows you to send emails through its SMTP servers. With the right configuration, you can integrate your Office 365 account with various platforms, including WordPress, to send secure and authenticated emails.
Does WordPress email work with Outlook?
Yes, WordPress can send emails using Outlook’s SMTP server. By configuring WordPress with Microsoft 365’s SMTP settings through a plugin like Post SMTP, you can easily send emails using your Outlook or Microsoft 365 email account.
What are the SMTP settings for Office 365?
The SMTP settings for Office 365 are as follows:
1. SMTP Server: smtp.office365.com
2. Port: 587
3. Encryption: TLS
4. Authentication: Required (Use your Microsoft 365 email address and password)