



























WordPress not sending emails can cost you leads, sales, and customer trust.
A contact form submission may never reach your inbox. A password reset email might not arrive. A WooCommerce customer could complete a purchase without receiving an order confirmation.
But before you start changing settings, ask: Did WordPress fail to send the email, or did the email leave your site but fail to reach the recipient?
Those are two different problems.
WordPress uses PHPMailer to process outgoing email, and its default mail transport relies on PHP’s mail() function, which depends on the mail environment configured on your server. A successful wp_mail() result also doesn’t prove that the recipient received the message.
So, don’t start by changing every WordPress email delivery setting at once.
In this guide, you’ll learn how to diagnose WordPress email failures, configure an SMTP mailer, authenticate your sending domain, test email delivery, troubleshoot common errors, and monitor your site’s email activity.
Why Is WordPress Not Sending Emails?
Several things can break WordPress email delivery.
Sometimes the problem starts inside WordPress. Other times, your hosting environment, mailer, DNS configuration, or recipient’s mailbox provider causes the failure.
Here’s where to look first.
Reason #1: WordPress’s Default Mail Transport
WordPress uses the built-in wp_mail() function to process outgoing email. wp_mail() uses PHPMailer, and the default configuration tells PHPMailer to use PHP’s mail() transport. That transport depends on your server’s local mail environment, so a poorly configured or restricted server can cause WordPress emails to fail.
Your hosting provider controls much of that environment.
Some hosts restrict outbound mail. Others disable or limit PHP-based mail to reduce abuse. A server may also lack the mail transfer setup that PHP’s mail transport expects.
That can leave WordPress looking fine while email quietly fails behind the scenes.
Reason #2: Missing or Incorrect Email Authentication
Email authentication helps receiving providers verify that your messages come from an authorized sender.
SPF identifies the servers authorized to send email for your domain. DKIM adds a cryptographic signature that receiving servers can verify. DMARC tells receiving servers how to handle messages that fail authentication and can provide reports about authentication failures.
Google currently requires senders to personal Gmail accounts to use SPF or DKIM authentication. Senders who reach Google’s bulk-sender threshold of about 5,000 messages per day to personal Gmail accounts face additional requirements, including SPF, DKIM, and DMARC.
But authentication isn’t a magic fix for every WordPress email problem.
If your server can’t establish an SMTP connection, adding a DMARC record won’t repair that connection. Authentication mainly addresses how receiving systems verify and evaluate your messages.
For reliable email delivery, configure SPF and DKIM for your sending domain and add DMARC where appropriate.
Reason #3: Incorrect From Address
Your contact form might use the visitor’s email address as the sender.
That’s a problem.
If your site sends a message through your domain but uses a visitor’s Gmail, Yahoo, or other unrelated address in the From: header, the message can create authentication and DMARC alignment problems because your mail service isn’t authorized to send on behalf of that domain.
Use an address from a domain you control instead.
For example, a contact form could use:
From: website@example.com
and place the visitor’s address in:
Reply-To: visitor@example.com
That setup lets you reply to the visitor without pretending that your server sent the message from the visitor’s domain.
Reason #4: Poor Sender Reputation
Sender reputation reflects how mailbox providers view your sending behavior and infrastructure.
Spam complaints matter. So do invalid recipients, repeated bounces, sending patterns, authentication results, and the reputation of your sending domain or IP.
Poor reputation can increase filtering, throttling, or blocking even when an individual email looks legitimate.
And reputation can take time to recover.
If your site sends transactional emails, keep your recipient lists clean, authenticate your domain, avoid unnecessary bulk sending, and investigate repeated bounces or spam complaints.
Reason #5: Hosting Restrictions and Shared Infrastructure
Your hosting provider may limit outbound email, restrict SMTP ports, or disable PHP-based mail.
Those restrictions come from the hosting environment rather than WordPress itself.
Shared hosting adds another variable. Several websites may send mail through the same IP infrastructure; if that infrastructure develops a poor reputation, some mailbox providers may apply stricter filtering to messages from that IP.
Your site may look fine. The emails can still fail.
Step-by-Step Process to Fix WordPress Not Sending Emails
Earlier, we explained that WordPress uses the wp_mail() function by default to send emails. However, this method depends on your hosting server’s mail configuration and may not provide reliable email delivery.
To improve your WordPress email delivery, the first step is to configure an SMTP or API-based mailer. You can do this with an SMTP plugin like Post SMTP, which lets you connect your site to 20+ SMTP service providers. It also provides tools to test your connection, view email logs, check server error responses, and monitor your site’s email activity.
For a detailed breakdown of Post SMTP features and premium plans, check out the Post SMTP pricing page.
Now, let’s get started.
Step 1: Install and Activate Post SMTP
Start in your WordPress dashboard.
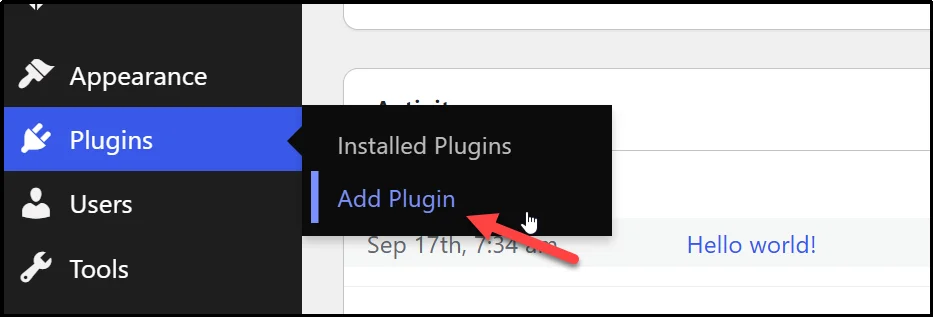
- Go to Plugins → Add Plugin.
- Search for Post SMTP.
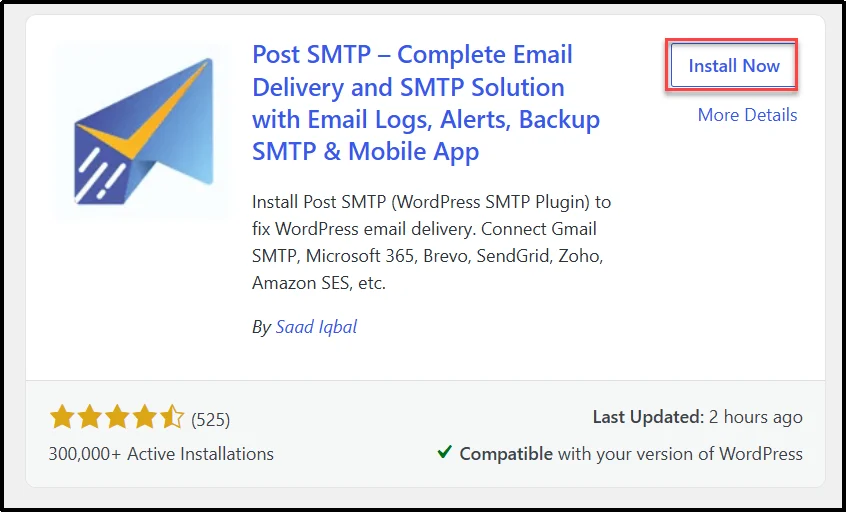
- Click Install Now.
- Click Activate.
That’s it.
Next, configure your mailer.
Step 2: Connect an SMTP or API-Based Mailer and Send a Test Email
WordPress doesn’t provide a default SMTP server.
Instead, you need to connect it to a mail service that can handle outbound messages.
Post SMTP’s setup wizard lets you select a supported mailer and configure its connection.
Follow these steps:
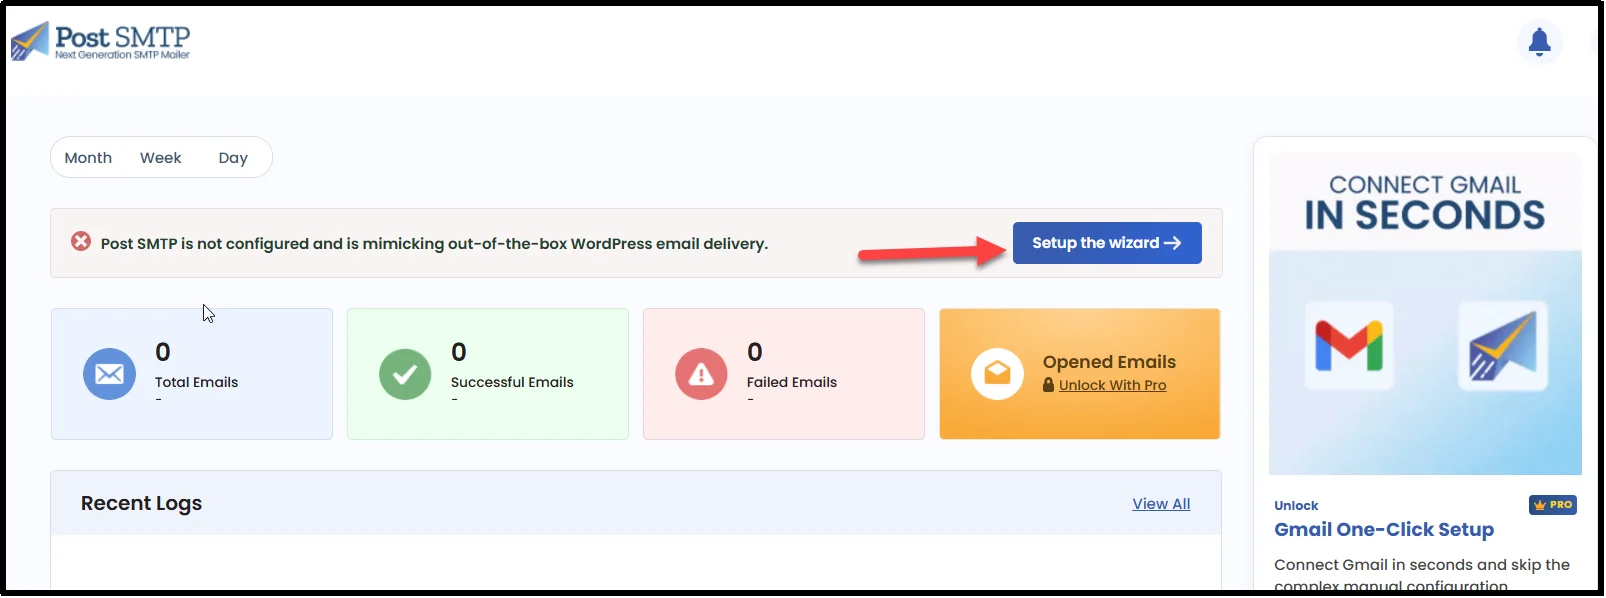
- Open the Post SMTP dashboard.
- Click Setup the wizard.
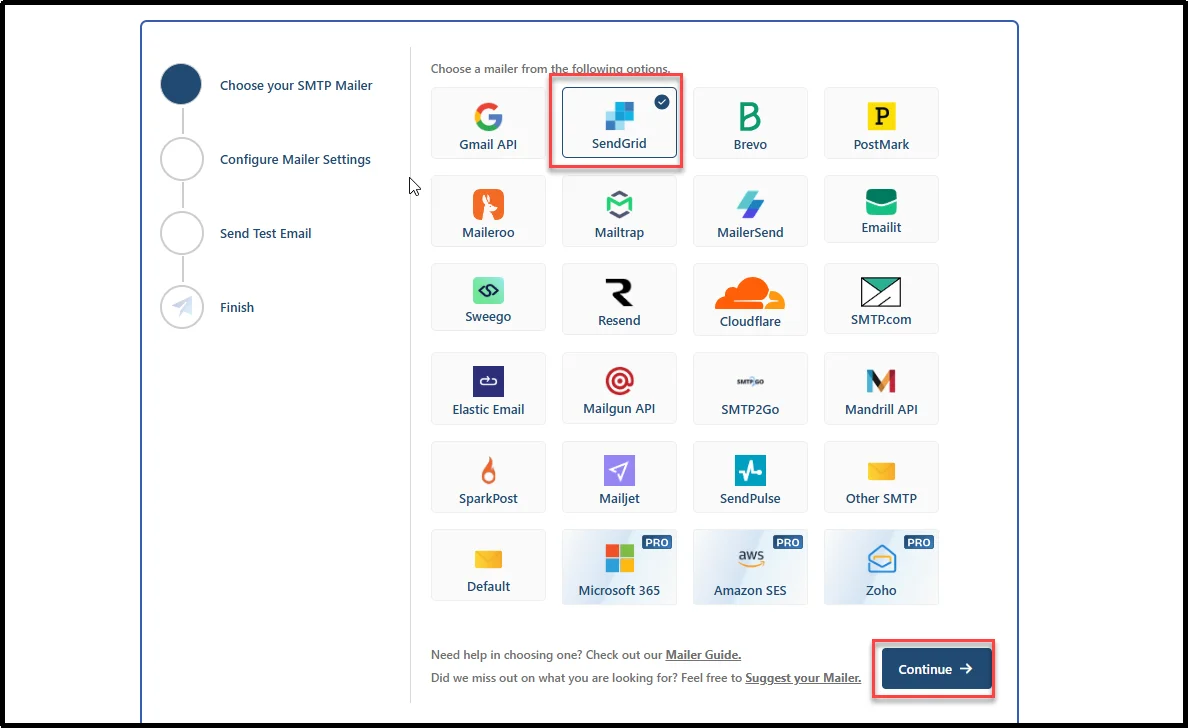
- “Select your preferred mailer and click “Continue.” For this guide, we’re using SendGrid.” If you choose SendGrid, you can follow our SendGrid setup guide
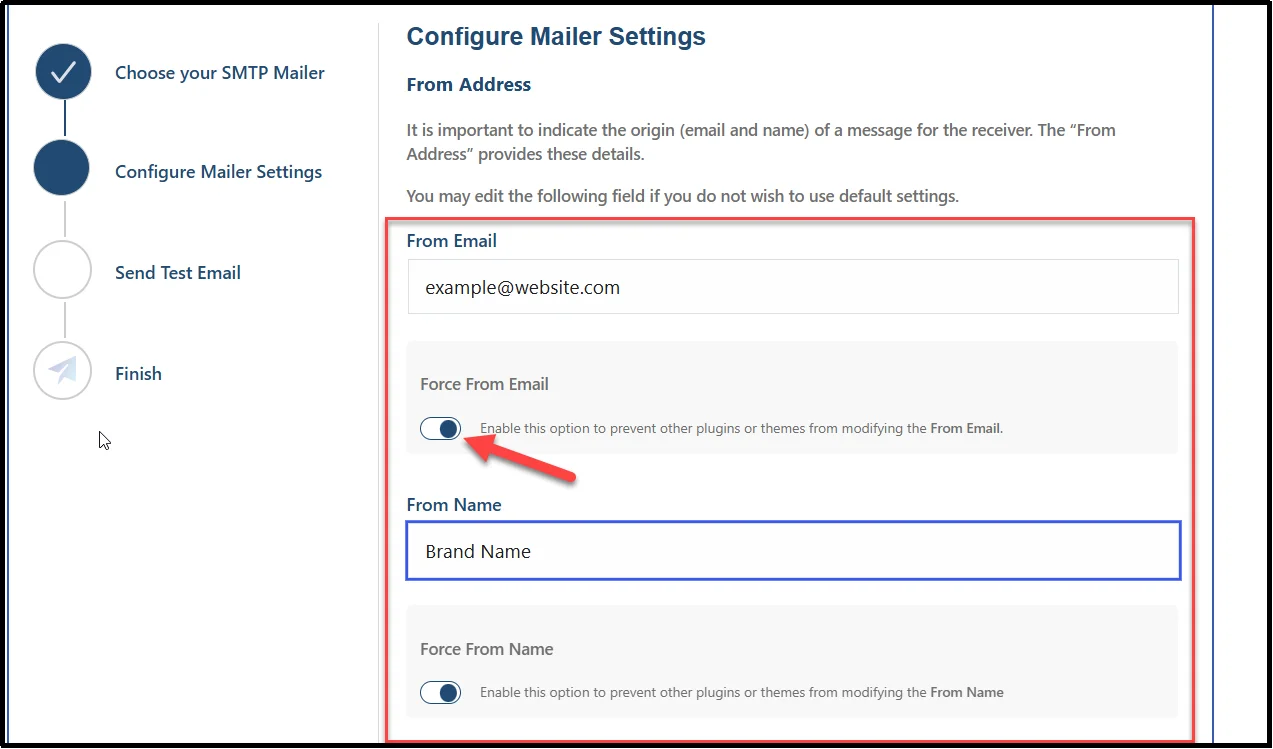
- Enter your From Name and From Email Address. Then, toggle on “Enable this option to prevent other plugins or themes from modifying the From Email.” This keeps your chosen From Email address from being changed by other plugins or themes.
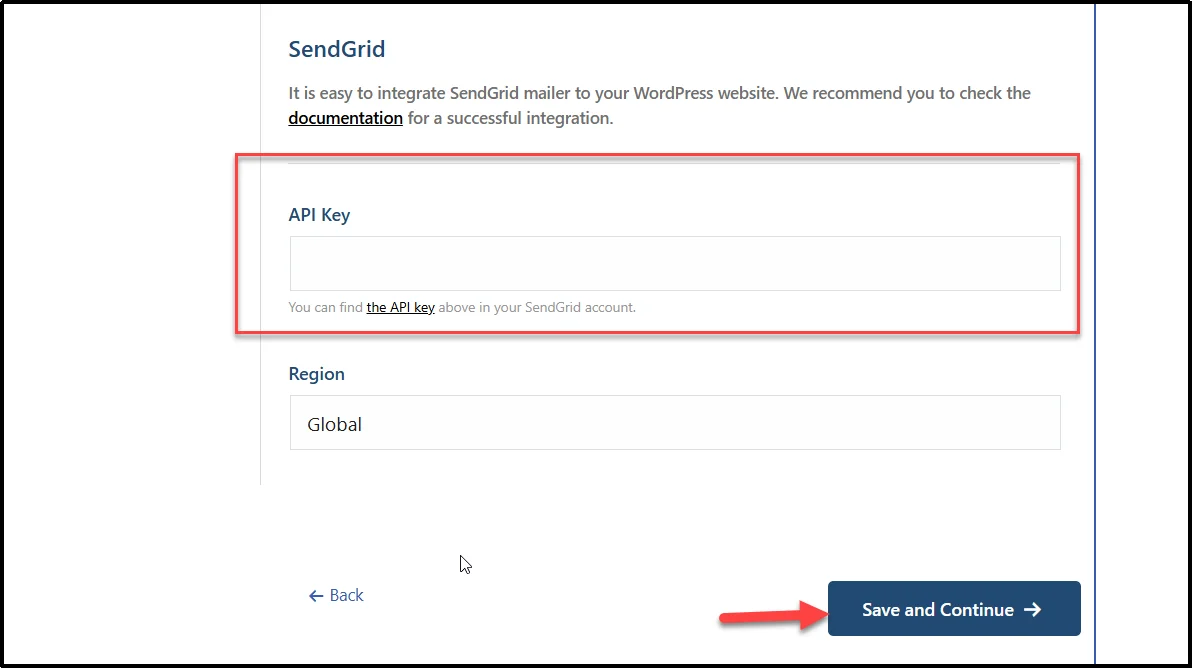
- Enter the required SMTP credentials, API key, or authorize the OAuth connection, depending on the mailer you choose. For SendGrid, you only need an API key, which you can generate from your SendGrid account. Once you’ve entered the required details, click “Save and Continue.”
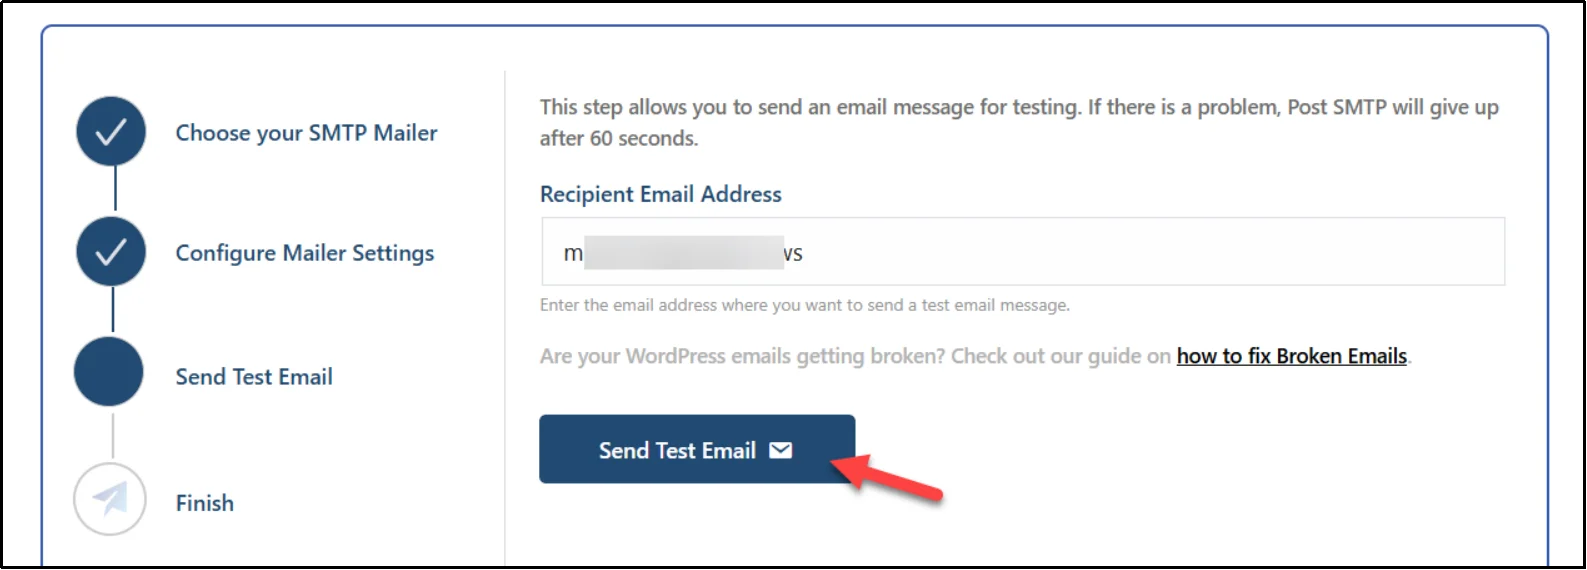
- Enter an email address you can access, then click “Send Test Email.”
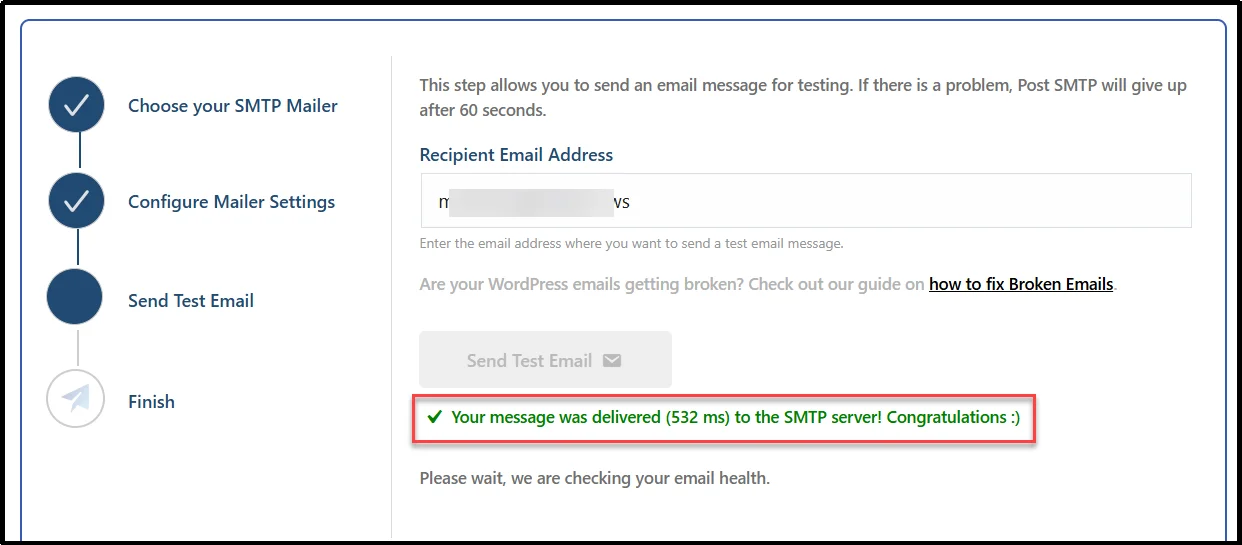
If the test succeeds, Post SMTP will display a success message like the one shown below.
Now WordPress routes your website emails through the configured SMTP mailer rather than relying on the server’s default mail transport.
Which Mailer Should You Use?
There’s no single mailer that fits every WordPress site.
Consider your email volume, provider limits, authentication options, pricing, regional requirements, and whether you need transactional email, marketing email, or both.
For a small site, a standard SMTP connection may be enough.
For a store or busy membership site, an email service built for transactional sending can provide more control and reporting.
Providers such as Amazon SES, SendGrid, Mailgun, Postmark, Brevo, and Gmail can work with WordPress through supported Post SMTP integrations.
Provider limits and pricing can change, so check the current plan and sending requirements before choosing one.
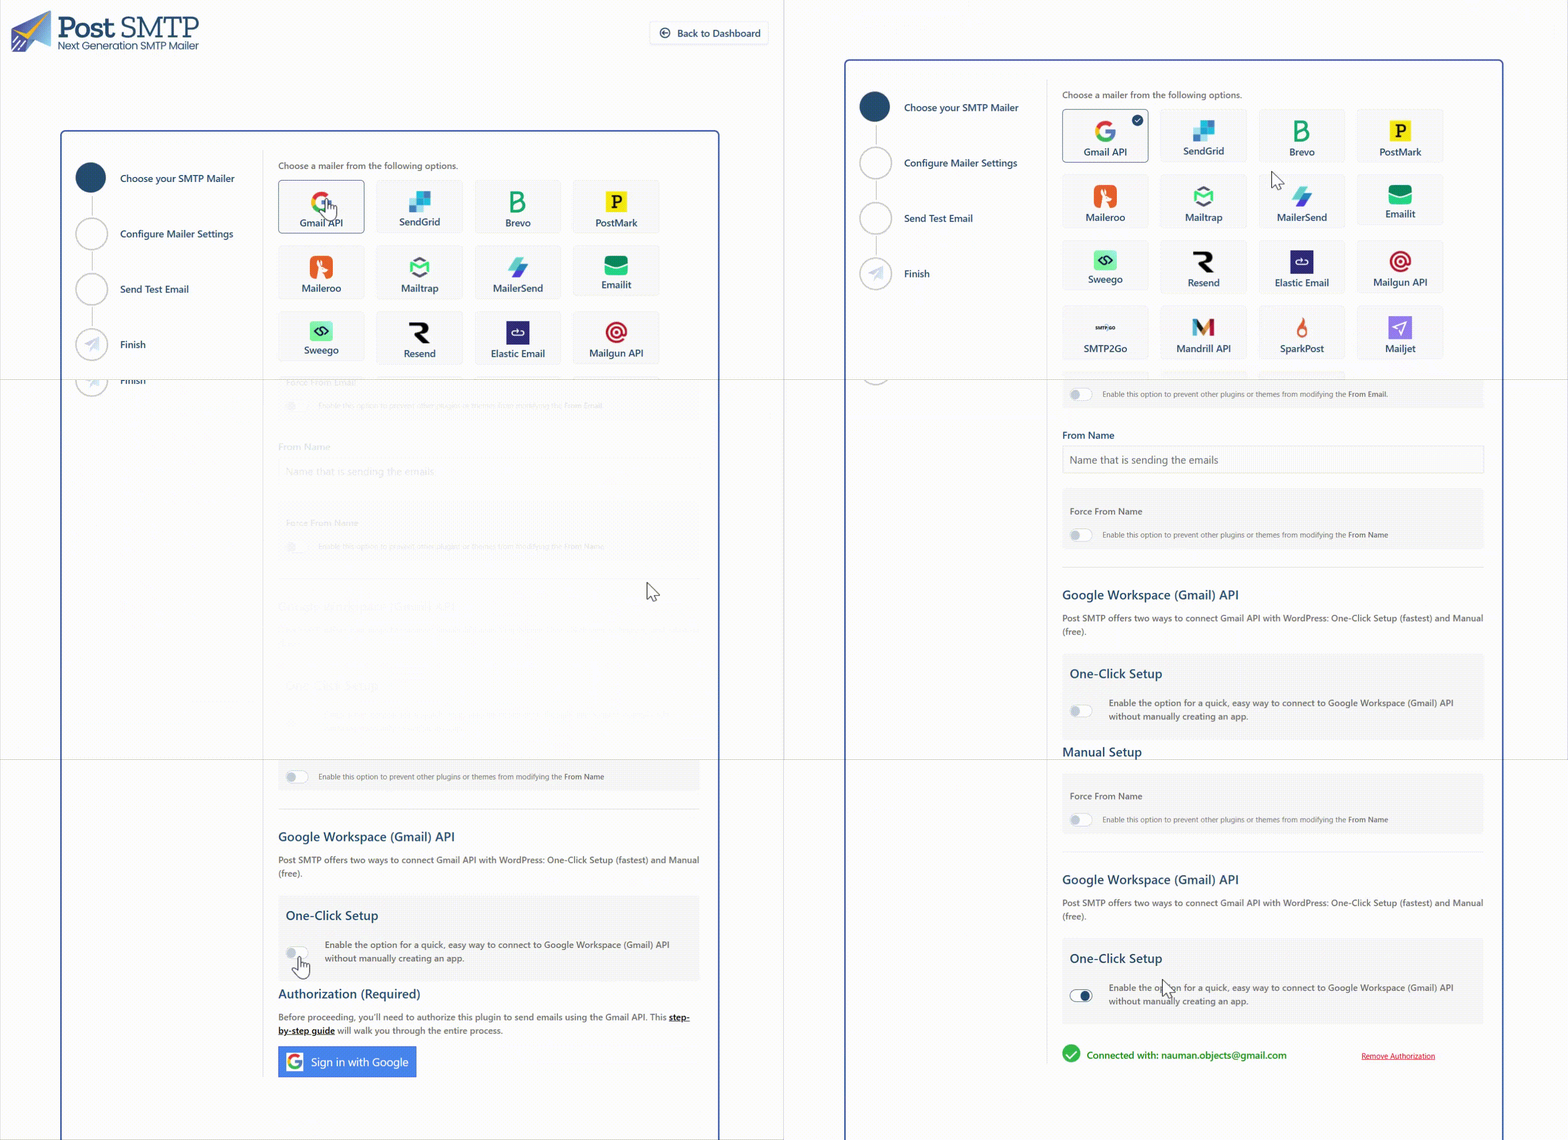
If you’re using Gmail, Post SMTP’s Gmail One-Click Setup makes the connection much easier. You don’t need to create or configure a Google app, deal with complicated OAuth settings, or manually enter API credentials. Simply connect your Gmail account through the guided setup, and Post SMTP handles the rest.
This makes Gmail setup much easier, especially if you’re not familiar with Google Cloud or OAuth configuration.
Need more help?
Check the Post SMTP Gmail documentation for detailed setup instructions.
Step 3: Authenticate Your Sending Domain
Connecting a mailer changes how WordPress sends email, but it doesn’t automatically guarantee inbox placement.
Your sending domain also needs proper authentication.
Set up:
- SPF: Identifies authorized sending servers for your domain.
- DKIM: Adds a cryptographic signature that receiving servers can verify.
- DMARC: Defines how receiving systems should handle messages that fail SPF or DKIM authentication and can provide authentication reports.
Google recommends that senders configure SPF, DKIM, and DMARC for their domains; Gmail requires at least SPF or DKIM for all senders, while bulk senders need SPF, DKIM, and DMARC.
To configure your records:
- Open your DNS provider.
- Find the DNS settings for your sending domain.
- Add the SPF, DKIM, and DMARC records supplied by your email provider.
- Wait for the DNS changes to propagate.
- Check the records again.
You can also use Post SMTP’s domain health checker to review your domain’s email authentication status.
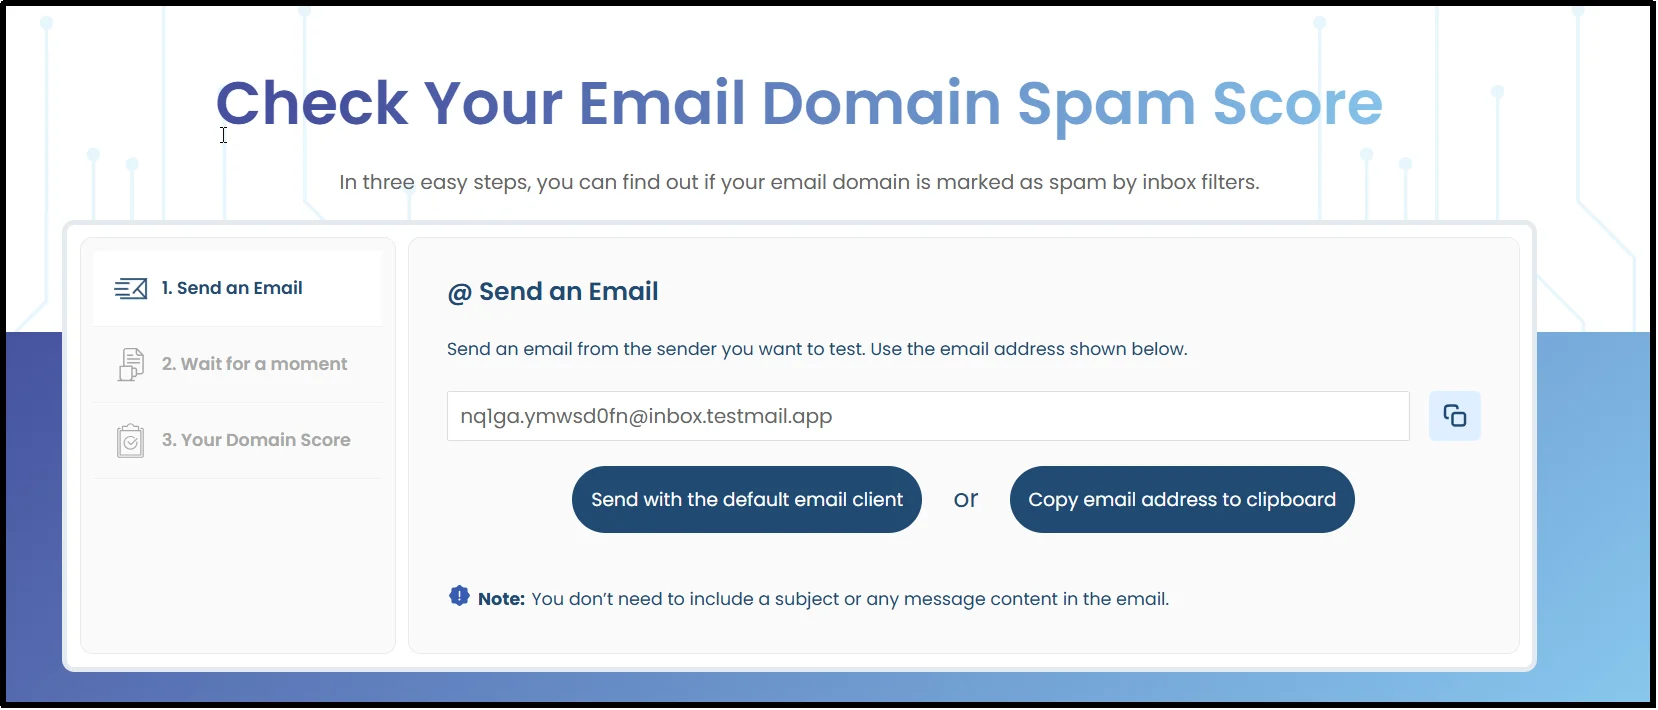
For Gmail, authentication matters even more as sender requirements continue to apply to messages sent to personal Gmail accounts.
If you send large volumes, Google also requires additional measures such as DMARC, TLS, and proper From-domain alignment.
Step 4: Configure Your From Address
Your From address should use a domain you control.
Don’t use the visitor’s address.
Don’t use a random free mailbox as the sender for your website’s transactional messages.
Instead, create an address such as:
notifications@example.com
or:
support@example.com
Then configure your WordPress mailer to use that address.
For DMARC alignment, the domain in the From address needs to align with an authenticated SPF or DKIM domain under the applicable DMARC rules. Google also requires From-domain alignment with SPF or DKIM for bulk senders sending directly to personal Gmail accounts.
You can also configure the sender name.
For example:
From Name: Your Store
From Email: notifications@example.com
If you use Post SMTP, you can enable Force From Email when you want the configured sender address to remain consistent even when another plugin or theme attempts to set a different one.
Go to Post SMTP → Settings → Message and configure the From Name and From Email settings.
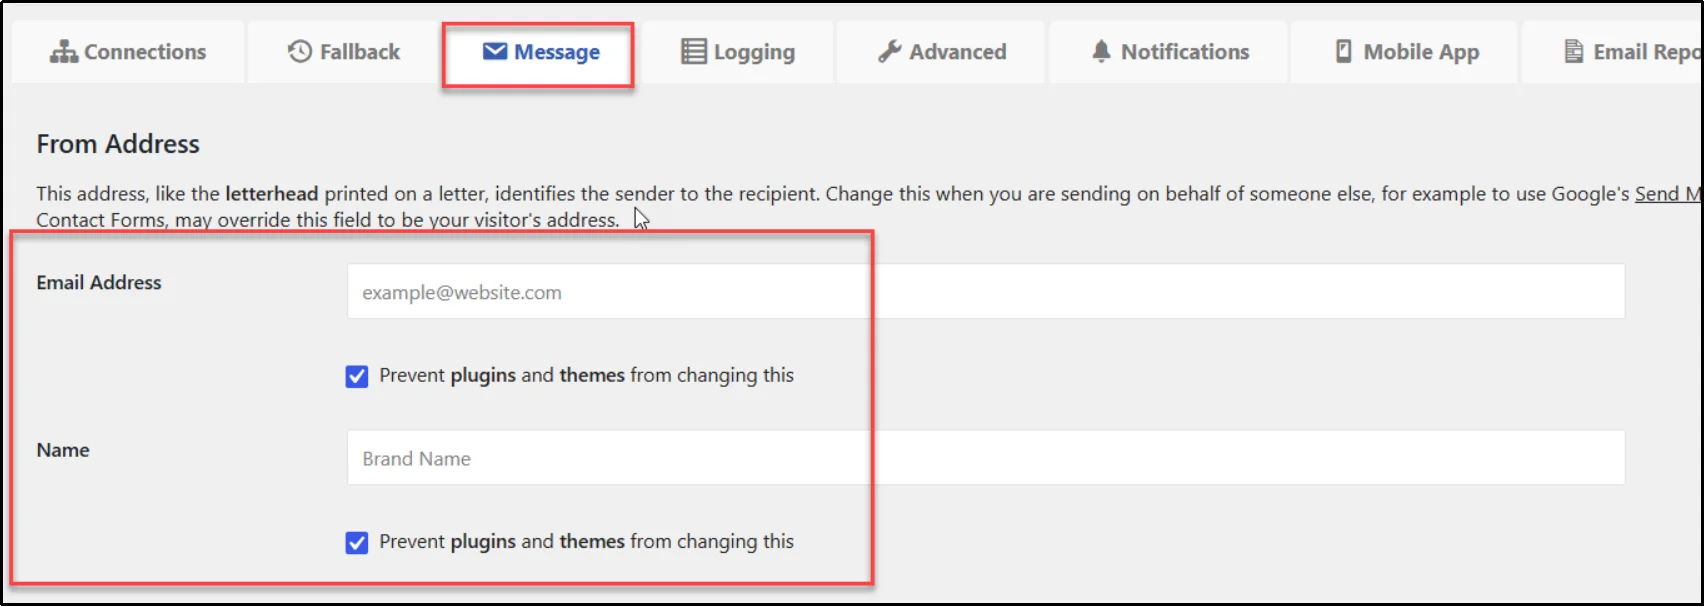
If you use the option to prevent plugins and themes from changing these values, check that your forms, WooCommerce notifications, and other applications still use the sender address you expect.
Step 5: Test and Monitor Email Delivery
A working mailer today doesn’t guarantee that everything will keep working next month.
API credentials can expire. DNS records can change. Providers can experience outages. Hosting settings can change without you touching WordPress.
So, test the setup again after you’ve finished configuring it.
- Send another test email. This confirms that your new mailer, authentication, and sender settings work together.
- Check the recipient inbox and spam folder. A successful sending result doesn’t guarantee final inbox placement.
- Review the Email Log. Inspect the messages processed through your configured mailer, their status, and any available error information.
- Check your mailer’s dashboard. Provider-side logs can show bounces, rejections, delays, or other responses that WordPress can’t see.
- Enable email reporting. Use reporting tools to spot changes in sending activity.
In Post SMTP, go to Post SMTP → Email Log to review your site’s email activity.

You can inspect failed messages and available error details, and supported configurations allow you to resend them.
Learn more in our guide to setting up WordPress email logs.
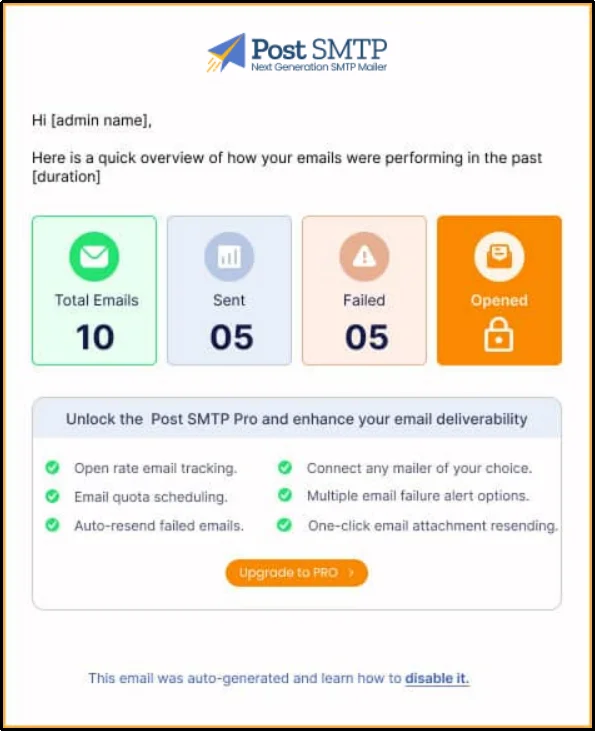
Post SMTP also provides Email Health Report for monitoring email activity.
How to Troubleshoot WordPress Email Delivery
Still stuck?
Work through these checks to fix WordPress email delivery issues.
1. Check the Email Log
Start with the message itself.
Look for:
- Sending status
- Error messages
- Mailer response
- Recipient address
- From address
- Timestamp
- Mailer used for the message
The exact error often tells you where to look next.
2. Run a Connectivity Test
Use the Post SMTP Connectivity Test to check whether your WordPress server can reach the configured mail service.
This helps rule out:
- Incorrect hostname
- Wrong SMTP port
- TLS or SSL mismatch
- Firewall restrictions
- Hosting restrictions
- Invalid credentials
3. Run a Diagnostic Test
Use Post SMTP’s Diagnostic Test to review your WordPress configuration and server environment.
The test can help identify common configuration problems, including an incomplete mailer setup or restrictions that prevent outbound email.
4. Check SPF, DKIM, and DMARC
If WordPress processes the message but the recipient doesn’t receive it, check your domain authentication.
Look for:
- Missing SPF records
- Incorrect SPF entries
- Missing DKIM records
- Invalid DKIM configuration
- Missing DMARC records
- DMARC alignment problems
Don’t keep changing SMTP settings when the actual problem sits in DNS.
5. Review the Exact Mailer Error
The error returned by your provider can point directly to the problem.
Copy the full error before changing anything.
That small habit can save a lot of time.
Common WordPress SMTP and Email Delivery Errors
Here are several errors you may encounter while troubleshooting.
SMTP Authentication Failed
Check the authentication method required by your mailer.
Depending on the provider, you may need an API key, OAuth authorization, username and password, or another provider-specific credential.
If the credential expired, regenerate it in the provider’s dashboard and reconnect the mailer.
Connection Timed Out
Your server may not be able to reach the SMTP service.
Check the hostname and port first.
Port 587 commonly supports authenticated SMTP submission with TLS, while port 25 often handles server-to-server SMTP and may be restricted by hosting providers. Always use the port and encryption method specified by your mail provider.
Mailer Account Not Activated
Some providers require account, domain, or sender verification before they allow outbound email.
Open your provider dashboard.
Check for pending verification steps.
Email Shows as Sent but Never Arrives
This usually means you need to investigate the delivery stage rather than WordPress itself.
Check:
- Spam and junk folders
- Provider-side logs
- SPF
- DKIM
- DMARC
- From-domain alignment
- Sender reputation
- Recipient-side filtering
A successful wp_mail() result doesn’t prove that the recipient received the message.
From Address Rejected
Use an address from a domain you control.
Then configure the authentication records required by your mail provider.
If the provider requires domain verification, complete that step before testing again.
Still Not Receiving Contact Form Emails?
If your site’s other emails work but one contact form doesn’t send notifications, check that form plugin before changing your SMTP configuration.
Start here:
- Confirm that the form notification is enabled.
- Confirm that the notification uses the correct To address.
- Check the From address.
- Use a domain-matched From address.
- Put the visitor’s address in Reply-To instead of From.
- Check the form plugin’s own mail settings.
- Submit the form again.
- Look for the message in the Post SMTP Email Log.
Some plugins can set their own From address or notification settings, so site-wide SMTP configuration doesn’t automatically fix every form configuration problem.
These checks apply to popular WordPress form plugins such as Contact Form 7, WPForms, Gravity Forms, Formidable Forms, and Jetpack.
Still Having Problems With WooCommerce Emails?
WooCommerce sends several transactional messages, including order confirmations, customer notifications, account emails, and password-related messages.
If one doesn’t arrive, check the WooCommerce email settings first.
Then inspect the Post SMTP Email Log.
If the message never appears in the log, investigate whether WooCommerce triggered the email at all.
If the message appears but fails, inspect the mailer error.
If the message succeeds but never reaches the customer, investigate authentication, provider responses, spam filtering, and sender reputation.
This approach saves time because it separates a WooCommerce configuration problem from an email delivery problem.
How to Prevent Future WordPress Email Failures
Fixing the current problem is only half the job.
You also want to know when something breaks later.
Use Post SMTP Email Logs
Email logs give you a record of messages processed through your configured mailer.
When a customer says, “I never received my order email,” you can check the log instead of guessing.
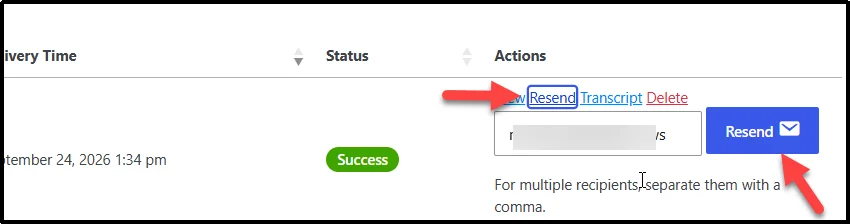
You can diagnose errors and even resend failed emails directly from the Post SMTP Email Logs Screen.
That’s useful.
Enable Failure Alerts
Failure alerts notify you when your site’s email system encounters a problem. This lets you investigate the issue before a missed password reset or order notification turns into a support ticket.
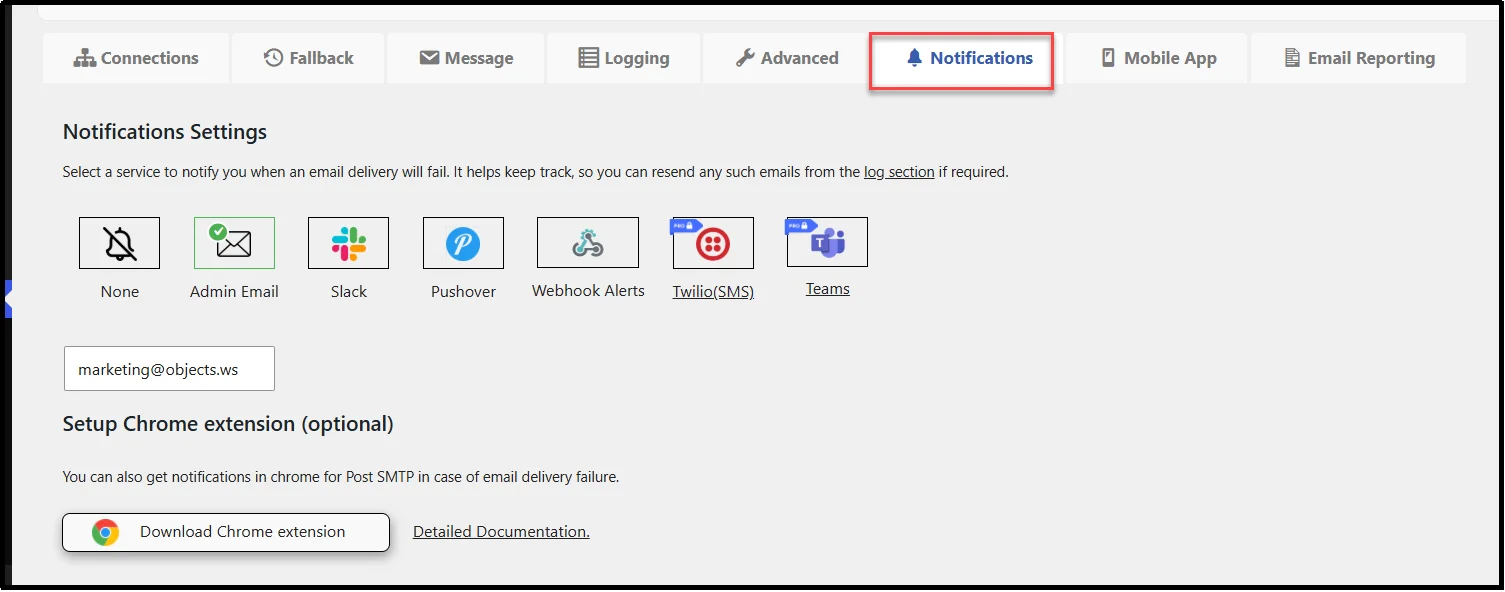
To set up email failure alerts, go to Post SMTP → Settings → Notifications.
By default, Post SMTP sends failure notifications to the Admin Email. However, you can choose from several other notification options, including Slack, Pushover, Webhook Alerts, Twilio (SMS), Microsoft Teams, Chrome Extension, and the dedicated Post SMTP Mobile App.
Configure a Fallback Mailer
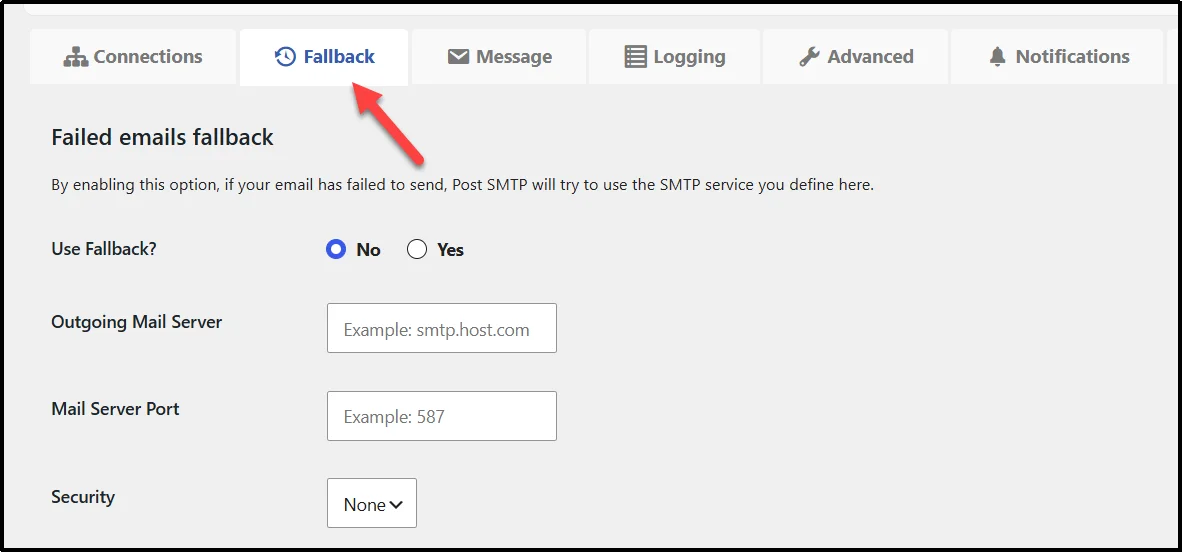
A fallback or secondary mailer can provide another delivery path when your primary mailer fails, depending on your configuration and the type of failure.
In Post SMTP, you can configure a fallback connection under the fallback settings.
Choose the secondary SMTP server, port, security method, sender address, and authentication details required by that provider.
Then test the fallback configuration before you depend on it.
Monitor Domain Authentication
DNS changes can break email authentication without changing anything inside WordPress.
Check your SPF, DKIM, and DMARC records after major DNS changes.
For high-volume Gmail sending, Google also provides Postmaster Tools to monitor sender compliance and other email-related metrics.
Reset Post SMTP as a Last Resort
Don’t reset the plugin just because an email test failed. First, check your credentials, mailer configuration, DNS records, connectivity, and server restrictions.
If you’ve verified these settings and Post SMTP still behaves unexpectedly, resetting the plugin can give you a clean starting point.
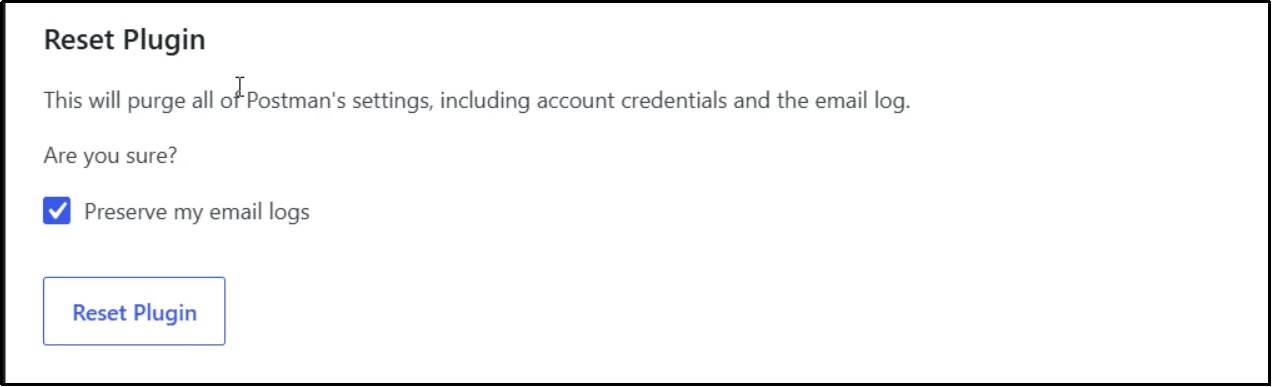
Keep in mind that resetting the plugin can remove your existing configuration. Before resetting it, record or export your current settings so you can restore the connection if needed.
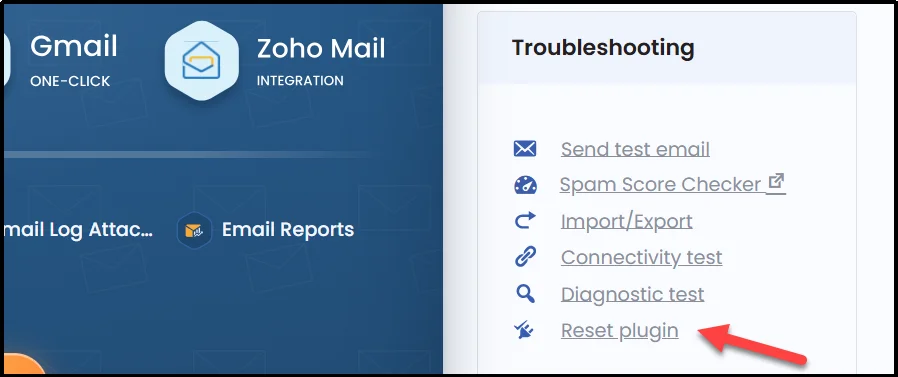
To reset Post SMTP, go to Post SMTP → Dashboard and click Reset Plugin under the Troubleshooting section.
On the next page, scroll down and click “Reset Plugin.” Make sure “Preserve my email logs” is checked if you want to keep your existing email logs.
Fix WordPress Not Sending Emails Issue Before It Costs You
When WordPress stops sending emails, don’t change settings at random. First, identify where the problem occurs. Check whether WordPress processes the message, whether your mailer accepts it, and whether the recipient’s provider delivers or filters it.
Configuring an SMTP or API-based mailer can give your WordPress site a more reliable way to send emails. You should also authenticate your sending domain with the appropriate SPF, DKIM, and DMARC records and use a From address that aligns with your authenticated domain.
Once everything works, keep monitoring it. Test your email setup, review your email logs, watch for mailer errors, and enable failure alerts so you can spot problems when they occur.
Post SMTP brings these tools together in your WordPress dashboard. You can connect 20+ SMTP mailers, send test emails, review email logs, troubleshoot delivery errors, configure a fallback mailer, and monitor your site’s email activity from one place.
If you need advanced email delivery and monitoring features, explore Post SMTP Pro and choose the plan that fits your site.
Frequently Asked Questions
Why is my WordPress email not sending?
WordPress emails can fail at several points. The server’s PHP mail configuration, SMTP credentials, hosting restrictions, application settings, authentication failures, or recipient-side filtering can all cause problems. Start with a test email to determine whether WordPress fails to send the message or whether delivery fails afterward.
How do I test if WordPress is sending emails?
Use Post SMTP’s test email feature to send a message to an address you control. Then check both the inbox and spam folder.
A successful test shows that WordPress and the configured mailer processed the message without returning an immediate error. It doesn’t guarantee that the recipient’s mailbox accepted or displayed the message.
How do I fix email not sending in WordPress?
First, identify where the failure occurs. Then configure an authenticated SMTP mailer using Post SMTP, verify your sending domain with SPF, DKIM, and DMARC where appropriate, correct any From-address problems, and monitor your email logs for future failures.
Why are my WordPress emails going to spam?
Common causes include missing or failing authentication, poor sender reputation, a mismatched From address, sending patterns, message content, recipient engagement, and recipient-side filtering.
Start by checking SPF, DKIM, and DMARC.
Then review your mailer’s response and sender reputation.
Do I need SMTP to send WordPress emails?
No. WordPress can send emails through its default wp_mail() function, which uses PHPMailer. However, this method depends on your hosting server’s mail configuration and may not provide reliable email delivery.
Using an SMTP mailer gives you more control over how WordPress sends emails. With Post SMTP, you can connect your site to a supported mailer, test the connection, view email logs, troubleshoot errors, and monitor your email activity.
Can I use Gmail as SMTP for WordPress?
Yes. For supported Gmail integrations, OAuth 2.0 lets WordPress authenticate with Google without storing your regular Gmail account password in the WordPress database.
Google also applies specific sender requirements to email sent to personal Gmail accounts, so follow Google’s current authentication and sending guidelines when configuring your domain.
What is the default SMTP for WordPress?
WordPress doesn’t provide a default SMTP server. WordPress uses wp_mail(), which relies on PHPMailer and, by default, PHP’s mail() transport. You can configure WordPress to use an SMTP server instead.
How do I send WordPress emails on localhost with SMTP?
Configure your WordPress SMTP plugin, like Post SMTP, with the credentials or OAuth connection provided by your email service.
Your local WordPress environment doesn’t need to run its own mail server when an external SMTP provider handles outbound email.
Does SMTP guarantee WordPress email delivery?
No. SMTP changes the way your site hands email to a mail server, but it doesn’t guarantee inbox placement. Authentication, sender reputation, provider policies, message content, recipient filtering, and other factors can affect whether the recipient receives the message.
What SMTP port should I use for WordPress?
Use the port specified by your email provider. Port 587 commonly supports authenticated SMTP submission with TLS, while port 25 often serves server-to-server SMTP traffic and may face hosting restrictions. Your provider’s documentation should determine the exact port and encryption settings.