
 OpenAI
 Perplexity
If you encounter the “DMARC record is not found” error, it means your domain lacks a vital DNS TXT record designed to safeguard your email against phishing and spoofing attacks.
A missing DMARC policy exposes your domain to unauthorized use, enabling malicious actors to send fraudulent emails on your behalf. This can result in phishing scams, spoofing attempts, and significant damage to your brand’s reputation.
Additionally, email providers often flag or reject emails from domains without a DMARC setup, causing a decline in your email deliverability.
But don’t worry—this article explains what a DMARC record is, how it works, why it’s essential, and how to resolve the “DMARC Record Is Not Found” error with a straightforward step-by-step guide.
Let’s dive in!
What is a DMARC Record, and How Does it Work?
A DMARC record is a DNS (Domain Name System) record that works with email authentication protocols like SPF (Sender Policy Framework) and DKIM (DomainKeys Identified Mail) to protect your email domain from being exploited by cybercriminals.
With DMARC, you define policies that instruct email servers on how to handle messages that fail SPF and DKIM authentication checks. This process ensures that only authorized emails from your domain are delivered to recipients.
When an email is sent from your domain, the recipient’s server verifies its authenticity by checking your SPF and DKIM records. SPF confirms the email originated from an authorized server, while DKIM validates the integrity of the message with a digital signature.
If either check fails, the DMARC policy is applied. You can configure the policy to perform one of three actions:
- None: The email is delivered as usual, but authentication failures are reported.
- Quarantine: Emails failing authentication are sent to the recipient’s spam folder.
- Reject: Unauthorized emails are blocked entirely from reaching the recipient.

DMARC also offers valuable reporting capabilities. By specifying an email address for reports (using the ‘rua’ tag in your DMARC record), you can track which messages pass or fail authentication checks. These reports provide insights into potential phishing or spoofing attempts targeting your domain.
Example of a DMARC Record
A DMARC record consists of various components that determine how email servers handle messages that fail authentication checks. Below is an example of a typical DMARC record:
v=DMARC1; p=reject; rua=mailto:dmarc_reports@example.com; ruf=mailto:forensic_reports@example.com; pct=100
Let’s break down each element:
- v=DMARC1: This specifies the version of the DMARC protocol being used. The value is always set to DMARC1 to indicate compliance with the current DMARC standard.
- p=reject: This is the policy tag, which defines how to handle emails that fail both SPF and DKIM checks. In this case, “reject” blocks such emails entirely. Other options include “none” (just monitor) and “quarantine” (send failed emails to the spam folder).
- rua=mailto: This tag designates the email address for receiving aggregate DMARC reports. These reports summarize the results of SPF, DKIM, and DMARC checks, providing insight into the overall email authentication status of your domain.
- ruf=mailto: This specifies the email address for receiving forensic reports, which offer detailed information about individual emails that failed authentication. These reports may include the sender’s IP address, subject line, and more. Forensic reports are less common and may be subject to privacy regulations in certain regions.
- pct=100: This defines the percentage of emails to which the DMARC policy applies. A value of 100 applies the policy to all emails, while lower values allow for gradual implementation.
Here’s a simplified example of a DMARC record for monitoring purposes:
v=DMARC1; p=none; rua=mailto:reports@example.com
This configuration only monitors emails that fail authentication without enforcing any action, making it a good starting point for domains new to DMARC implementation.
Further Tags for Customization
- sp: Defines a separate policy for subdomains. For instance, using “sp=reject” enforces a stricter policy for subdomains.
- fo: Specifies the conditions for generating forensic reports.
DMARC records provide flexibility, allowing you to adapt your email security setup to the specific needs of your domain. By leveraging DMARC effectively, you can protect your domain from spoofing and unauthorized use.
Why Should You Configure a DMARC Policy?
You don’t want your email domain to remain vulnerable to cybercriminal activities like phishing and spoofing. Configuring a DMARC policy helps protect your domain by preventing unauthorized use.
Email spoofing occurs when attackers send emails using your domain to trick recipients into believing they are legitimate. This often leads to phishing attacks where sensitive information is stolen. Even if you have SPF and DKIM set up, DMARC is the protocol that connects them and enforces rules for handling emails that fail authentication.
DMARC’s Key Benefits:
- Protects Brand Reputation: Spoofed emails damage your brand’s reputation. When customers receive phishing emails appearing to be from your domain, it erodes their trust in your business.
- Improves Email Deliverability: Many email service providers, such as Google, Amazon SES, and Zoho, are more likely to reject or flag emails as spam when a domain lacks a DMARC policy. With DMARC, your legitimate emails are more likely to land in inboxes.
- Prevents Phishing Attacks: DMARC reduces the risk of cybercriminals sending fraudulent emails that appear to come from your domain.
DMARC offers robust email protection by ensuring that only legitimate emails from your domain are delivered to recipients.
Requirements to fix the “DMARC Record Is Not Found”
To fix the “DMARC Record Is Not Found” issue, you need to meet a few key requirements before proceeding with the configuration, such as:
- Access to DNS Settings: You need administrative access to your domain’s DNS settings through your domain registrar or hosting provider. This access allows you to add or modify your DMARC record.
- SPF and DKIM Records: DMARC relies on SPF and DKIM to function effectively. Make sure you have these records set up for your domain. If they are not configured, you must create them before implementing DMARC.
Once you fulfill these requirements, you can move forward with resolving the “DMARC Record Is Not Found” error.
What is an SPF Record?
SPF, or Sender Policy Framework, is a DNS TXT record that specifies which mail servers are authorized to send emails on behalf of your domain. Its primary purpose is to prevent email spoofing by verifying that emails claiming to come from your domain are sent through legitimate servers.
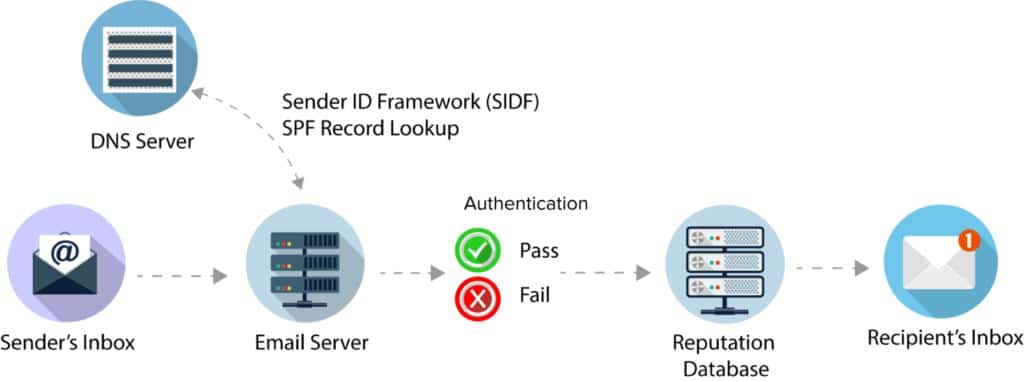
When an email is sent from your domain, the receiving server checks the SPF record to confirm that the email originates from an authorized IP address. If the IP address is not included in the SPF record, the email fails authentication.
How to Configure an SPF Record?
Configuring an SPF record involves adding a TXT record to your domain’s DNS settings. Follow these steps to set it up:
NOTE: The following process is not specific to any DNS provider dashboard, if you need any assistance with the configuration, feel free to contact us or your DNS provider.
- Log in to Your Domain Registrar’s Control Panel: Access the DNS management section where you can edit or add DNS records.
- Create a New TXT Record: In the DNS settings, add a new TXT record. This is where you will define your SPF rule.
- Format Your SPF Record: Structure the SPF record to include the authorized IP addresses or servers allowed to send emails on behalf of your domain. For example:
⇒ v=spf1 include:example.com -all
⇒ v=spf1: Identifies the SPF version being used.
⇒ include:example.com: Specifies the authorized sending servers or IPs.
⇒ -all: Denotes that any server not listed is unauthorized to send emails on your behalf.
- Save the Record: After creating the TXT record, save the changes in your DNS settings.
- Wait for Propagation: DNS changes may take up to 48 hours to propagate across the internet.
Note: If your domain already has multiple SPF records, you need to combine them into a single record to avoid configuration errors. For further assistance, consult your DNS provider or refer to our detailed guide on merging multiple SPF records into a single one.
If you have completed these steps, you are very close to resolving the “DMARC Record Is Not Found” issue.
What is a DKIM Record?
DKIM (DomainKeys Identified Mail) is an essential element of email authentication. It adds a digital signature to the header of each outgoing email, allowing the receiving server to confirm that the email is legitimate and hasn’t been modified during transit.
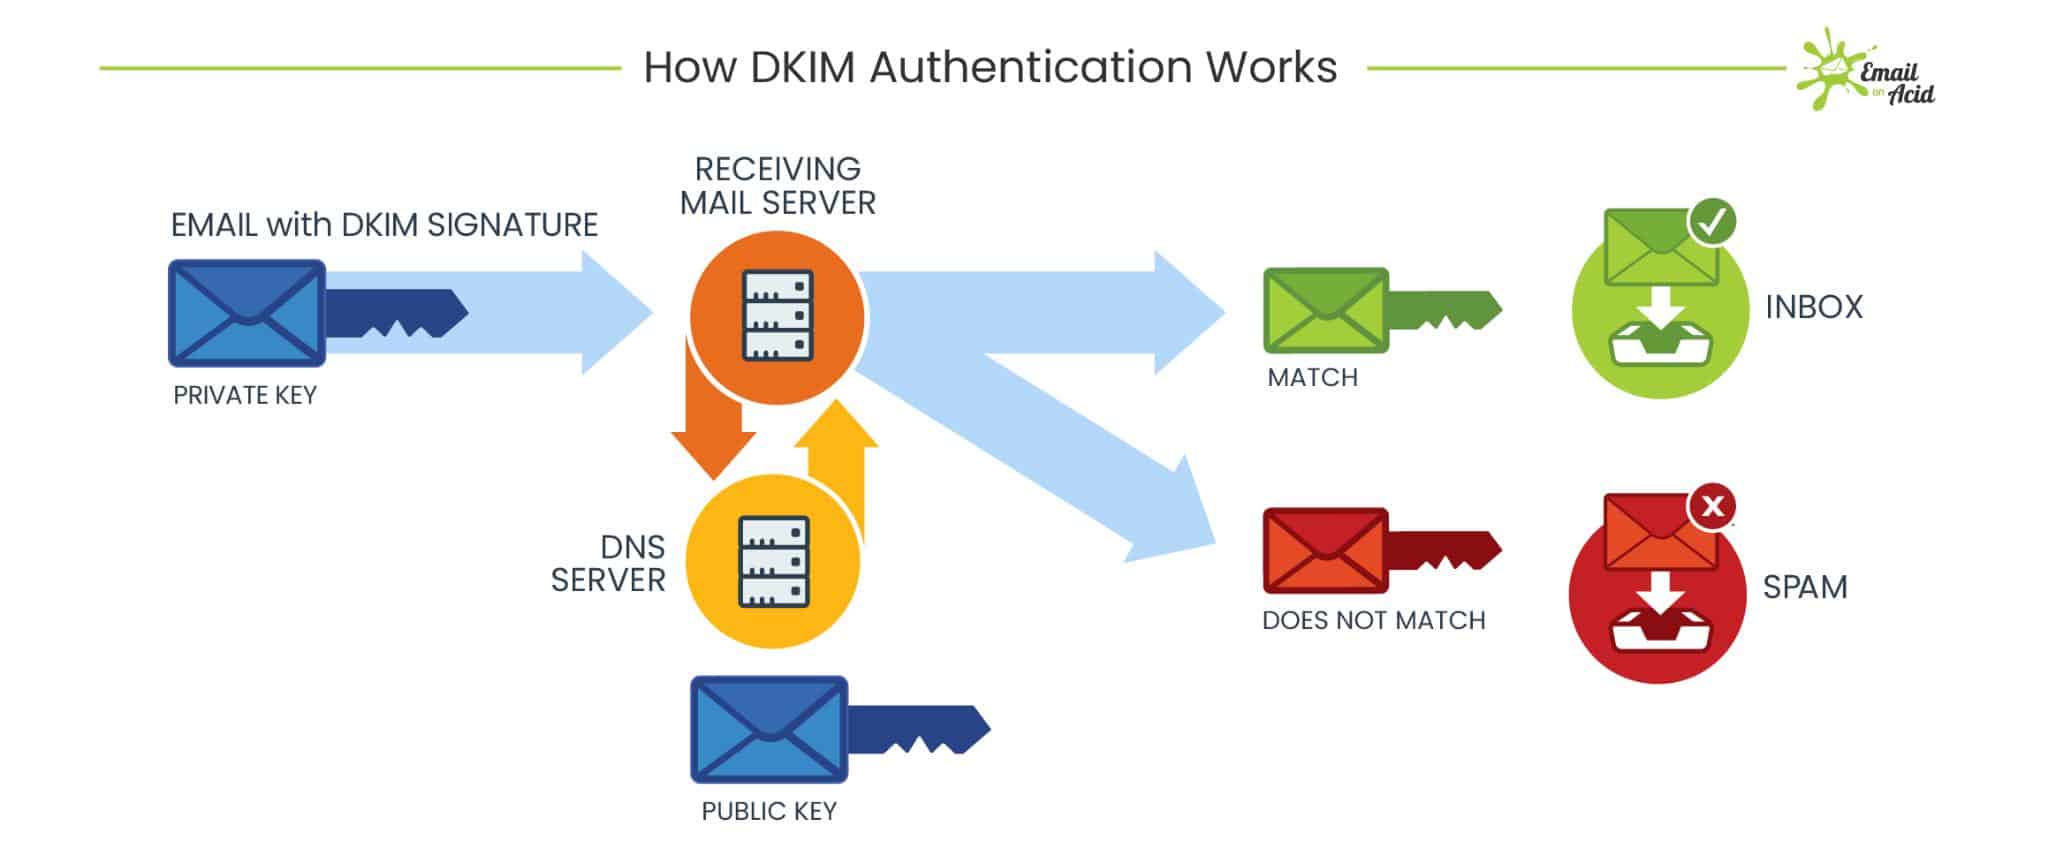
When you configure DKIM for your domain, each outgoing email is signed using a private cryptographic key. The recipient’s server then retrieves the corresponding public key from your domain’s DNS to validate the email.
If the signature matches, the email is verified as authentic and untampered. If it doesn’t match, the email may be flagged or rejected.
How to Set Up a DKIM Record
Follow these steps to add a DKIM record for your domain:
- Generate a DKIM Key: Use your email service provider’s tools to generate a DKIM key pair, which includes a private key and a public key. Many providers, such as Google Workspace and Microsoft 365, offer built-in options for this.
- Access Your Domain’s DNS Settings: Log in to your domain registrar or hosting provider’s control panel and navigate to the DNS management section.
- Add a TXT Record for DKIM: Create a new TXT record in your DNS settings. Use the following format for the Host or Name field:
default._domainkey.yourdomain.com
Replace yourdomain.com with your actual domain name.
- Insert Your Public Key
In the Value or Data field of the TXT record, paste the public key provided by your email service provider. A sample public key may look like this:
v=DKIM1; k=rsa; p=MIGfMA0GCSqGSIb3DQEBA…
- Save and Apply Changes: Save the TXT record to your DNS settings and wait for the changes to propagate, which may take up to 48 hours.
- Activate DKIM Signing in Your Email Platform: Access your email service provider’s settings and enable DKIM signing for outgoing emails. Refer to their documentation for specific instructions.
By completing these steps, you will have successfully configured a DKIM record for your domain.
Step-by-Step Guide to Fix the “DMARC Record Is Not Found” Issue
Once you have your SPF and DKIM records set up, you are ready to fix the “DMARC Record Missing” issue by creating and adding a DMARC policy. Follow these five easy steps to address the error:
NOTE: If you are using the “AWS Route 53” for DNS, then follow our step-by-step guide on How to Add a DMARC Record on AWS Route 53. Also, for Microsoft 365, check out this guide on How to Set Up DMARC in Office 365 [3 Easy Ways].
#1: Access Your Domain Registrar’s DNS Settings
Start by logging into the control panel of your domain registrar (such as GoDaddy, Namecheap, or Bluehost). Navigate to the DNS management section, where you can add or edit DNS records. This is where you’ll configure the DMARC record for your domain.
#2: Generate Your DMARC Record
In your DNS management dashboard, create a new TXT record. The host or name field for the DMARC record should be set as:
_dmarc.yourdomain.com
Replace yourdomain.com with your actual domain name. The value of this TXT record will define your DMARC policy. A basic example might look like this:
v=DMARC1; p=none; rua=mailto:dmarc_reports@yourdomain.com
This will monitor email authentication failures and send reports to the specified email address.
Also, as we discussed earlier in the guide, you can add additional tags.
#3: Decide On DMARC Policy
You will need to define how your domain handles emails that fail authentication. There are three options for your DMARC policy:
- None (p=none): No action is taken, and only reports are generated.
- Quarantine (p=quarantine): Emails that fail authentication are sent to the spam folder.
- Reject (p=reject): Emails that fail authentication are blocked.
For a gradual rollout, start with “none” to monitor the authentication failures before enforcing a stricter policy like “quarantine” or “reject.”
#4: Set Up Reporting
DMARC allows you to receive two types of reports:
- Aggregate reports (rua): These provide an overview of all email authentication results.
- Forensic reports (ruf): These offer detailed information on individual email failures.
To receive these reports, add the following tags to your DMARC record:
rua=mailto:dmarc_aggregate@yourdomain.com; ruf=mailto:dmarc_forensic@yourdomain.com
These reports will help you analyze the effectiveness of your DMARC policy.
#5: Save The Changes and Monitor Your Email Reports
Once your DMARC record is configured, save the changes in your DNS settings. Allow up to 48 hours for the changes to propagate. Afterward, you’ll start receiving the reports. Regularly monitor these reports to ensure that your DMARC policy is functioning correctly and make any necessary adjustments.
Get On-Demand Expert Assistance for SPF, DKIM, and DMARC Set Up
If you find yourself uncertain about configuring SPF, DKIM, or DMARC records, contact us for expert assistance. Our team of Email Authentication Experts is ready to assist you in setting up these critical DNS records and all WordPress not sending email related issues.

With expert guidance, you can avoid common configuration mistakes that may result in email issues, including lost emails or reduced deliverability. Working with a professional guarantee that your email authentication methods are implemented correctly, giving you peace of mind while safeguarding your email security.
Don’t let the complexities of email configuration hinder your efforts. Reach out today for on-demand assistance tailored to your needs.
Conclusion
Fixing the “DMARC Record Is Not Found” issue should be a priority if you aim to enhance your email domain’s security. Before implementing a DMARC record, make sure your SPF and DKIM records are properly set up. Follow the steps in this guide, and you’ll be well on your way to protecting your domain.
Regularly review your DMARC reports to stay ahead of potential threats and adjust your policies as needed. With the right steps, you can maintain a secure, reliable, and trusted email domain.
If you encounter any difficulties while resolving the “No DMARC Record Found” error, don’t hesitate to reach out for professional assistance.


