
Are you frustrated because your Kali Forms plugin is not sending emails? This issue can disrupt your workflow, delay important communications, and leave you wondering what went wrong.
Fortunately, the “Kali Forms Not Sending Email” issue is usually tied to a few common misconfigurations or conflicts.
In this comprehensive guide, we’ll discuss why Kali Forms might fail to send emails and also show you the five easy steps to fix this issue and get your Kali Forms email notifications working properly.
Ready? Let’s get started!
Kali Forms —Brief Introduction
Kali Forms is a powerful WordPress plugin designed to build user-friendly contact forms. With its user-friendly interface and robust features, it is a popular choice for website owners.

Key Features of Kali Forms:
- Drag-and-drop form builder for creating forms effortlessly.
- Pre-designed templates for various use cases.
- Conditional logic to control form fields dynamically.
- Multi-page forms for better user experience.
- Integration with popular email marketing tools and services.
Why Is Kali Forms Not Sending Emails?
Several factors can cause such problems. These reasons are often related to configuration issues or conflicts within your WordPress setup. Identifying the root cause is the first step toward resolving the issue.
Below are the common reasons why this might happen:
Reason #1: Kali Forms Email Notification Settings
Kali Forms relies on its email notification settings to process and send emails. If these settings are misconfigured, your emails might never reach the intended recipient. Common mistakes include:
- Incorrect recipient email address.
- Unspecified email subject or message content.
- Misconfigured “From” address, etc.
Reason #2: WordPress Default Mail Functionality
WordPress uses the `wp_mail` function for email delivery, which relies on PHP’s `mail()` function. Unfortunately, many hosting providers disable this functionality, and it lacks the necessary email authentication, such as SPF, DKIM, and DMARC, thus resulting in email delivery failures.
Keep reading, as we will show you how to fix this issue later in the article.
Reason 3: Conflict Between Multiple SMTP Settings
Using multiple SMTP settings for email delivery can lead to conflicts, causing emails to fail.
For example, if Kali Forms uses one SMTP server and another plugin uses a different one, this mismatch may disrupt email sending. These conflicts can result in errors like incorrect headers or emails being blocked by servers.
To resolve this, configure a single SMTP server for all WordPress email deliveries. This approach prevents conflicts and ensures Kali Forms and other plugins send emails reliably.
5 Easy Steps to Fix Kali Forms Not Sending Email Issue
To resolve this issue, follow these five steps carefully. Each step addresses a specific potential cause, helping you restore email functionality.
Step #1: Review the Kali Forms Setup Settings
Misconfigured contact form settings are a common reason for email deliverability issues. To review and correct the Kali Forms settings, follow the steps below:
- Access the Kali Forms Plugin: Log in to your WordPress dashboard and navigate to the Kali Forms >> All Forms
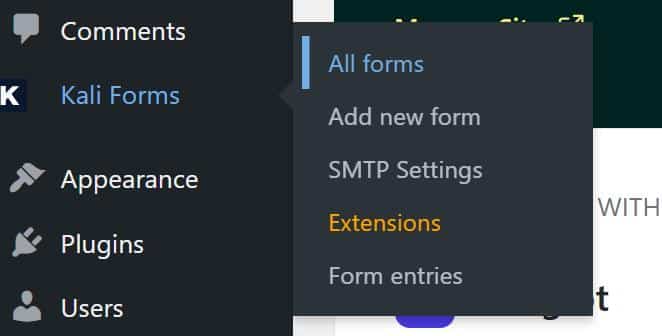
- Check Form Configurations: Click on the “Edit” option of the form experiencing issues and review its settings.

- Check the Fields’ Label: Select any field from the contact form on the right-hand side of the screen and check the “Field caption/label.” Sometimes Kali Forms does not assign the Field caption/label. If that is the case, simply type in the field label describing the field.
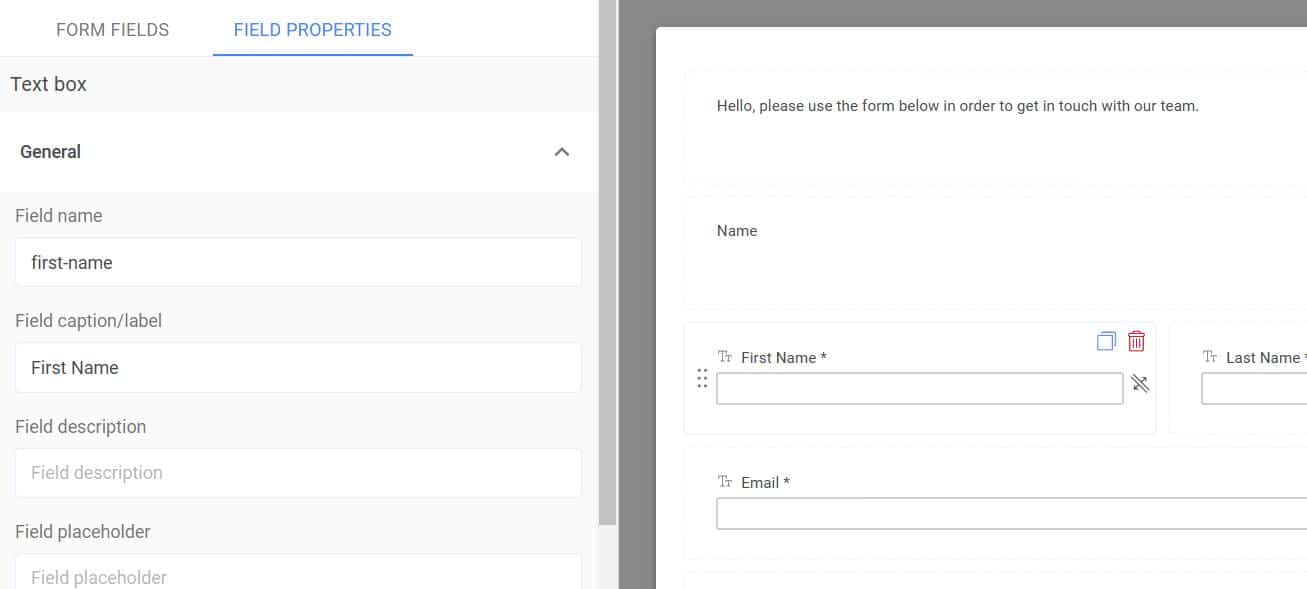
Now, check each field individually and move on to the next step.
Step #2: Check Your Kali Forms Notifications
If you start with a blank form, it won’t have any notifications set up by default, which might explain why emails aren’t being sent. Even if you’re using a template like the default contact form, reviewing and configuring your notification settings is essential to avoid delivery issues.
Here’s how to inspect and update your notification settings in Kali Forms:
- Open Notification Settings
- In the form builder, locate the tabs at the top and click on Notifications.
- If you don’t see any notifications listed, create one by selecting Create new email notification.
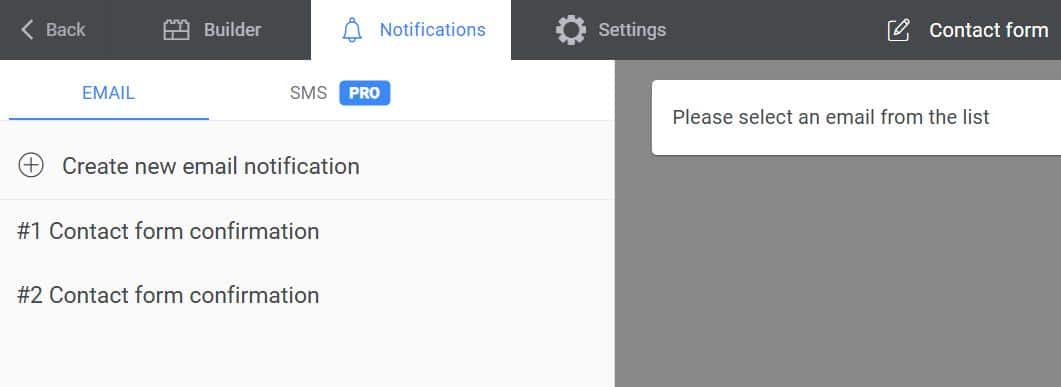
- Review the Notification Configuration
- If notifications already exist, click on the first notification to review its details.

- Verify the Sender’s Email Address
- Check the Sender Email field (also called From Email).
- The default is usually your site admin email, which may not align with your domain name, potentially causing issues. Update it to an email address matching your domain, such as contact@yourdomain.com.

📕 If you don’t have a custom email domain, check out our guide on How to Get an Email Domain for Your Business – 100% Free
- Inspect the Recipient’s Email Address
- Review the Send Notification To field (referred to as Send To Email).
- Avoid using the same email address as both the sender and recipient, as this can trigger spam filters, leading to warnings like “Be careful with this message” in Gmail.

- Check Additional Fields
- Look at the Sender Name and Reply-To fields.
- Make sure these are configured correctly to reflect accurate and professional information.
- Repeat for All Notifications
- If your form includes multiple notifications, repeat these steps for each one to verify their accuracy.
By thoroughly reviewing your notification settings, you can resolve common misconfigurations and significantly improve email deliverability for Kali Forms.
Step #3: Turn off SMTP Settings in Kali Forms
To enhance email delivery and avoid potential conflicts, it’s best to disable SMTP in Kali Forms and switch to a dedicated SMTP plugin like Post SMTP. Relying on a contact form plugin for SMTP often leads to issues such as configuration errors or incompatibility with DNS settings.
Why Disable SMTP in Kali Forms?
Here are some of the reasons why switching to a dedicated SMTP plugin is important and how to make it effective:
- Avoid Plugin Conflicts: Using a contact form plugin for SMTP can interfere with other plugins, leading to email delivery issues. A separate SMTP plugin handles all WordPress emails more efficiently.
- Prevent Misconfigured DNS Settings: Kali Forms doesn’t validate DNS settings, making it easier to misconfigure a mailer. Incorrect DNS configurations increase the chances of emails landing in spam folders.
- Unlock Advanced Features with Post SMTP: The Pro version of Post SMTP offers features like email open tracking, providing valuable insights into email engagement.
- Support for More Mailers: Unlike Kali Forms, Post SMTP supports popular mailers like Gmail SMTP Server, Microsoft 365 SMTP, Mailgun SMTP, SendGrid, Brevo, etc.
Step-by-Step Process to Disable SMTP in Kali Forms
To turn off the SMTP settings in Kali Forms, follow the steps below:
- Access the SMTP Settings: Navigate to Kali Forms >> SMTP Settings from your WordPress dashboard.
- Select the Default WP Mailer: In the SMTP configuration grid, choose Default WP Mailer as your preferred option.
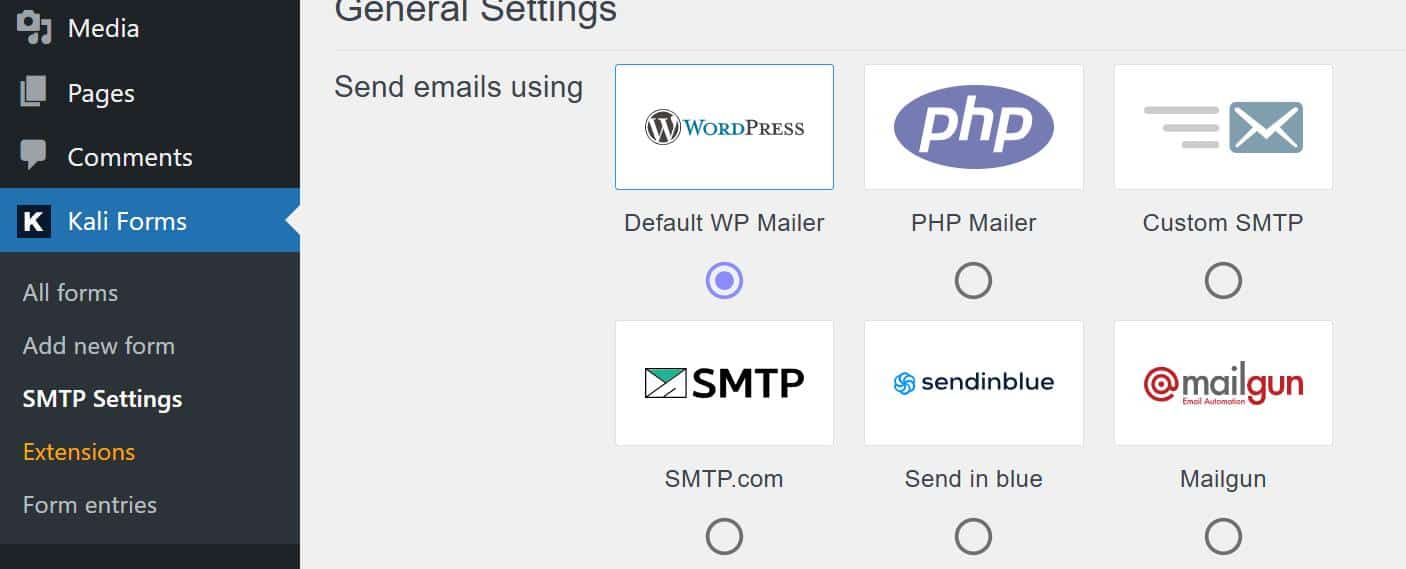
- Save the Settings: Scroll down and click the Save button to apply the changes.
By selecting the Default WP Mailer, you effectively disable SMTP in Kali Forms. Now, in the following section, we will show you how to set up a dedicated SMTP connection on WordPress using the Post SMTP plugin to avoid the Kali Forms and WordPress not sending emails issues.
Step #4: Install Post SMTP Plugin
To improve email delivery reliability for your WordPress forms, set up the Post SMTP plugin. This plugin is designed to resolve common email issues by offering robust SMTP support. Here’s how to configure the plugin:
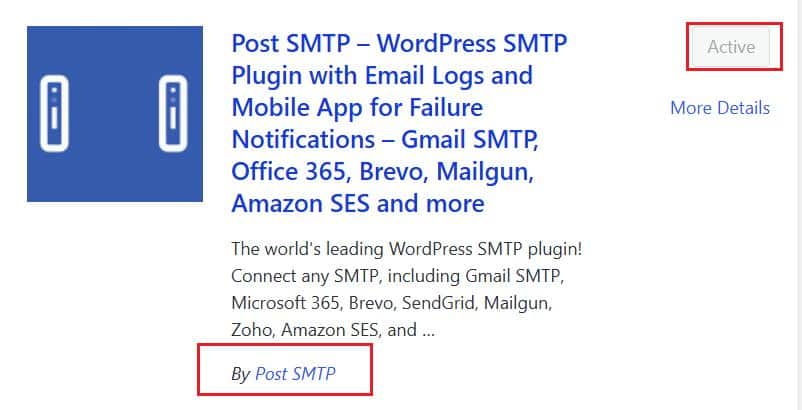
- Install and Activate the Plugin
- Navigate to your WordPress dashboard, then go to Plugins >> Add New Plugin.
- Search for “Post SMTP” and click Install. After installation, click Activate to enable the plugin.
- Run the Setup Wizard
- After activation, the setup wizard should automatically appear. If not, navigate to Post SMTP >> Dashboard and select Start the Wizard.
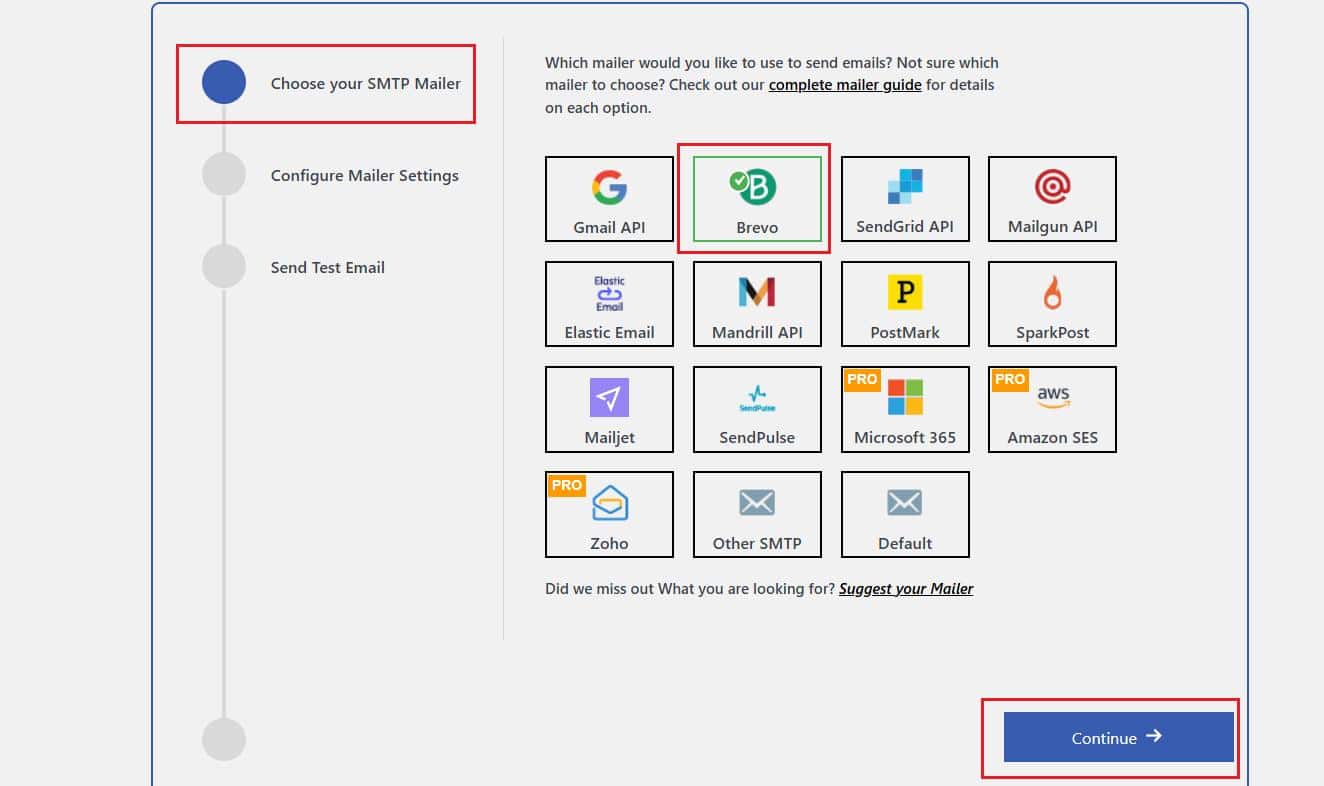
- Select Your Email Provider
- Choose your preferred email provider from the list. Popular options include Gmail, SendGrid, Brevo, Zoho Mail, Amazon SES, Mailgun, and Microsoft 365.
- For example, if you choose Brevo, click Continue to proceed.
- Enter SMTP Details
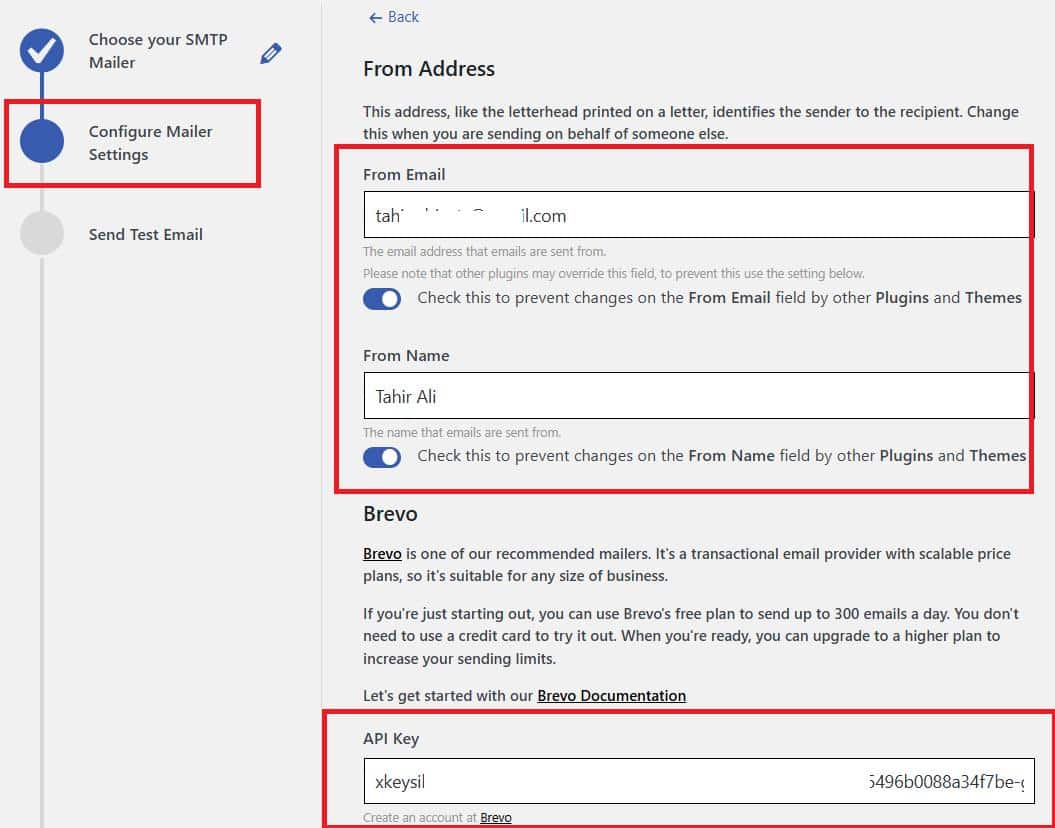
- Provide the From Email and From Name fields.
- Add the SMTP server details and the API Key provided by your email provider. Click Save and Continue to proceed.
- Test the Email Configuration
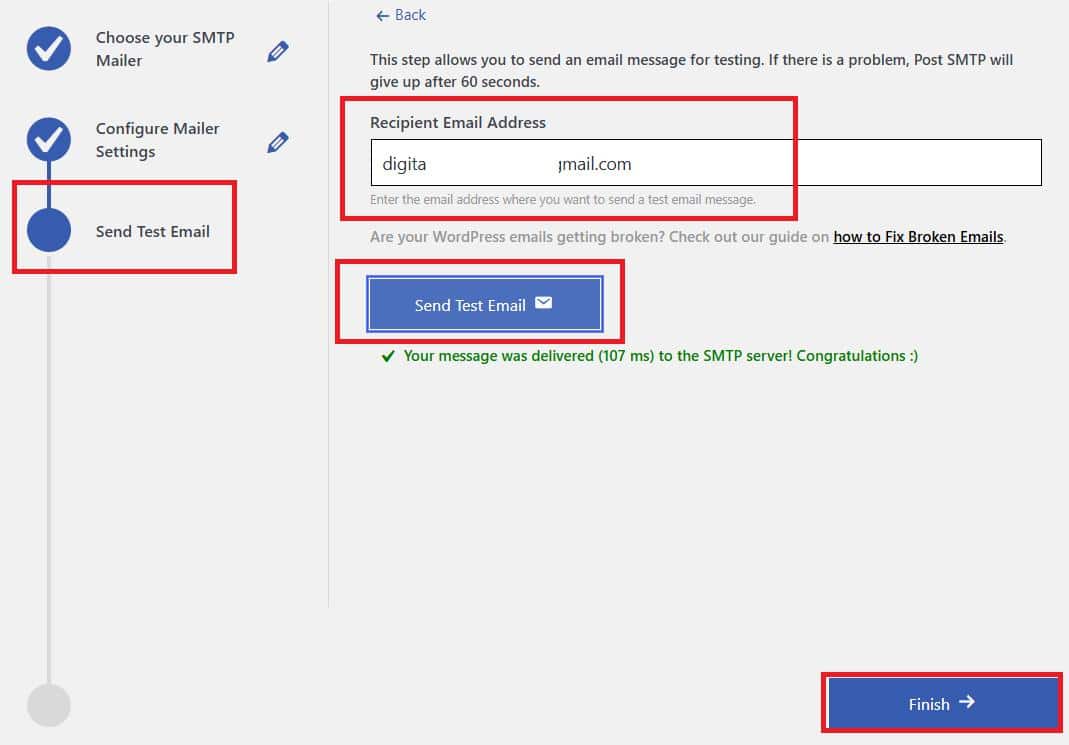
- Send a test email to confirm everything is working. Enter a test email address you can access and click Send Test Email. Verify the test email reaches your inbox without issues.
- Save Settings
- Once the test email is successful, click Finish to complete the setup.
Your Kali Forms email notifications will now utilize the new SMTP configuration, significantly improving deliverability.
Resend Failed Email Notifications (Optional)
Have you missed form notifications before setting up SMTP? You can now resend them using Post SMTP’s email log feature.
- Access Email Logs: In your WordPress dashboard, go to Post SMTP » Email Log. This screen shows all sent emails.
- Identify Failed Emails: Look for entries marked as failed in the email log. Each entry includes status details to help you pinpoint issues.
- Resend Emails: Click the Resend button for each failed email. The system will attempt to deliver these emails using your updated SMTP configuration.
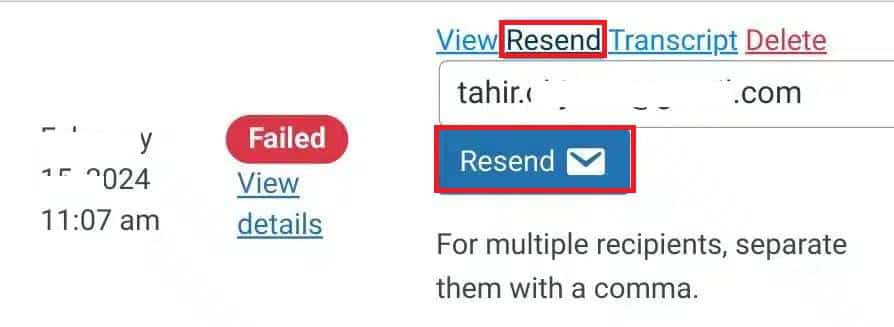
This feature allows you to recover missed form submissions or inquiries, maintaining communication with your users.
Step #5: Force “From” Email Address
Using a consistent “From” email address for all outgoing emails helps avoid conflicts between plugins and prevents deliverability issues. You can set it up using Post SMTP:
- Open Post SMTP Settings: In the WordPress dashboard, go to Post SMTP » Settings and open the Message tab.
- Specify the “From” Email Address: Enter the desired email address in the Email Address field. This address will serve as the “From” address for all outgoing emails, including Kali Forms notifications.
- Prevent Overrides: Check the box labeled Prevent plugins and themes from changing this to ensure no other plugin or theme can modify the “From” address.
- Save Changes: Click Save Changes to finalize your settings.
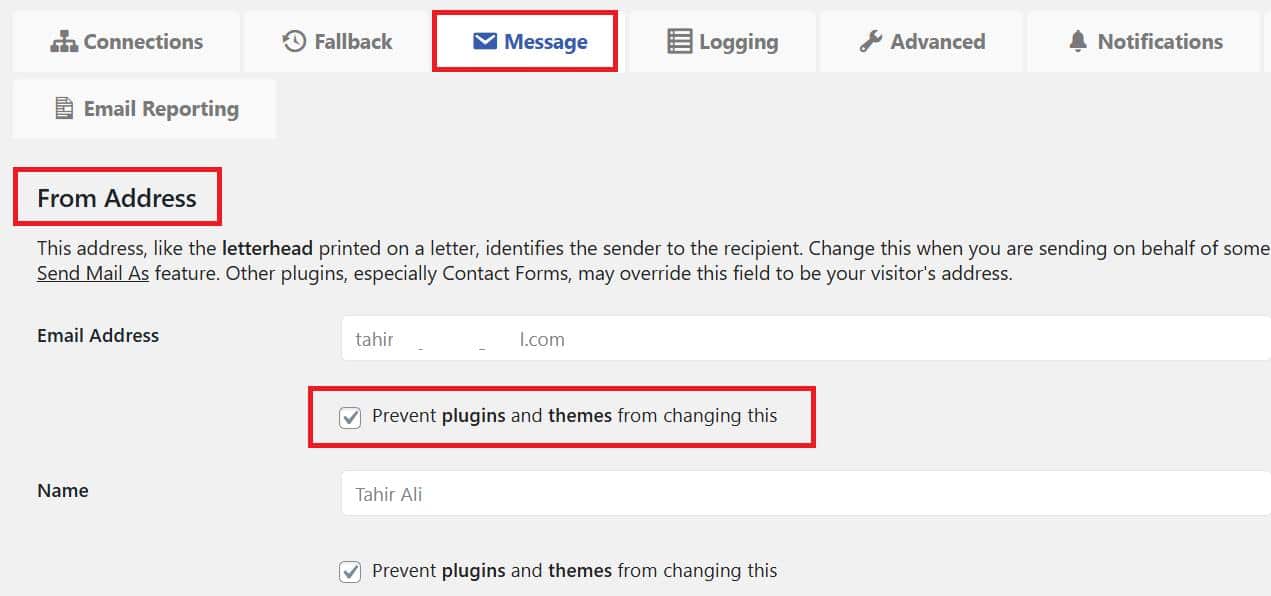
By forcing a consistent “From” address, you standardize your email delivery process, reducing the chances of emails being flagged as spam or blocked by email providers. This adjustment also simplifies troubleshooting any email-related issues.
Keep an eye on the Spam Score for Your Email Domain
If your Kali Forms emails still fail to deliver, your email domain’s spam score might be the issue. A high spam score means email servers will likely flag your messages as spam. This often happens when your domain lacks critical authentication protocols like SPF, DKIM, and DMARC.
To identify and resolve this, use a reliable Spam Score Checker tool. This tool evaluates your domain’s score and suggests ways to lower it, increasing the chances of your emails reaching recipients’ inboxes.
If you need assistance with configuring DNS records, such as SPF, DKIM, and DMARC, or have other email-related issues, contact us for live expert assistance. We’ll guide you through optimizing your email domain for better delivery rates.
Final Remarks
The “Kali Forms not sending email” issue can be frustrating, but it’s often easily resolved with the right approach. By reviewing your settings, disabling conflicting configurations, and leveraging a dedicated SMTP plugin like Post SMTP, you can restore reliable email functionality. Here are the three key points to remember to avoid deliverability issues:
- Double-check all forms and notification settings.
- Use a reliable SMTP plugin for enhanced email delivery.
- Regularly monitor your domain’s spam score to avoid issues.
For additional help or personalized support with your WordPress email setup, feel free to reach out to us. We’re here to help you resolve your email delivery challenges swiftly and effectively.

 OpenAI
 Perplexity

