


























Email security is a growing concern nowadays when phishing, spoofing, and other malicious activities can put your personal and professional communications at risk. That’s where DMARC (Domain-based Message Authentication, Reporting, and Conformance) comes in.
DMARC is a powerful email authentication protocol. It protects the integrity of the email. By setting up DMARC records, you can enhance email security, safeguard your reputation, and ensure your emails reach their intended recipients.
This guide will walk you through the process of setting up DMARC records for Gmail. Let’s dive right in!
What is DMARC Record in Gmail?
Earlier, we claimed that DMARC record in Gmail helps maintain the integrity of the email. You must be wondering how does it happen. This section will answer this. Also, we will shed light on what a DMARC record in Gmail looks like and what it means.
DMARC records work together with SPF and DKIM checks. Simply put, DMARC checks if the incoming email follows the proper email authentication protocols, such as SPF and DKIM.
SPF and DKIM are email authentication protocols that validate the authenticity of the incoming email, so the email server can receive it according to the DMARC policy—more on this in a minute.
Elucidating on the SPF and DKIM:
- SPF, or Sender Policy Framework, identifies the servers or IP addresses authorized to send emails on behalf of your domain. If an incoming email originates from a server or IP address not listed in the SPF records, the email receivers can readily recognize it as fraudulent.
- DKIM, or DomainKeys Identified Mail, operates with two email keys: a private key known only to you and a public key accessible to anyone. When an email server gets your email, it verifies the public key found in your domain’s DNS to confirm that the email was not altered during the process.
Once the email server receives the email, DMARC checks if the domain is listed in the SPF and if the DKIM signature is available. If so, the email is legitimate and will be allowed to land in the intended sender’s inbox. Otherwise, it would react according to the DMARC’s policy.
Understanding DMARC Records and Policies
DMARC records look like this: v=DMARC1; p=none; rua=mailto:youremail@yourdomain.com.
Even though it sounds like something very technical, it’s actually pretty easy to understand. As you can see, the string has three parts, divided by a semicolon (;). The first one is v, which indicates the version of DMARC. The next is p, which simply means policy, in simple terms, what to do if the email fails to follow authentication protocols (SPF and DKIM). The last one is rua, which is the email address to which the DMARC records should be sent.
The ‘P’ or policy has three variants. You can select from none, quarantine, and reject.
- None: None simply does nothing about the email. This is usually useful when you are setting up the DMARC records or testing something regarding your email delivery. Eventually, you will need a stricter policy—one from the next two.
- Quarantine: Sends the email into quarantine by pushing it into the spam or junk folder.
- Reject: As the name suggests, the receiving email server rejects the email, and it bounces back to the sender.
After evaluating the email, the receiving email server looks at the DMARC policy and acts accordingly.
Why Set up a DMARC Record in Gmail?
Setting up a DMARC record for Gmail is essential to enhance email security and maintain the integrity of your communications. Here are some key reasons to implement DMARC:
- Prevent Email Spoofing: DMARC helps protect your domain from being exploited by cybercriminals who use spoofed emails to impersonate your brand. This prevents phishing attacks that can harm your reputation and trick recipients into giving in their sensitive information.
- Boost Email Deliverability: Email providers like Gmail can authenticate your emails using DMARC to ensure they come from a verified source, which definitely helps with email deliverability.
- Protect Your Brand Reputation: A compromised domain can damage your credibility and trustworthiness.
- Detailed Email Activity Monitoring: DMARC provides detailed reports about how your emails are being handled by email servers. These insights help you identify potential problems and fix them to polish your email policies.
- Compliance with Security Standards: Many organizations expect DMARC compliance to be a standard security measure. Setting up DMARC shows that you prioritize email security, making your domain more trustworthy to customers.
How to Set up DMARC Records in Gmail: XX Easy Steps
Now that you understand everything you need to know about the DMARC record in Gmail. Here are XX actionable steps to set up DMARC records in Gmail.
Step #1: Create Your DMARC Records
We already discussed what the DMARC record in Gmail should look like. So you can easily create for yourself by adding in the values. For instance, ‘v’ should always be DMARC1 because there is only one valid version of DMARC. The next one is ‘p’; you can choose none at the beginning and then move on to stricter policies. Finally, enter your email address after rua=mailto:(enter your email address here. You can add multiple by separating each with a comma.)
Alternatively, you can try an online DMARC records generator, such as EASYDMARC. The service helps you create (and check) your DMARC records for free.
Just go to the website and specify your requirements, such as domain name, policy type, and the email address where the aggregate and failure reports should be sent. Once done, click the “Generate” button to get your DMARC records.

Step #2: Access Your Domain’s Settings
After your DMARC records are up and ready to be added, login to your domain registrar; conversely to how it sounds, adding a DMARC record in Gmail does not need to be done from Gmail but from your domain registrar.
Navigate to your domain registrar’s website (i.e., GoDaddy, Namecheap, etc.) and log in with your credentials. Once inside your account, locate DNS management or DNS settings. Please note that it could be named anything else, such as Name Server Management, DNS Server Management, etc. In fact, you might even find it under Additional/Advanced Settings.
In the previous article, we discussed adding DMARC records in GoDaddy. If you want to change your records in GoDaddy, we recommend checking it out.
Step #3: Add the DMARC Record in Gmail
After getting inside your domain’s settings, you will see a list of other DNS records. Do not engage with them; instead, add a new DMARC record. Usually, you will find a specific link or a button that will redirect you to a place where you can add a new DMARC record in Gmail.
This is how it looks like in GoDaddy.

Usually, there are three or four input fields, such as type, host, TXT value, and TTL.
- Type: Refers to the type of the DMARC record, set it to TXT.
- Host: Add “_dmarc.”
- TXT Value: Here goes your entire DMARC string, which means the entire “ v=DMARC1;p=none;rua=mailto:youremail@example.com.”
- TTL: TTL stands for Time to Live. It indicates the duration a DNS record, such as the DMARC record, remains stored in a caching server before requiring a fresh query to the authoritative nameserver. The best practice is to set it to 1 hour.
Below is how it looks after entering the information in GoDaddy.
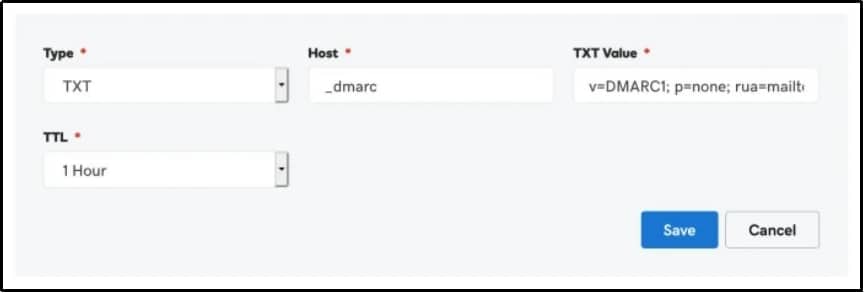
Hit save, and there you go!
You just set up a DMARC record in Gmail. Now, let’s test it to ensure the record works correctly.
Step #4: Check if the DMARC Record in Gmail
Earlier, we introduced you to a tool called EASYDMARC. It not only helps create a DMARC record but also helps verify it. Just go to the tool or use any other online DMARC checker to check your status. However, you must remember that a DMARC record may take time before showing effects. Therefore, always wait for up to 48 hours before checking.
After 48 hours, go to EASYDMARC, switch to DMARC Lookup, and enter your domain in the input box.

In a few seconds, you will get to know the status of your DMARC records.

Get Expert Live Assistance
If you’re looking for help setting up the DMARC record in GoDaddy, our team of Technical Email Specialists is here for you! Simply choose our Business Plan and enjoy the perk of Expert Live Assistance. We’re excited to support you!
Our passionate team of experts is excited to assist you in configuring your SPF, DKIM, and DMARC settings! We’ll also take care of setting up an SMTP server with the best WordPress SMTP plugin, making sure your emails are delivered smoothly and dependably.
Even with properly configured DMARC records, emails can still be missed or end up in spam. Therefore, it’s crucial to verify your domain’s spam score. You can conveniently check this using our free Spam Score Checker tool.
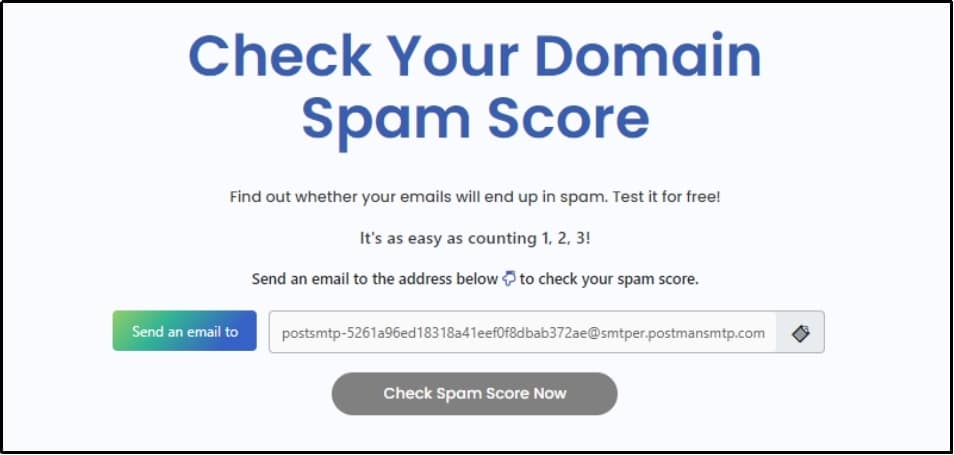
Navigate to PostSMTP and send an email to the string that appears in the box, after sending the email, click Check Spam Score Now button. Afterward, enter your email address and get the reports sent directly to your email address.
Conclusion
Setting up DMARC records for Gmail is a vital step for your email security and maintaining the trustworthiness of your domain. By implementing DMARC you can effectively combat phishing, spoofing, and other cyber threats. This boosts your email deliverability while also safeguarding your brand’s reputation.
With the step-by-step guide provided, you now have the tools and knowledge to create and implement DMARC records easily. Remember, email security is an ongoing process, so continue monitoring and refining your settings to stay ahead of potential threats.
Secure your domain today and enjoy the peace of mind that comes with knowing your emails are safe and trusted by recipients. To enhance your email delivery, try PostSMTP.
Frequently Asked Questions
How long does it take for a DMARC record to take effect?
Usually, the DMARC records take effect in a few hours, but in some cases, it may take up to 48 hours.
Why is my DMARC record not working?
A DMARC record might not be working due to multiple reasons, including incorrect SPF or DKIM settings, “From” address issues, typos in the DMARC record, too strict DMARC policy, DNS propagation issues, or missing DMARC reports.
What happens if I set my DMARC policy to ‘reject’?
When you set your DMARC policy to reject, the receiving email server rejects the emails, and (the email) bounces back to the sending server.