
 OpenAI
 Perplexity
It’s very frustrating when activation emails fail to be received, leaving users no way to authenticate their registration.
As a business, this can be costing you tons of connections, customers, and, simply, revenue.
BuddyPress is a community plugin. Not receiving activation emails defeats its purpose.
If you find yourself in such a condition, don’t worry. This can be easily countered. This article will help you do so.
This guide explores what BuddyPress is, the common reason behind the problem, and provides two actionable methods to fix this issue.
What is BuddyPress?
BuddyPress is a powerful WordPress plugin that transforms your website into a social network.
It adds features such as user profiles, activity streams, private messaging, and group creation, allowing visitors to become “buddies” and interact directly on your site.
Since it’s built around user interaction, proper onboarding is crucial. Activation emails are a crucial part of that process. If they fail to send, new users remain unable to activate their accounts or participate in the service.
Understanding how BuddyPress works helps frame the urgency of fixing this issue. Without functioning activation emails, the core functionality of your community platform is impaired.
Why BuddyPress Activation Emails Might Not Be Sending
There can be multiple reasons behind this, including:
- A plugin or theme conflict.
- The default mail() function is not functioning properly.
A plugin or theme conflict occurs when two or more plugins or themes ‘misbehave’ due to compatibility issues, poorly written code, or misconfigurations.
Next, the default mail() function failed. This usually occurs due to a lack of authentication protocols.
Most reliable email servers sign emails using authentication protocols, such as SPF, DKIM, and DMARC. These protocols help receiving servers validate the authenticity of incoming emails and ensure they are not spoofed.
SPF and DKIM stand for Sender Policy Framework and DomainKeys Identified Mail.
SPF specifies the domain allowed to send emails on behalf of your domain, and DKIM marks emails using a cryptographic signature. DMARC simply controls what to do with the email if it fails this security verification process.
The following resources can help learn more about the aforementioned security protocols:
Fixing Email Notification Failures in BuddyPress: 2 Methods
To restore proper email functionality in BuddyPress, you can approach the issue in two practical ways. The first is to eliminate any plugin conflicts that may be interfering with the activation process. The second one includes changing the SMTP mailer.
Let’s examine both in detail.
Method 1: Checking for Plugin Conflicts
Before we dive into the technical part, let’s first ensure it’s not something that can be resolved by a simple solution, such as disabling a plugin.
Ensure that no other community plugins are installed on your WordPress site.
In fact, any plugin with a similar purpose might be causing this problem. Pay special attention to plugins related to membership, user registration, or email notifications. These plugins can overlap with BuddyPress’s functionality and may interfere with how activation emails are triggered or managed.
Common culprits include form builders with user registration features, security plugins that filter or block outgoing emails, or email marketing tools that attempt to override default behavior.
Additionally, many plugins behave erratically with common competitors due to the similar nature of their code and overlapping features. If you have plugins such as Ultimate Member, ProfileGrid, or PeepSo, you may want to disable these first. However, WordPress Membership plugins like ARMember are designed to work smoothly with BuddyPress, so you can manage your membership plans easily without breaking activation emails.
Once you’ve deactivated the suspected plugins, clear any cache and initiate a test registration.
If the activation email arrives, you’ve found the issue. You can then reactivate plugins one by one to isolate the exact source.
Otherwise, the next method will definitely help.
Method 2. Replace Mail() Function With SMTP Plugin
Next, you need to replace the WordPress default mail() function with a reliable third-party email sender that signs the emails using the necessary authentication protocols, allowing the receiving servers to accurately validate the authenticity of your emails.
To do this, there’s no better choice than Post SMTP, the top-rated SMTP plugin available in the WordPress plugin directory. Let’s address the issue in three actionable steps.
2.1. Install PostSMTP
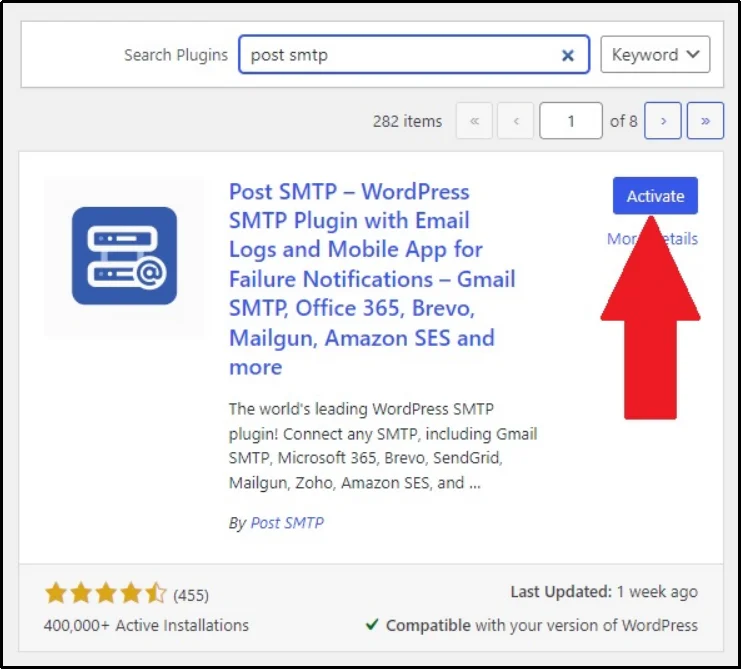
Go to your WordPress and navigate to Plugins ⇒ Add Plugin ⇒ Search for “PostSMTP” using the Search Plugins bar ⇒ Install and Activate.
Post SMTP is a freemium plugin that offers numerous features in its free version. However, for advanced features, consider one of our basic, business, or professional plans that fit your requirements.
Later in this article, we will examine an additional (optional) step that allows for resending failed emails with a single click. For such convenience, opt for the premium option. Compare the plans here.
2.2. Set Up a Reliable Third-Party Email Server
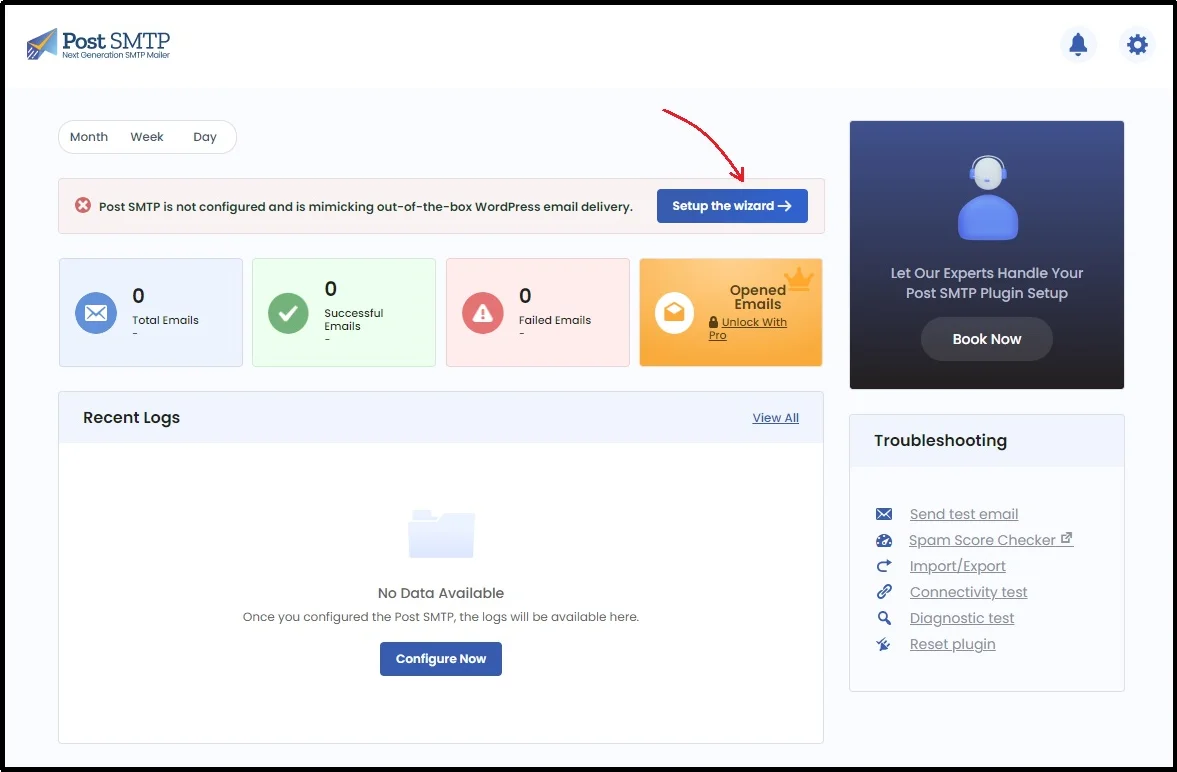
Head to the plugin and click Setup the wizard.
On the subsequent screen, you will need to select from several mailers. Alternatively, you can choose one of your choices using the Other SMTP button.
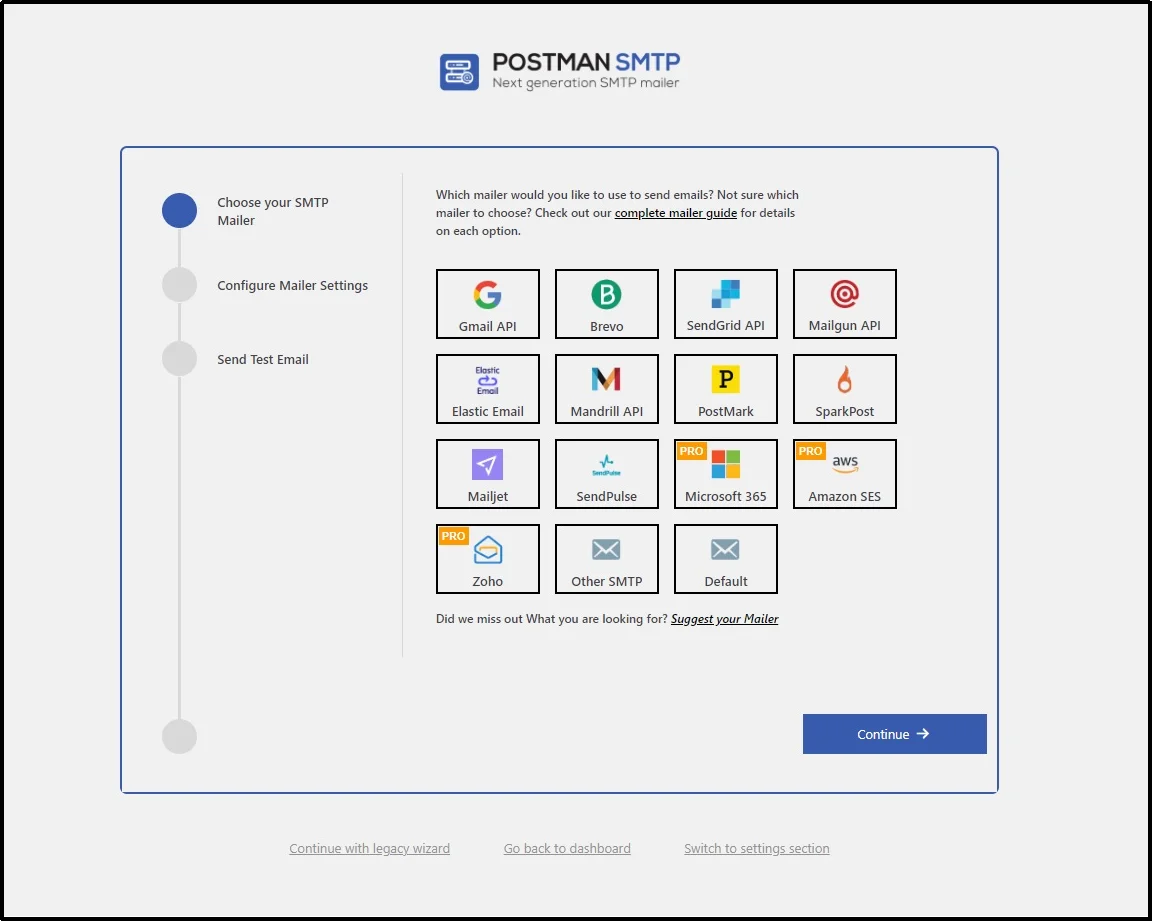
Next, you need to get the API key of your chosen mailer and paste it in the API Key input box.
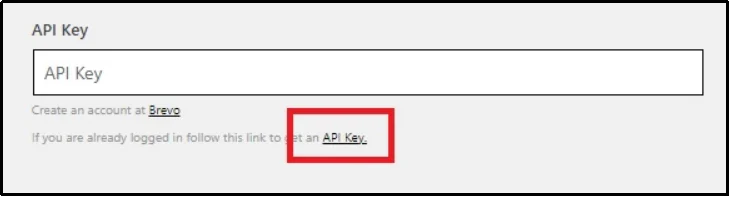
The process of getting the API key depends on your choice of mailer. The name of the mailer is linked to its documentation; clicking on one will open its documentation in a new tab.
- Gmail
- Brevo
- SendGrid API
- Mailgun
- Elastic Email
- Mandrill API
- PostMark
- SparkPost
- Mailjet
- SendPulse
- MailerSend
- Microsoft 360 [Pro]
- Amazon SES [Pro]
- Zoho [Pro]
Once you have completed the configuration, Post SMTP will allow you to send a test email using the new mailer you have just set up.
If the operation was successful, you will receive a successful delivery text.
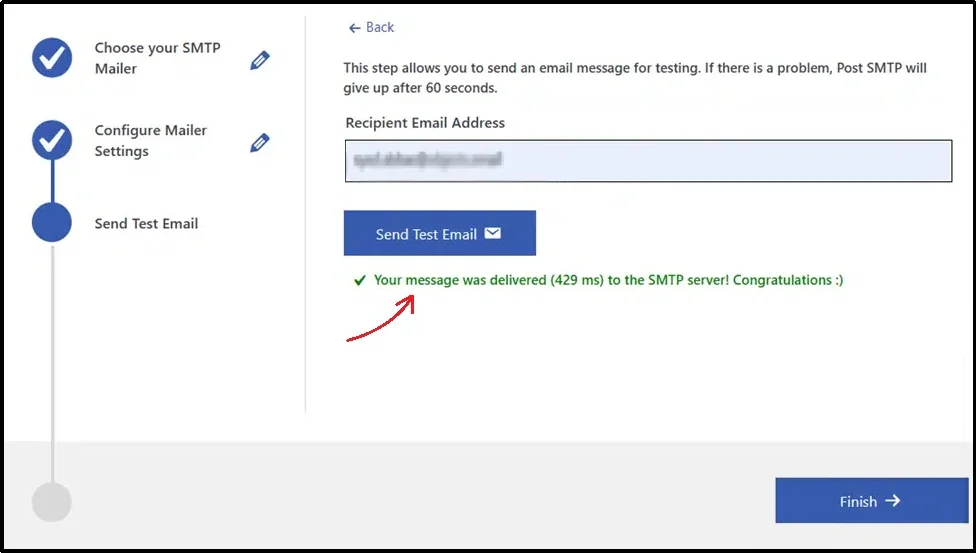
Otherwise, return to the previous steps and ensure that your steps are similar to those provided in the documentation.
Alternatively, get help from our trained professionals! We are committed to assisting you with any PostSMTP-related issues. The help is just a support ticket away.
2.3. Prevent Themes & Plugins From Making Changes
As discussed earlier, plugins with similar features may cause inconsistencies, leading to deliverability issues, such as the activation email not being sent.
In such a case, forcing the “From Name” and “From Address” prevents other plugins and themes from changing them.
You can do so by navigating to the Post SMTP’s settings ⇒ Email Settings ⇒ Message tab
Enter the “From Email Address” and “From Name” fields, and check the “Prevent plugins and themes from changing this” checkbox.
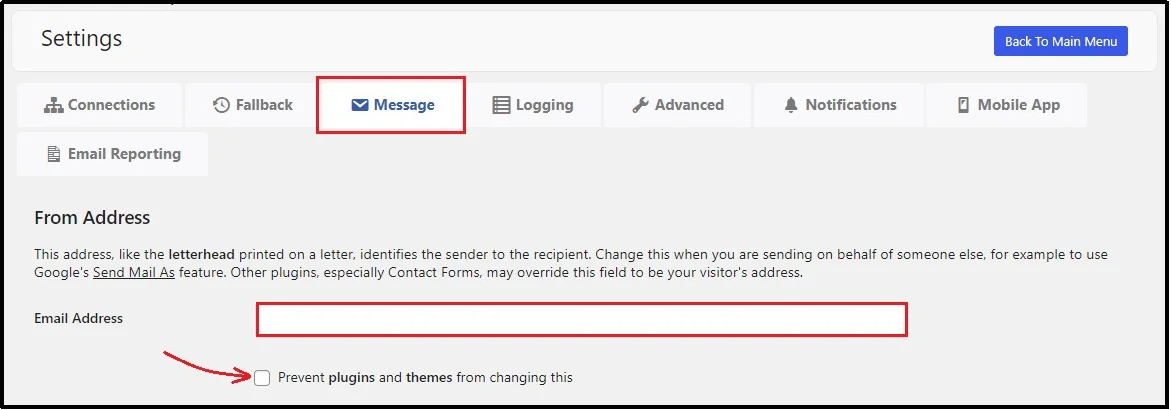
This ensures that no plugin or theme changes the default mailer, forcing BuddyPress or other plugins to send emails via the third-party email sender.
2.4. Enable Resend Emails [Optional]
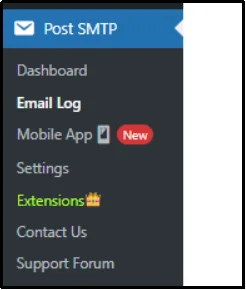
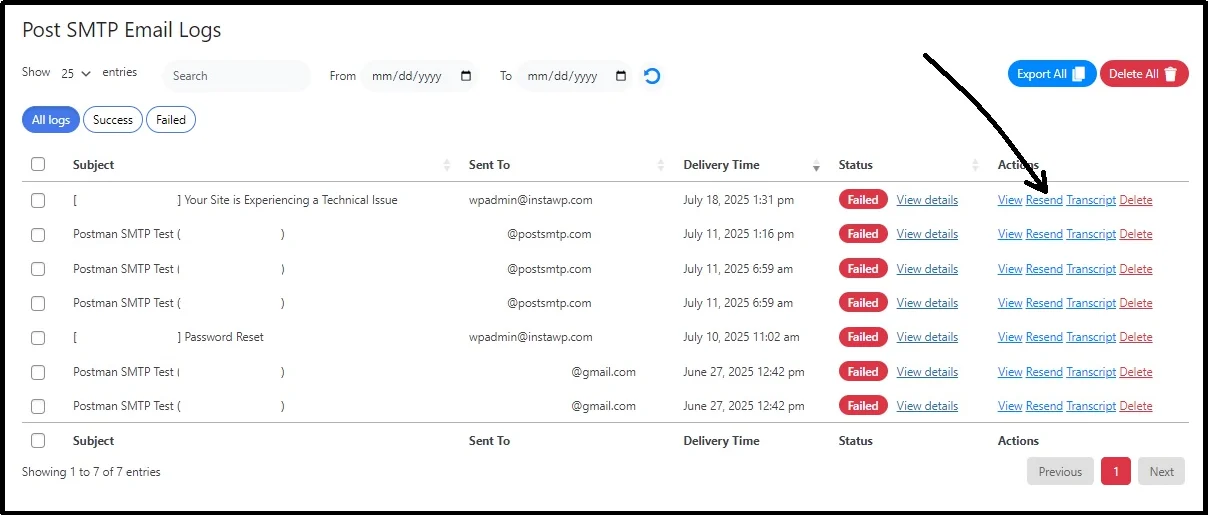
As discussed, this feature is exclusive to premium users. Once you activate the premium plan, you will be able to access Post SMTP ⇒ Email Log
Here are all the failed emails that you can resend with just a single click.
Do Not Forget To Check Your Spam Score
Even if your activation emails are technically being sent, there’s still a major hurdle left, which is deliverability.
Many emails never land in a user’s inbox because they’re flagged as spam. If you’re not actively checking your spam score, you’re missing out on your user experience.
This is particularly critical for community platforms.
If the first email a user receives is lost in spam, they may assume the site is broken or untrustworthy. That initial interaction sets the tone. Worse, repeated failures can damage your domain’s reputation, pushing even legitimate emails into spam over time.
That’s a long-term consequence no serious website can afford.
To avoid this, Post SMTP offers a reliable Domain Health Checker tool. This checks whether your domain is properly authenticated with SPF, DKIM, and DMARC protocols. Actively running this check and actively addressing the underlying issues will boost your email reputation across all mailers.
Make it a habit to run a domain health check after setting up Post SMTP, or any time you notice declining email performance. It’s a small step that can return amazing benefits.
Bid Farewell To Deliverability Issues With Post SMTP
Post SMTP is equipped with everything you need to deliver successful transactional emails, including detailed email logs, auto-retry of failed emails, email failure alerts, an email health report, and a dedicated mobile app.
With a dedicated mobile app, it’s similar to keeping your email campaign in your pocket. Get notified and waste no time in resending the email back with just a single tap.


