

























WordPress powers millions of websites, but its default email system remains one of its biggest weaknesses. Contact form notifications disappear, password reset emails never arrive, and WooCommerce customers miss order confirmations.
In most cases, the problem isn’t WordPress itself. It’s the way WordPress sends email by default.
After helping hundreds of WordPress site owners troubleshoot failed email delivery, we’ve found that WordPress almost always struggles when it relies solely on PHP mail.
In this guide, you’ll learn how to configure WordPress SMTP settings using Post SMTP and dramatically improve email deliverability.
What Are WordPress SMTP Settings?
WordPress SMTP settings are a set of configuration values that tell WordPress how to connect to an external email server.
Rather than using your local hosting server, these configurations route WordPress emails through a dedicated provider or SMTP relay service (such as Gmail or SendGrid). This authentication process authorises the provider to deliver your outbound messages securely.
Most WordPress SMTP configurations require these settings:
- SMTP Host: the address of the SMTP server (e.g., smtp.gmail.com)
- SMTP Port: the port it connects through (usually 587)
- Encryption: how the connection is secured (TLS or SSL)
- Username: your email address
- Password: your account password or API key
- From Email Address: the sender email address
- From Name: the sender name
What Does SMTP Mean?
SMTP stands for Simple Mail Transfer Protocol. It’s the standard method computers use to send emails over the internet. When you send an email from Gmail, Outlook, or any email client, SMTP is the protocol that handles the delivery behind the scenes.
SMTP acts as the delivery system responsible for moving outgoing emails between mail servers. It verifies sender information, establishes secure connections, and helps ensure messages reach their intended destination.
To sum it up, SMTP acts as the communication protocol responsible for transferring outgoing emails between mail servers securely and reliably.
How WordPress Sends Emails by Default
WordPress uses a built-in PHP function, wp_mail(), which relies on your web server’s PHP mail () function to send emails.
The problem is: PHP mail doesn’t actually connect to an email provider.
PHP mail sends messages directly through the hosting server’s mail transfer agent rather than using authenticated SMTP services. Because these emails often lack proper authentication records and sender reputation, mailbox providers frequently filter them as spam or suspicious.
Why PHP Mail Causes Email Delivery Problems
PHP mail fails for a few key reasons:
- No authentication – There’s no proof that the email is from who it claims to be.
- No dedicated sender reputation – Shared hosting servers often host websites with poor sending reputations, increasing the likelihood that mailbox providers will distrust outgoing emails.
- Hosting restrictions – Many hosting providers block outgoing email on port 25 entirely to prevent spam abuse.
- No error reporting – If an email fails to deliver, WordPress won’t tell you. It just silently disappears.
Why You Should Configure SMTP in WordPress
When WordPress sends an email using PHP mail, it goes out with no identity attached. No sender verification, no domain authentication, nothing. Receiving servers see an unsigned email from a random hosting server and either bin it or send it to spam.
This affects everything that relies on email:
- A customer submits your contact form → you never get it
- A user requests a password reset → the link never arrives
- WooCommerce sends an order confirmation → the customer thinks the purchase failed
- WordPress sends you an admin alert → you miss it entirely
They’re all caused by the same issue: PHP mail lacks authentication, so emails aren’t delivered.
SMTP fixes this by routing your emails through a real mail provider, one that receiving servers already trust. Your emails go out with a verified sender identity, proper email authentication headers, and a strong email reputation.
This results in emails in the inbox.
NOTE: SMTP works best when combined with email authentication standards such as SPF, DKIM, and DMARC. Together, these records help mailbox providers verify sender identity, reduce spoofing attempts, and improve inbox placement.
SMTP vs PHP Mail Function
| Feature | PHP Mail | SMTP |
| Reliability | Low | High |
| Authentication | Weak | Secure |
| Spam Protection | Poor | Better |
| Email Tracking | No | Yes |
| Error Reporting | No | Yes |
| Works on All Hosts | Sometimes | Yes |
We have never seen a case where PHP mail is the better choice for a live WordPress site. Most production WordPress websites benefit from SMTP because authenticated email delivery improves reliability and monitoring capabilities.
What You Need Before Setting Up WordPress SMTP
Before we proceed with setting up WordPress SMTP, you should know the prerequisites.
- A WordPress Website
- An SMTP Plugin: As WordPress doesn’t support SMTP natively, you’ll need a plugin to fill the gap. For this guide, we will use the Post SMTP plugin.
- An Email Provider or SMTP Mailer:
You’ll connect WordPress to one of these services to send your emails:
- Gmail – Great for small sites; free with a Google account
- Outlook / Microsoft 365 – Good for businesses already on Microsoft
- SendGrid – Scalable transactional email; free tier available
- Mailgun – Developer-friendly; strong API support
- Amazon SES – Very affordable at high volume
- Brevo (formerly Sendinblue) – Free tier with daily send limits
- Zoho Mail – Good for teams using Zoho’s business suite
And more.
- SMTP Credentials: SMTP Host, SMTP Port, Username, Password, or API Key, and Encryption Type.
Steps to Set Up WordPress SMTP Settings:
Now that you understand why SMTP is essential for reliable email delivery, it’s time to configure it on your WordPress site. Follow these step-by-step instructions to set up Post SMTP and start sending authenticated emails.
Step 1: Install and Activate Post SMTP
The first thing to do is install and activate one of the best SMTP plugins on WordPress. Here’s how to install and activate Post SMTP:
- Navigate to your WordPress Admin page and log in to your WordPress site.
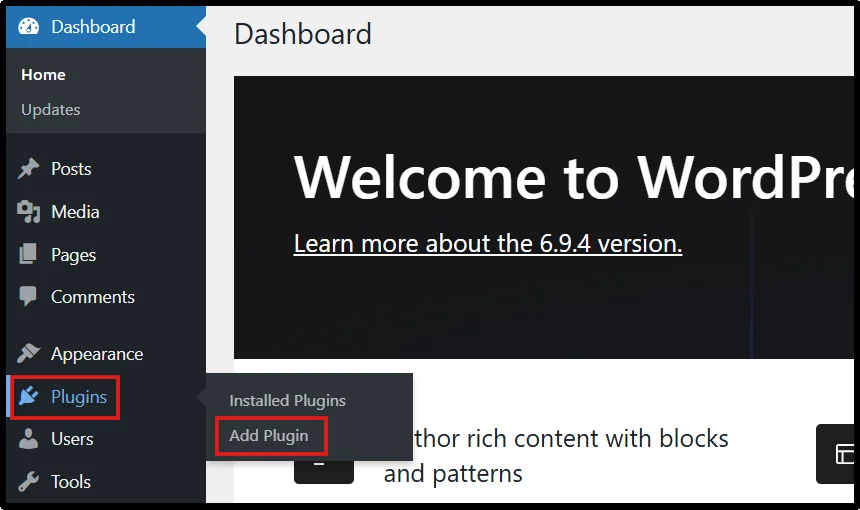
- Head to Plugins → Add Plugin.
- Enter “Post SMTP” in the right search bar and click “Install Now.” In a few seconds, click “Activate.”
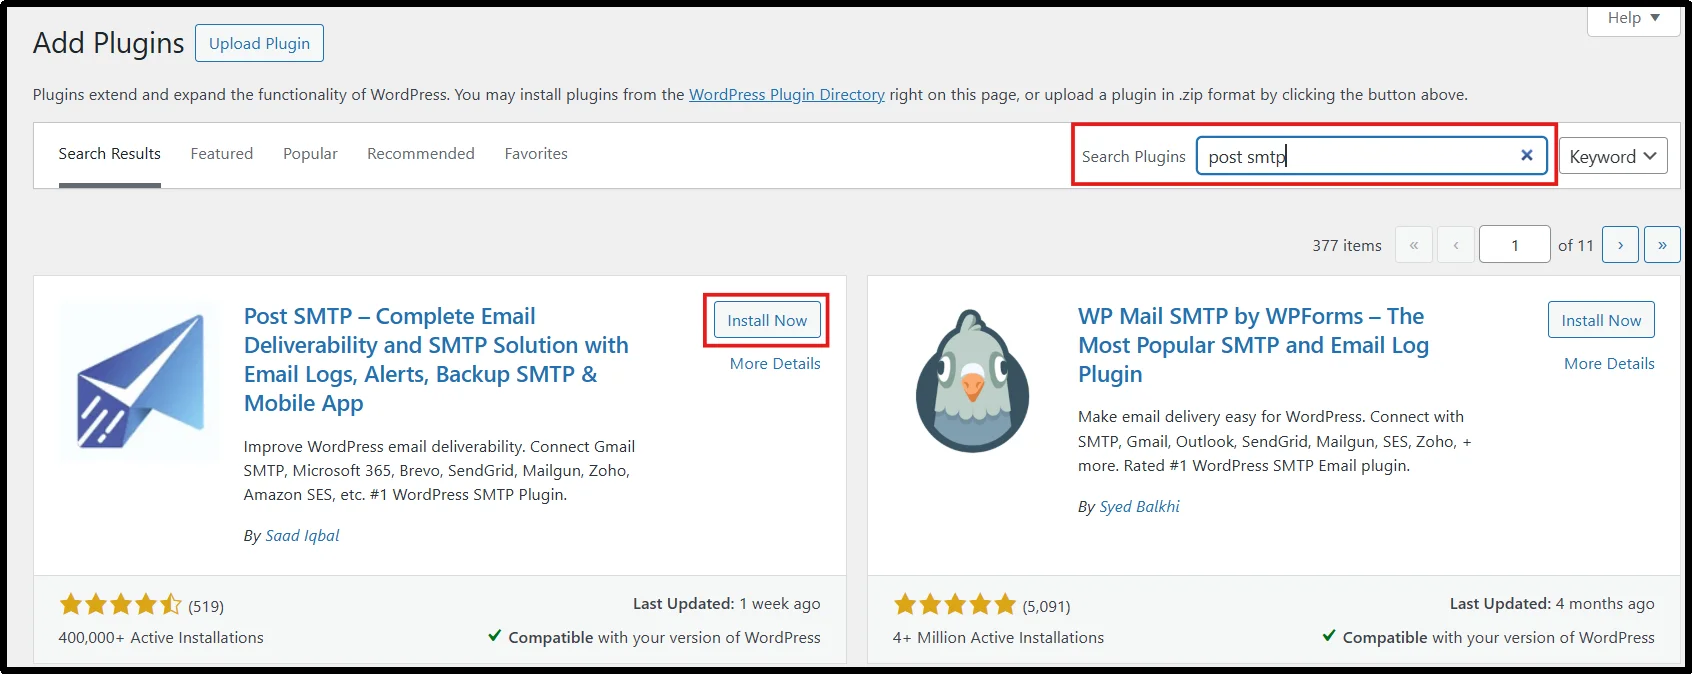
- You will be redirected to the Post SMTP setup wizard.
Note: Post SMTP Pro unlocks all WordPress SMTP settings, including One Click Mailers, email monitoring, automatic retries, mobile alerts, and backup SMTP routing.
- If you want to use the premium version of Post SMTP, head to the Post SMTP pricing page and purchase either the Pro or Business plan.
- You will receive an email with a link to download the Pro ZIP file and its license key.
- Head back to Plugins → Add Plugin, then click Upload Plugin at the top left.

- Select the appropriate Post SMTP Pro ZIP file, click Install Now, then Activate Plugin.
- Enter your license key, then click Activate License to unlock all features.
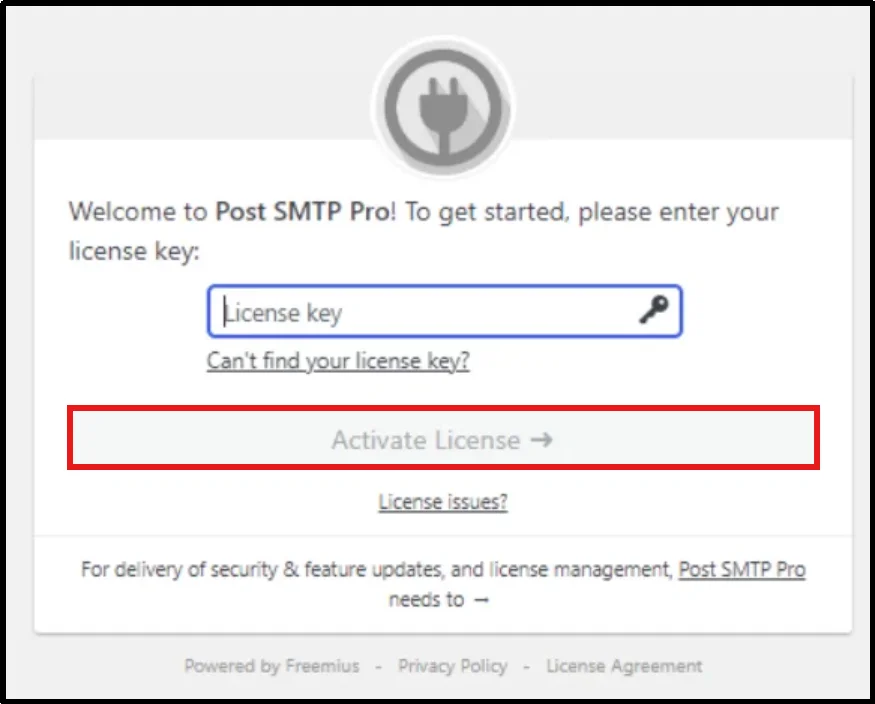
Congratulations on installing and activating Post SMTP Pro!
Step 2: Connect to Your SMTP Mailer
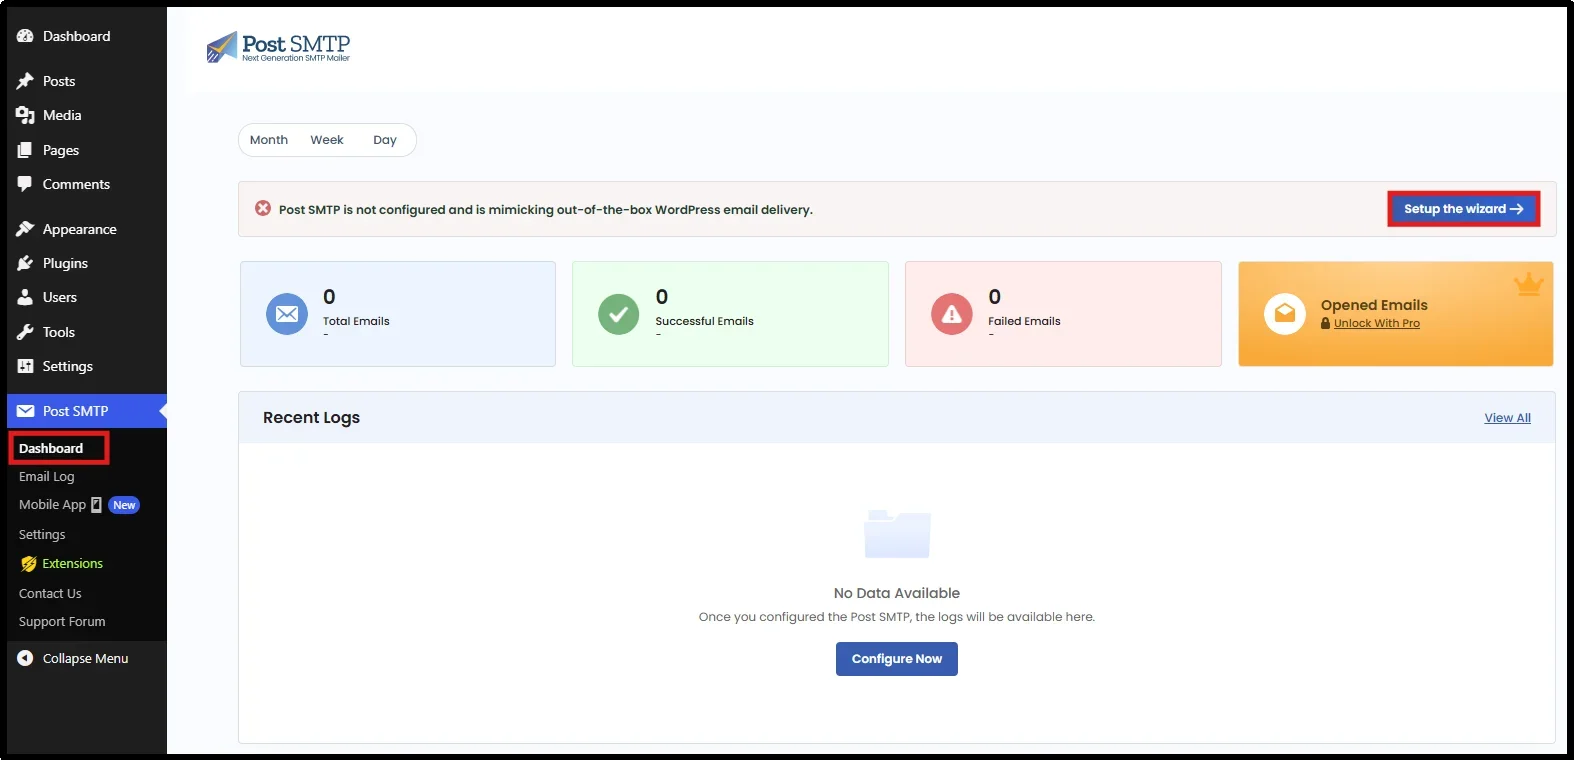
- Head to Post SMTP → Post SMTP Dashboard
- Click on Setup the Wizard.
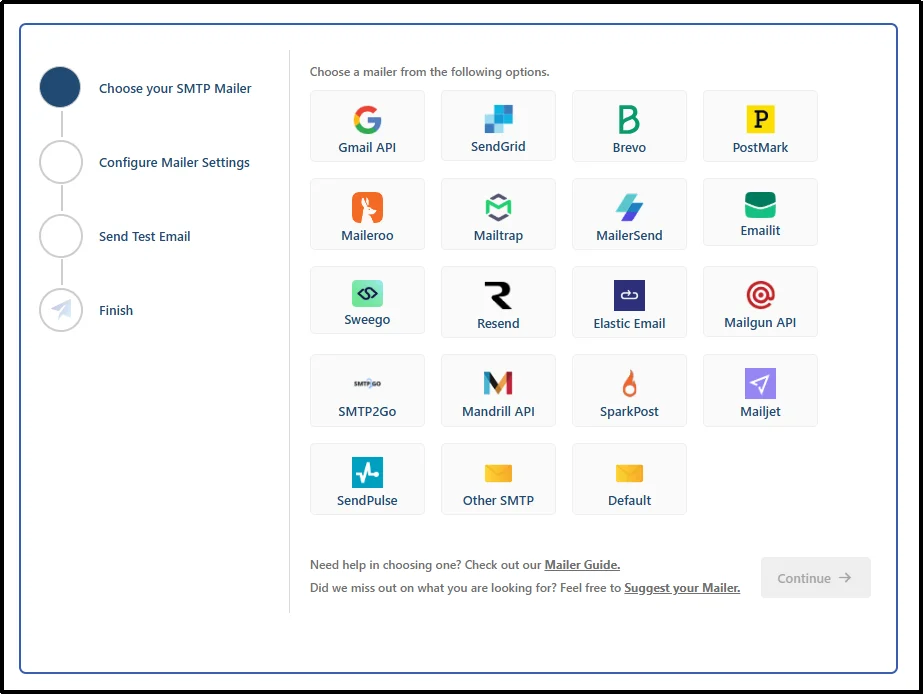
- In the Post SMTP setup wizard, choose your desired SMTP Mailer, then click Continue.
Post SMTP has 15+ SMTP Mailer options including, Gmail API, SendGrid, Brevo, Maileroo, Microsoft 365, Zoho, Amazon SES, Mailtrap, etc. All of them offer reliable delivery, strong authentication options, and beginner-friendly setup processes.
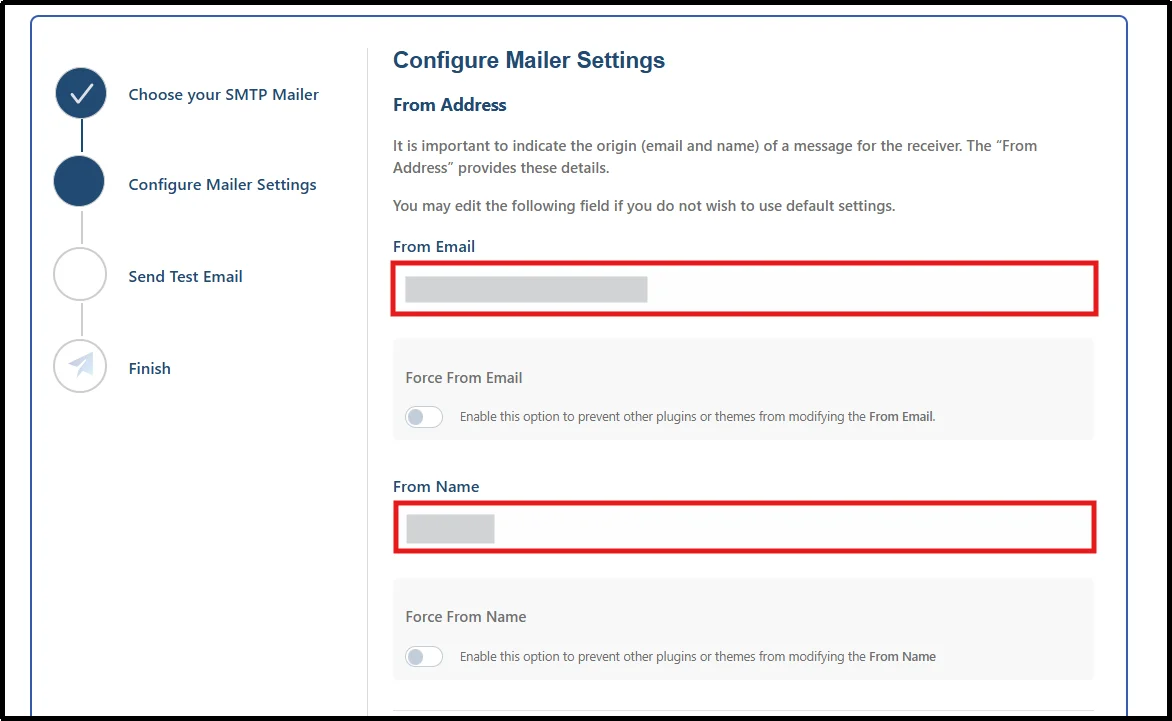
- Set your desired From Address and From Name, and lock both in by enabling the “Prevent plugins and themes from changing this” toggle.
- Now scroll down until you come across these settings (we’ve selected Gmail SMTP Mailer).
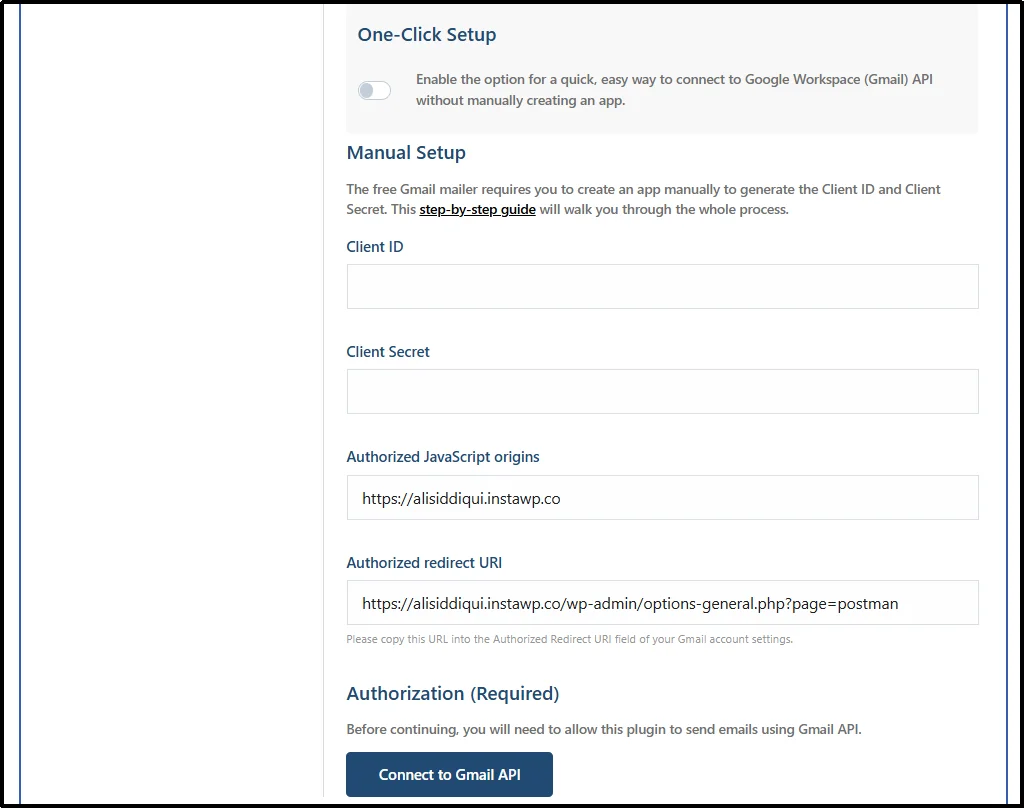
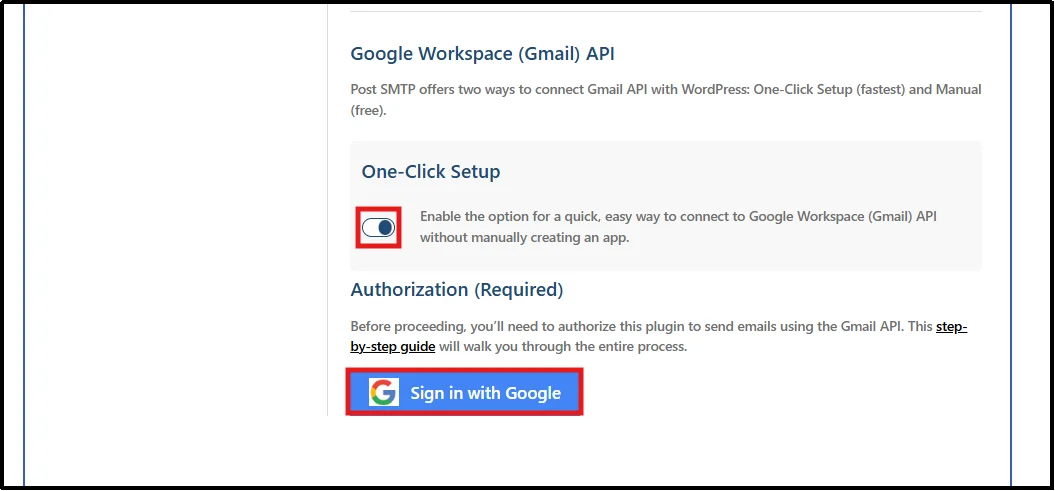
There are two ways to connect the SMTP Mailer: One-Click Setup and Manual Setup.
- One-Click Setup simplifies the authentication process and reduces configuration errors, making it suitable for most users. So, toggle it on and directly sign into Google.
- Else, you have to manually generate the Client ID and Secret, enter each piece of information, and then click Authorize.
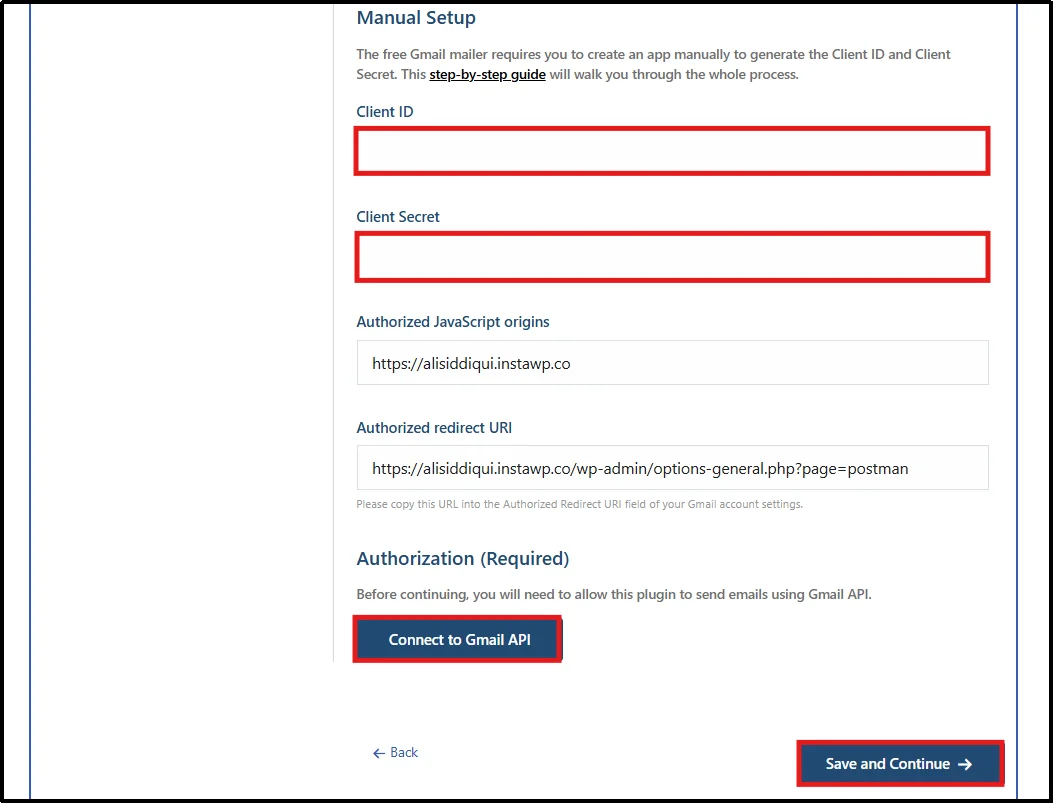
- After authorization, you can click Save and Continue.
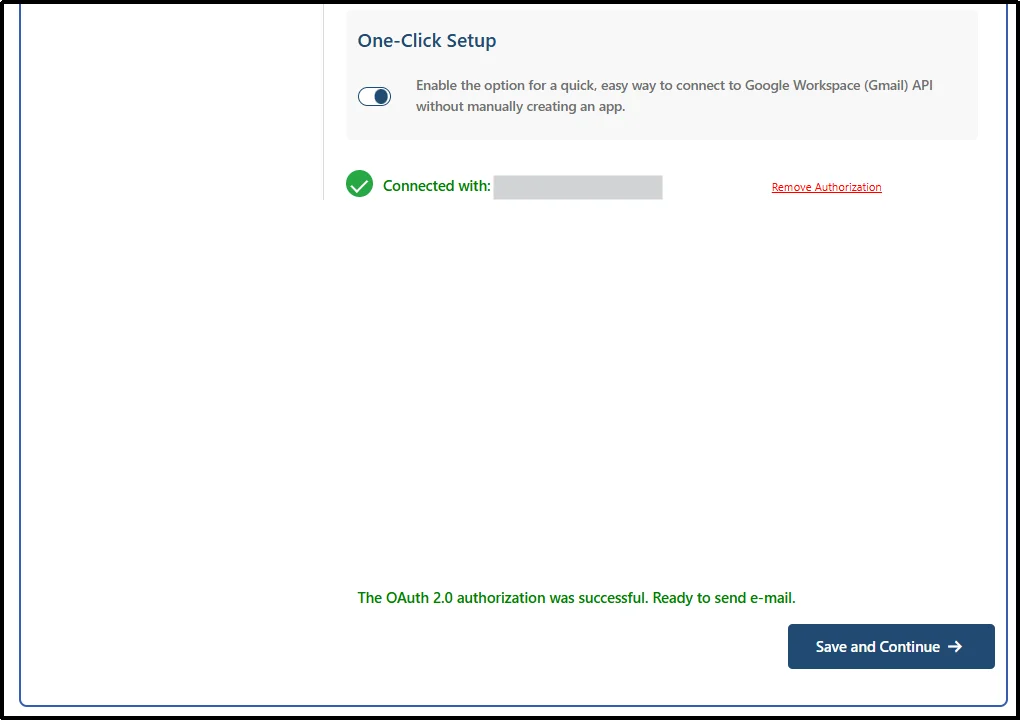
Step 3: Send a Test Email
- Enter a recipient email to send your test email.
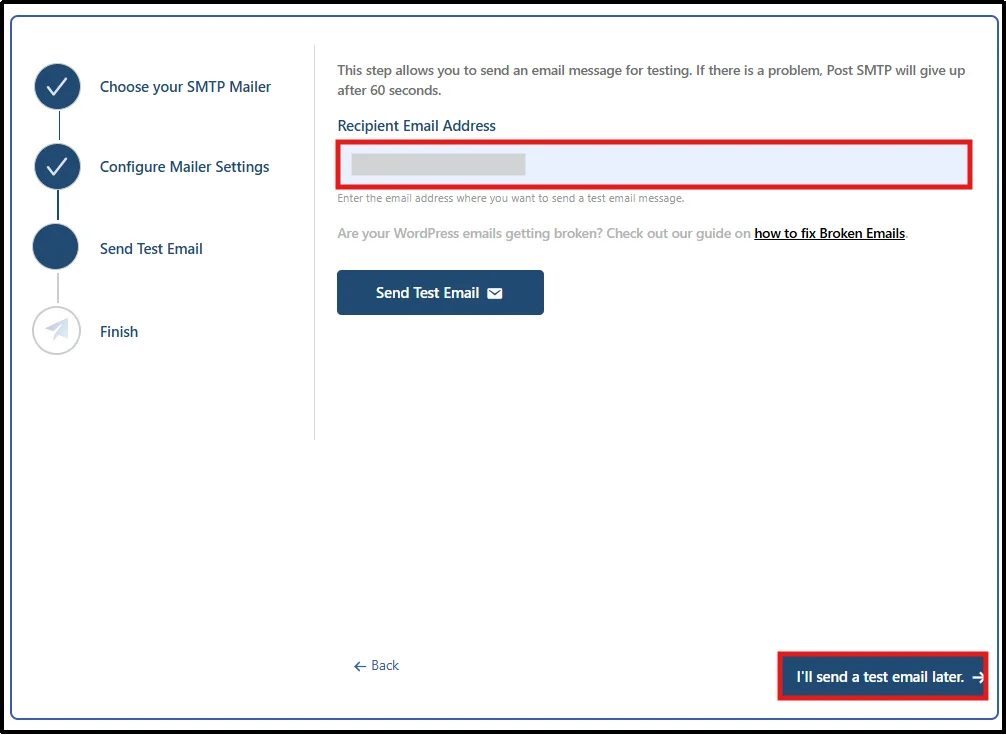
- Click Send Test Email, then wait a few seconds.

- Click Finish after you see the successful message.
- You can now either check logs or skip to the dashboard.
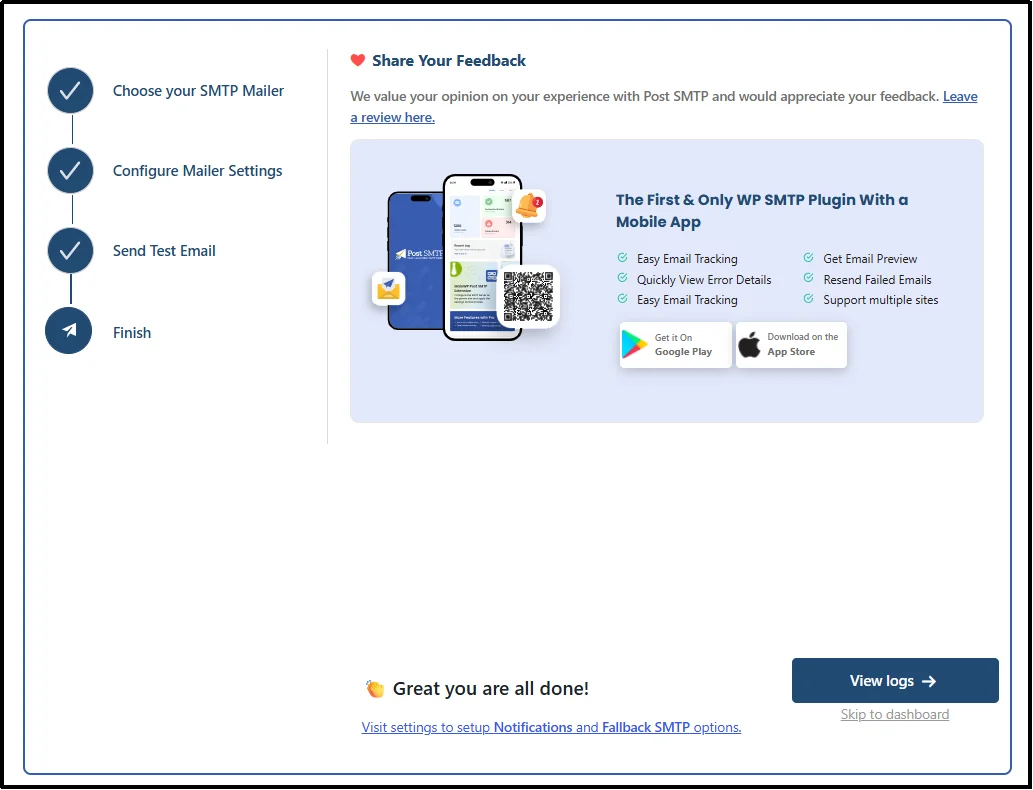
Congratulations! You have successfully set up WordPress SMTP.
Step 4: Enable Email Logging
Now, to configure SMTP settings in detail, follow the steps below:
- Go to Post SMTP → Settings.
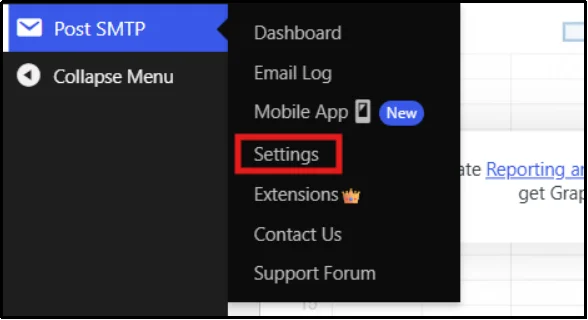
- Go to the Logging Tab from the top menu.
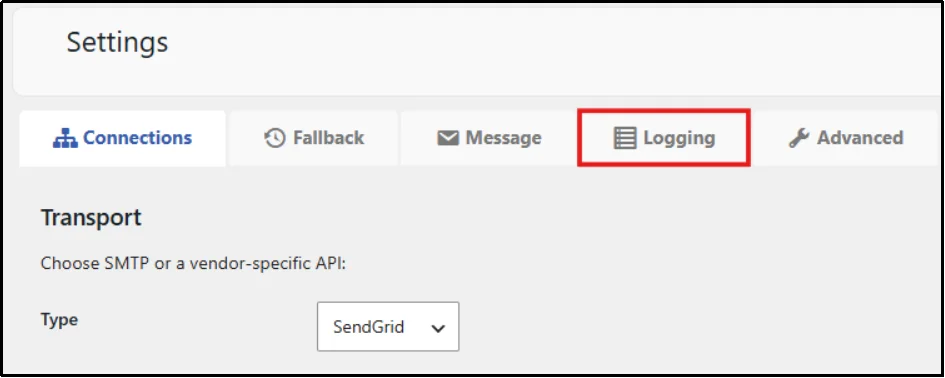
- By default, Logging is enabled, but if it is disabled, you can select the correct option from the drop-down. You can also limit the number of entries and the transcript size.
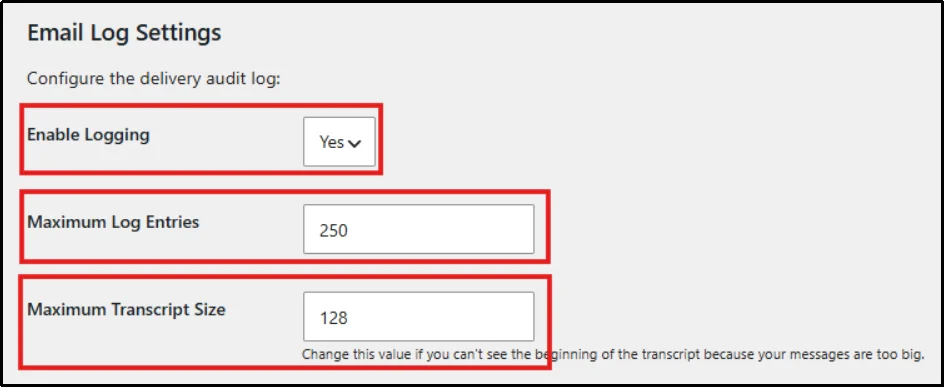
- Upon finalizing your configuration, click Save Changes.
Step 5: Turn on Email Failure Alerts
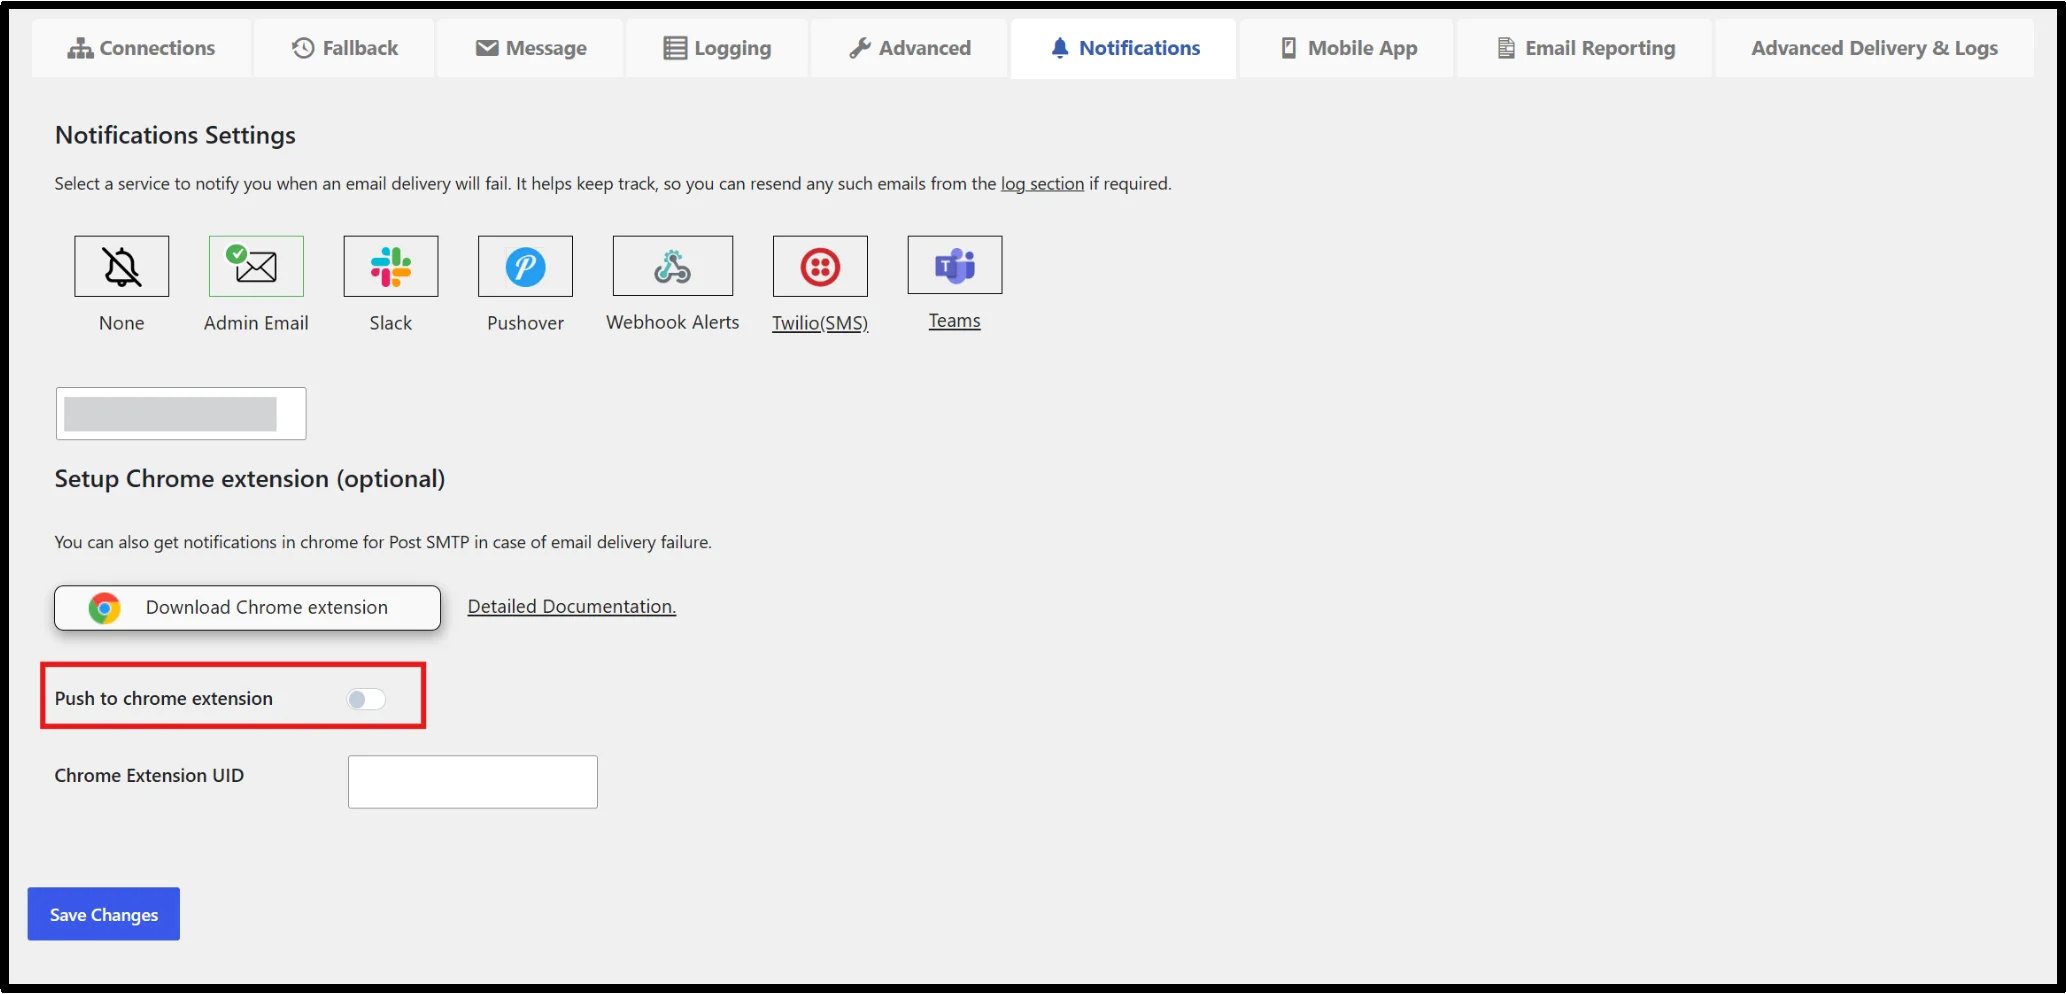
- Select the Notifications Tab in the top bar.

- By default, notifications are enabled for the administrator email address.
- Adjust the notification settings based on your preferences. You can get email failure alerts via SMS (Twilio), Slack, MS Teams, Webhook, Pushover, and even Post SMTP Mobile App.
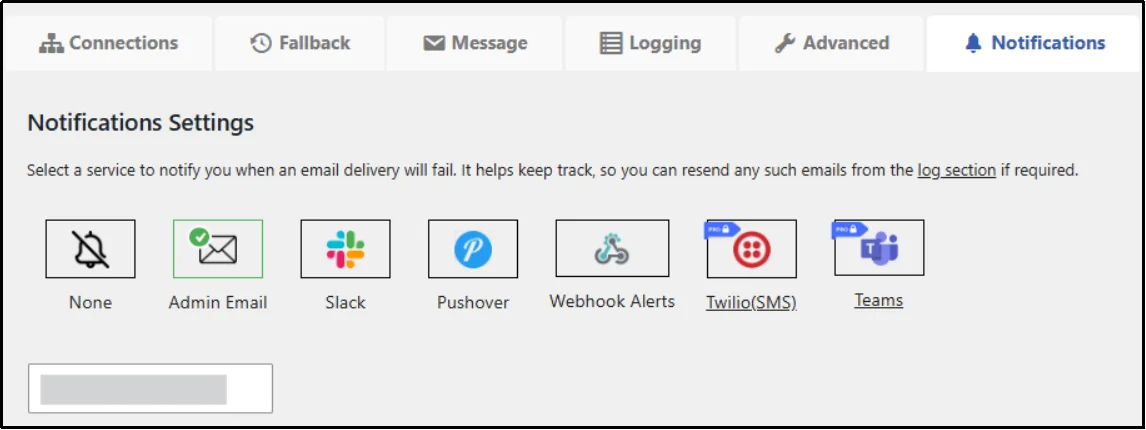
- To receive browser notifications, install the Chrome extension and copy the generated UID code.
- Paste the UID into the corresponding field and enable Push to Chrome Extension.
- Click Save Changes to save your notification settings.
Step 6: Configure Email Reporting
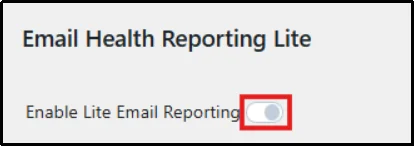
- Go to the Email Reporting bar in the top menu.

- Toggle Enable Lite Email Reporting to On.
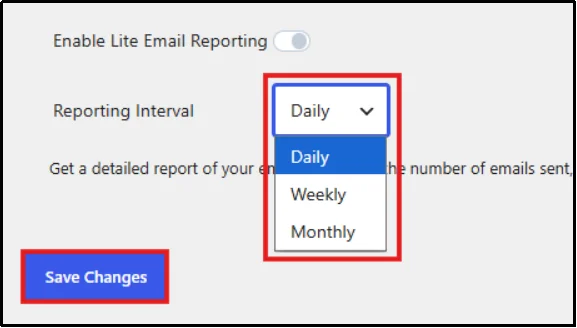
- Set your desired reporting interval, then save changes.
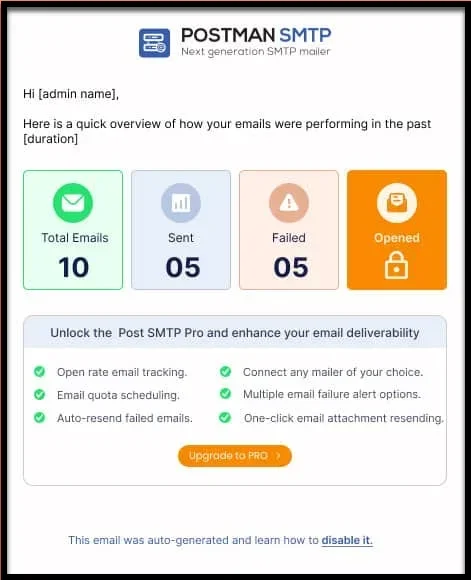
From now on, you will receive an email health report like this:
Step 7: Set Up a Backup Connection
- Select Fallback Tab from the top menu.
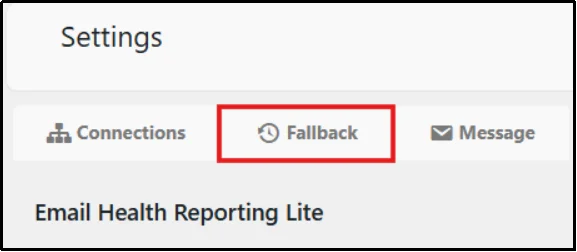
- Enable Fallback by clicking on the Yes button.
Fallback is a backup email deliverability feature. If your primary connection fails, you use the backup mailer automatically by enabling it. For more information about fallback, check our documentation.
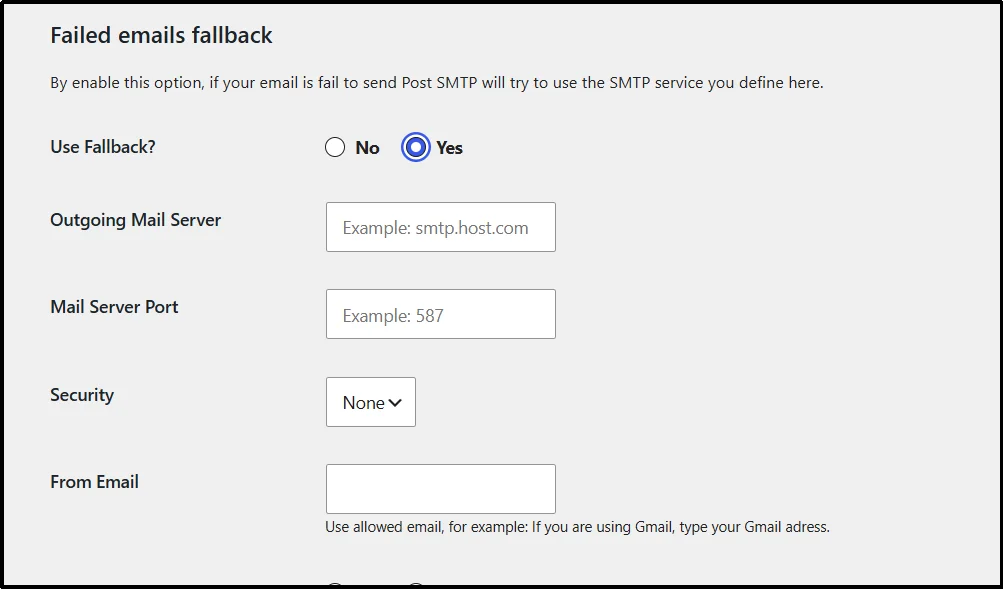
- Enter the necessary SMTP information (Mail Server, Server Port, Security, From Email, Username, and Password).
- Click Save Changes to store the settings.
Step 8: Configure Advanced Delivery Settings
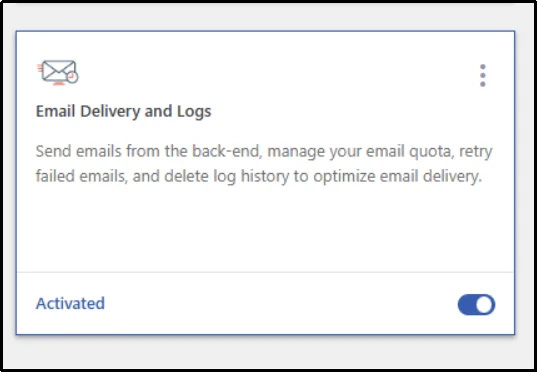
Note: This tab will only appear if you have Post SMTP Pro and have enabled the Email Delivery and Logs extension.
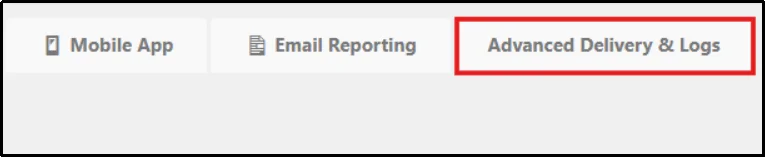
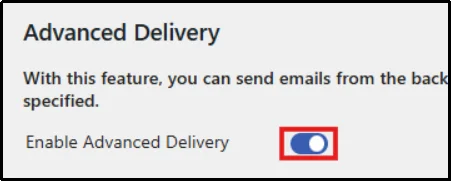
- Navigate to the Advanced Delivery & Logs Tab from the top menu.
- Enable the feature by toggling Enable Advanced Delivery to On.
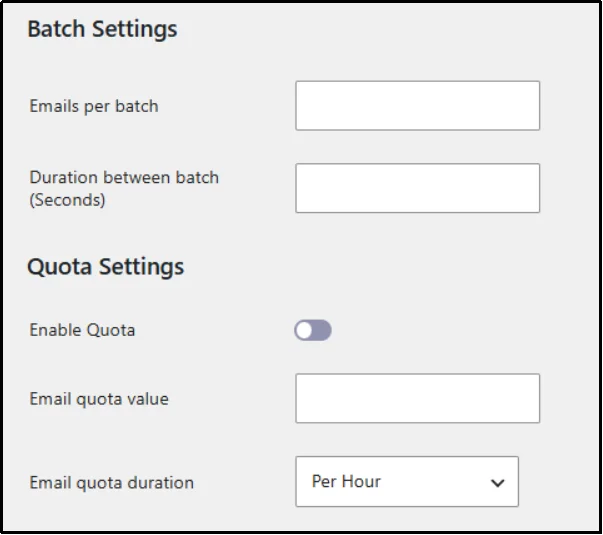
- Configure your preferred batch size and email quota settings.
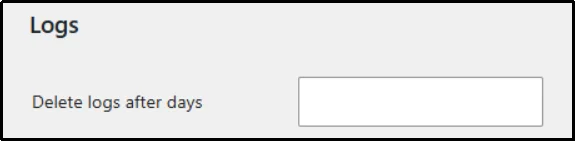
- Set the number of days to retain email logs using the Delete Logs after Days option.
- Click Save Changes to apply the settings.
To wrap it up, you have successfully understood and configured all the crucial WordPress SMTP settings.
Best Practices for WordPress SMTP Configuration
- Keep your SMTP credentials secure. Don’t share them or hard-code them in your theme files.
- Use OAuth authentication whenever your email provider supports it. It’s more secure than password-based authentication and won’t break if you change your email password.
- Send test emails after any major change. Plugin updates, domain migrations, or hosting moves can break SMTP without warning.
- Monitor your email logs regularly. Especially for WooCommerce or membership sites, where missed emails affect customers.
- Match your “From” address to your SMTP domain. Mismatches trigger spam filters. If you’re sending through Gmail, your From address should be your Gmail address.
- Don’t use a free email address for business emails. Sending from yoursite@gmail.com when your site is yoursite.com is a red flag for spam filters. Use a custom domain email.
Start Configuring WordPress SMTP Settings with the Best WordPress SMTP Plugin
WordPress email delivery issues rarely fix themselves. If your site still relies on PHP mail, important messages such as contact form notifications, password reset emails, WooCommerce order confirmations, and membership emails can easily end up in spam folders or fail to send altogether.
Configuring WordPress SMTP settings solves this problem by routing your emails through a trusted email provider with proper authentication. This improves email deliverability, increases inbox placement, and gives you greater visibility into every email your website sends.
With Post SMTP, you can connect WordPress to leading email providers, monitor delivery status, track failed emails, enable email logging, receive instant notifications, and set up backup mailers to protect against delivery failures. Whether you manage a blog, online store, membership site, or business website, these features help ensure your emails reach their intended recipients.
The setup process takes only a few minutes, but the impact on email reliability can be significant. Install Post SMTP today, configure your preferred mailer, send a test email, and start sending WordPress emails with confidence.
Frequently Asked Questions
Do I need SPF and DKIM if I use SMTP?
Yes. SMTP handles email transmission, while SPF and DKIM verify sender authenticity. Using both improves inbox placement and reduces spoofing risks.
Can shared hosting block SMTP ports?
Yes. Some hosting providers restrict ports such as 25, 465, or 587 to prevent abuse. Contact your host if SMTP connections fail.
Why is WordPress not sending emails?
The most common reason is that WordPress is using PHP mail by default, which is blocked or flagged as spam by most email servers. Other causes include incorrect SMTP credentials, blocked ports, or missing SPF/DKIM records. Installing an SMTP plugin and connecting it to a real email provider fixes this in most cases. Here’s how you can troubleshoot your email delivery issues.
What is the difference between SMTP and API mailers?
SMTP uses standard mail protocols, while API mailers communicate directly with email providers through APIs. API integrations often provide better reliability and advanced tracking features.
What SMTP port should I use?
Port 587 with TLS is the recommended default, it’s the most widely supported and least likely to be blocked. Port 465 with SSL is also common. Port 25 is generally blocked by hosting providers to prevent spam abuse.
Is SMTP better than PHP mail?
Yes, significantly. PHP mail has no authentication, poor deliverability, and no error reporting. SMTP sends emails through a trusted provider with proper authentication, better inbox placement, and full delivery logging.
Can I use Gmail SMTP with WordPress?
Yes. Gmail works well for small sites. You’ll need to either use an app password (if you have 2FA enabled) or authorize Post SMTP via OAuth. Note that free Gmail accounts have email sending limits of approximately 500 emails per day. For higher volume, use Google Workspace or a transactional email service.
Do I need an SMTP plugin for WordPress?
Yes. WordPress does not support authenticated SMTP connections out of the box. An SMTP plugin such as Post SMTP bridges that gap and allows WordPress to send emails through trusted mail providers.
Which SMTP provider is best for WordPress?
The best provider depends on your email volume and budget. Gmail works well for low-volume websites, while SendGrid, Amazon SES, Brevo, and Mailgun are better suited for growing businesses and transactional email delivery.
Can SMTP improve WooCommerce email delivery?
Yes. SMTP helps WooCommerce send order confirmations, invoices, shipping updates, and customer notifications more reliably.