
 OpenAI
 Perplexity
Are you and your users missing out on important emails because WordPress PHPMailer is not working properly on your website?
But here’s the problem: web hosts aren’t built to send reliable emails at scale. This leads to delivery failures, lost messages, or worse—emails being marked as spam.
Good news? You don’t have to stick with PHPMailer.
In this guide, we’ll show you exactly how to fix PHPMailer not working in WordPress and how to switch to a smarter, more reliable way to send email using SMTP.
Ready? Let’s get started!
What is PHPMailer in WordPress?
PHPMailer is a widely used PHP library that allows PHP-based applications like WordPress to send emails. When WordPress sends an email—whether it’s a password reset link, a comment notification, or a WooCommerce order update—it does so through the wp_mail() function, which relies on PHPMailer to actually deliver the message.
Sounds simple enough, right? Here’s the problem: PHPMailer sends email through your web server’s mail function. That means;
- No authentication is added to the messages.
- Shared hosting servers often limit how many emails you can send.
- Your emails are more likely to get flagged as spam or blocked altogether.
That’s why even though PHPMailer is built into WordPress, it’s not a great long-term solution for reliable email delivery—especially if your business depends on those emails reaching your users.
Why PHPMailer Fails to Send Emails
Let’s break down the most common reasons behind PHPMailer not working on your WordPress site:
- Your Hosting Provider Blocks Email Functions: Many shared or managed hosting plans (like GoDaddy or Bluehost) disable or restrict the PHP mail() function to prevent spam abuse.
- No Authentication = Spam Risk: PHPMailer sends unauthenticated emails, which means inbox providers can’t verify your messages. That alone is a big reason for delivery failures or emails being marked as spam.
- Conflicting “From” Addresses: If multiple plugins try to use different sender emails, it confuses mail servers and reduces trust.
- Missing DNS Records: Without proper DNS records (SPF, DKIM, and DMARC), your domain has no credibility in the eyes of email services like Gmail or Outlook.
- PHP Mail Function Disabled: Some server configurations block PHP’s mail function entirely, especially in stricter hosting environments or custom stacks.
Bottom line? If you’re relying on PHPMailer and wp_mail() alone, you’re bound to run into problems. Let’s move on to how you can fix it step by step using the Post SMTP plugin.
Step 1: Install an SMTP Plugin to Bypass PHPMailer
The most effective way to stop relying on the unreliable wp_mail() function is to install an SMTP plugin that routes your emails through a trusted SMTP server. This instantly improves your chances of emails being delivered successfully—and keeps them out of the spam folder.
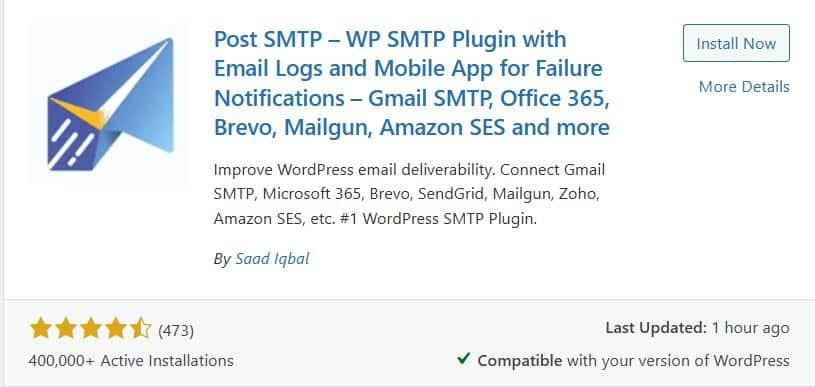
There are several options out there, but the Post SMTP plugin stands above the rest for WordPress email deliverability.
Why Post SMTP?
Post SMTP isn’t just a plugin that connects your WordPress site to an SMTP service—it’s a full email delivery solution. With it, you get:
- Real-time email delivery logs
- OAuth 2.0 authentication for security
- A fallback SMTP option if your main service fails
- Alerts for failed emails (via email, Slack, Webhook, or SMS)
- A mobile app to track email delivery on the go
And best of all? It’s easy to set up, even if you’re not a tech expert. Here’s how to install the plugin:
- Go to your WordPress dashboard.
- Click on Plugins → Add New.
- Search for Post SMTP.
- Click Install Now, then Activate.
Step 2: Set Up SMTP with Post SMTP
After activating the plugin, follow the steps below to configure the SMTP server on your WordPress site.
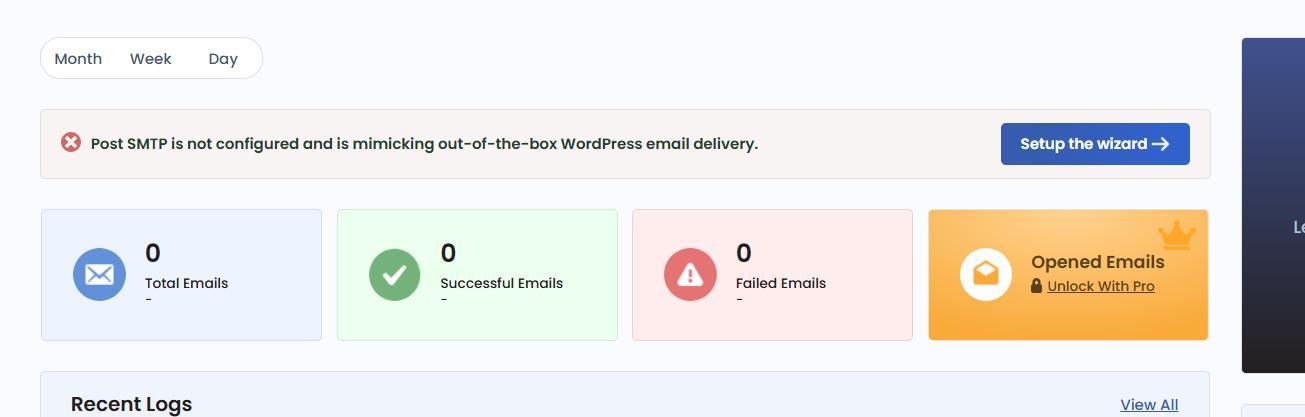
1. Launch the Setup Wizard
- Once activated, head over to Post SMTP → Dashboard.
- Click ‘Start the wizard’ to begin the configuration.
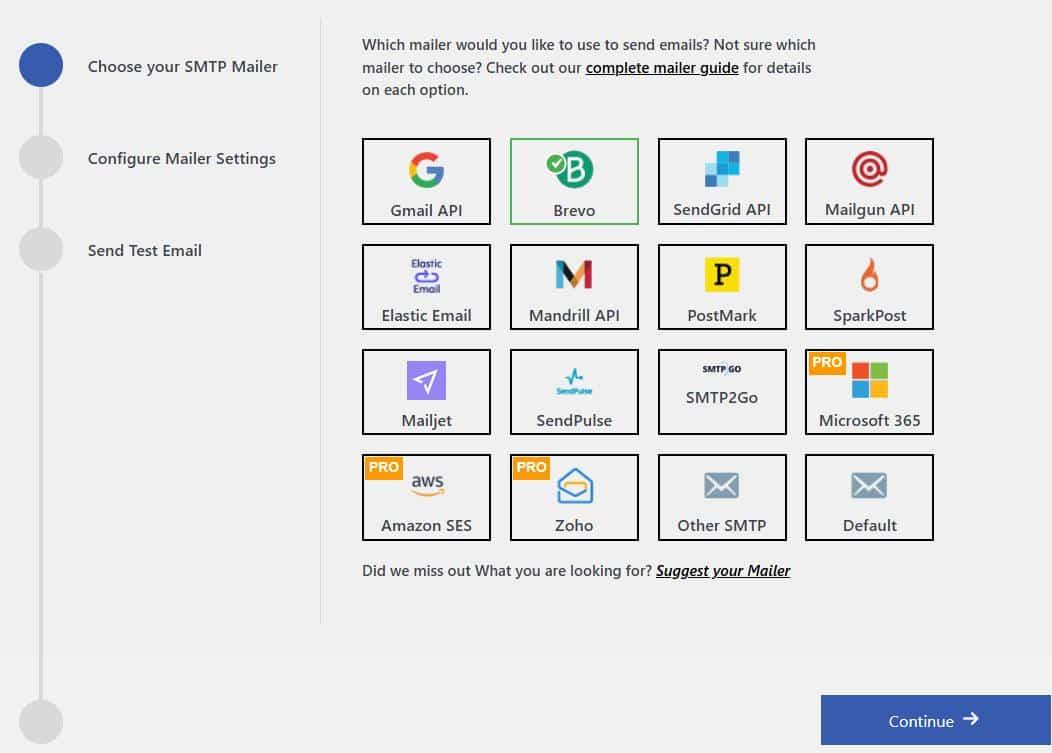
2. Choose Your SMTP Provider
The wizard will prompt you to select your email service. You can pick from popular options like:
- Gmail SMTP (Google Workspace)
- Outlook (Microsoft 365)
- Amazon SES
- Mailgun
- Zoho Mail
- Brevo (formerly Sendinblue)
- … and many more
For this example, let’s go with Brevo.
Click Continue to move forward, as shown in the screenshot below:
3. Enter Your Email Details
You’ll now need to fill in some basic info:
- From Email: Use a domain-based email (e.g., hello@yourwebsite.com)
- From Name: This is the name your recipients will see
- SMTP Credentials or API Key: Depends on your chosen provider
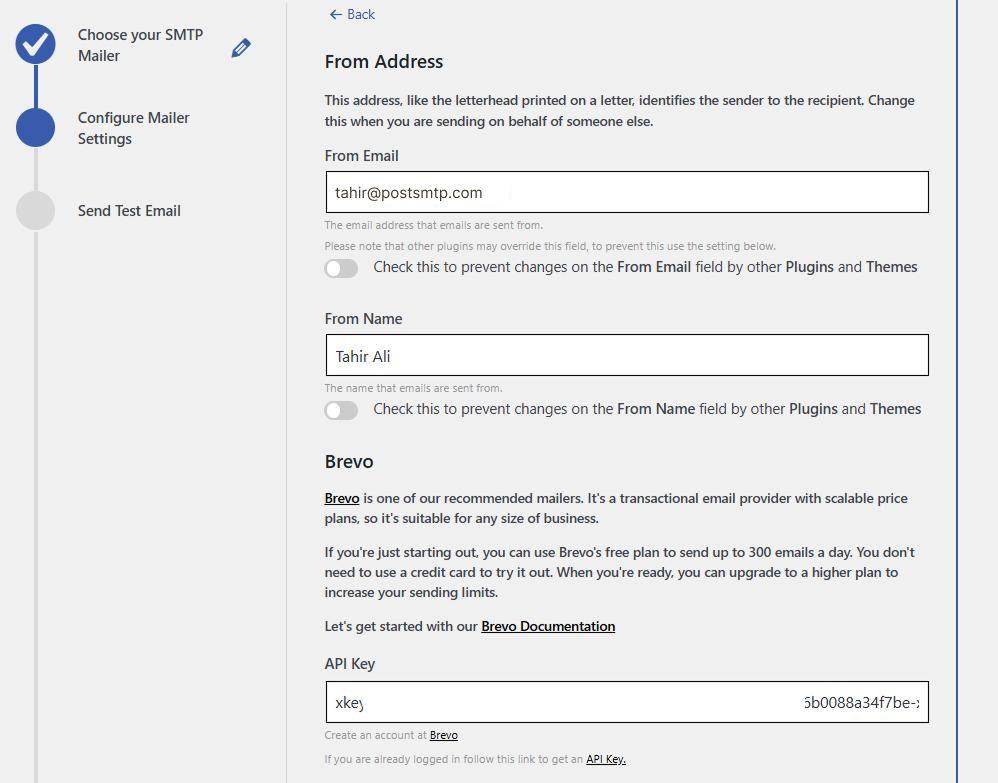
After filling this out, click ‘Save and Continue.’
4. Send a Test Email
Now, send a test email directly from the plugin to make sure everything is working. If your configuration is correct, you’ll see a confirmation that the email was delivered successfully.
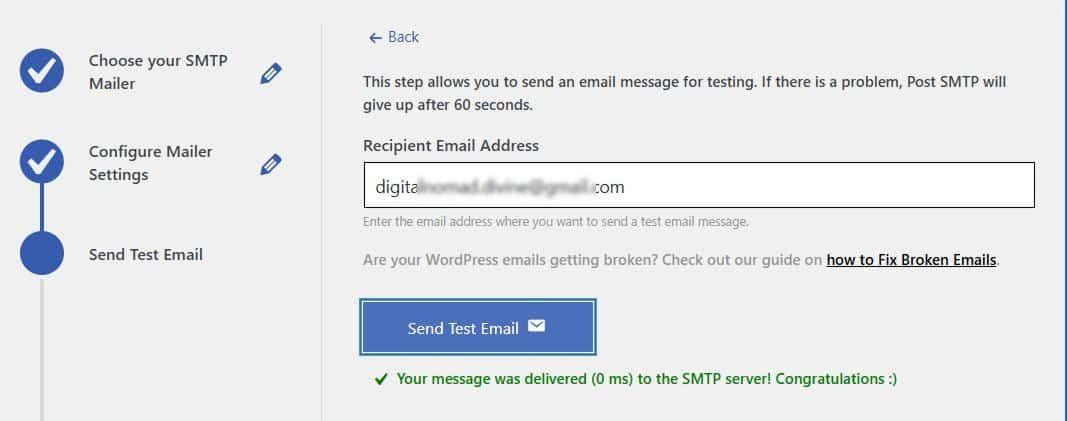
From this point forward, all of your WordPress emails—including plugin notifications, password resets, and form entries—will go through your authenticated SMTP provider.
Step 3: Lock a Consistent “From” Email Address
Here’s a little-known fact that causes a lot of headaches: if different plugins on your site send emails using different sender addresses, inbox providers like Gmail or Outlook can see those emails as suspicious or even mark them as spam.
Why? Because sender inconsistency is a red flag for phishing and spoofing.
Luckily, Post SMTP gives you an easy way to fix this once and for all.
How to Set a Consistent Sender Email with Post SMTP
Here’s how to make sure all emails from your site use a single, authenticated email address—no matter what plugin or theme is sending them:
1. Open Post SMTP Settings
- Go to your WordPress dashboard.
- Navigate to Post SMTP → Settings.
- Click on the Message tab.
2. Set Your Sender Email & Name
- In the Email Address field, enter the address you want to use as the sender for all outgoing emails.
Pro Tip: Use a domain-based address like noreply@yourwebsite.com for maximum credibility.
- In the Name field, set a friendly sender name, like your business name or website name.
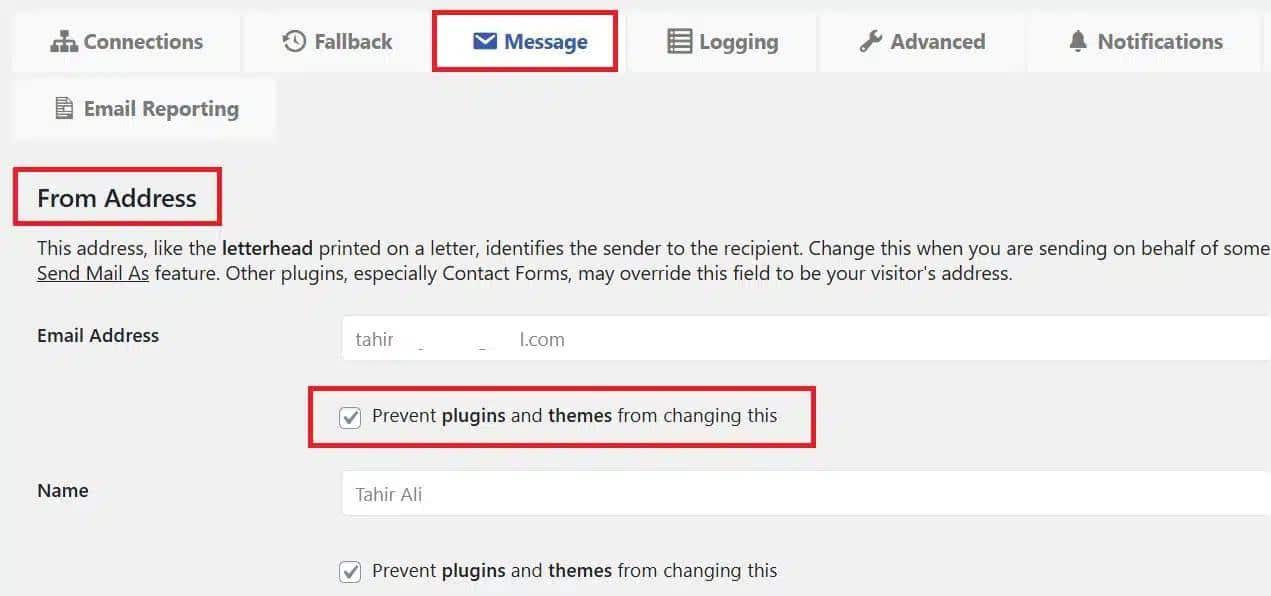
3. Prevent Other Plugins from Changing the Sender
This is the magic step. Right below the email fields, you’ll see a checkbox labeled:
“Prevent plugins and themes from changing this.”
Check that box. It locks your chosen sender email across the board—so no plugin can sneak in its own and break your deliverability.
4. Save Your Settings
Click ‘Save Changes’ to apply the new settings.
Step 4: Enable the Email Health Report
Even with everything set up correctly, your WordPress site might still hit email issues—like provider outages, misconfigured DNS, or plugin conflicts. The problem? You won’t always know when that happens unless you’re watching closely.
That’s exactly what the Email Health Report in Post SMTP is built for.
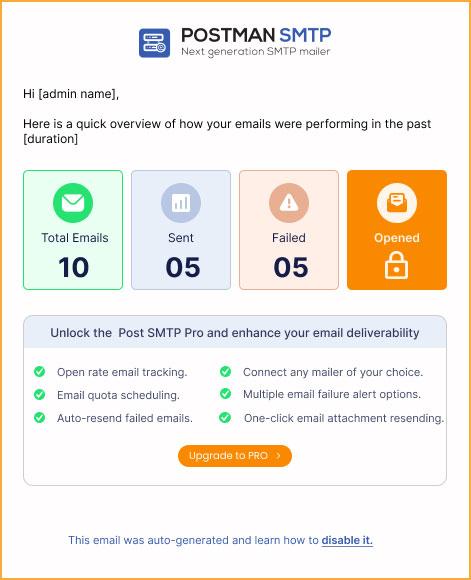
It gives you a crystal-clear view of how your emails are performing—daily, weekly, or monthly. Think of it as a checkup for your email system, delivered straight to your inbox.
How to Enable the Email Health Report in Post SMTP
Here’s how to activate this incredibly useful feature:
- Go to the WordPress dashboard, click on Post SMTP → Settings
- Navigate to the “Email Reporting” tab and look for the section labeled Email Health Report

- Click ‘Enable’ to activate reporting. This turns on automatic reporting for your site.
- Set the frequency. Choose how often you want to receive reports: Daily, Weekly, or Monthly.
- Click ‘Save Changes’

That’s it! You’ll now receive detailed email delivery insights on the schedule you chose. As you can see in the image below:
Pro Tip: If you’re managing multiple WordPress sites or eCommerce stores via the MainWP Dashboard plugin, we highly recommend you install the MainWP Post SMTP Extension so you can get a combined email health report for all your websites.
Step 5: Check Your Domain’s Spam Score (Optional, But Recommended)
You’ve done the heavy lifting. But what if your emails are still missing, landing in spam, or delayed?
There’s a good chance your domain reputation is the culprit.
Inbox providers like Gmail, Yahoo, and Outlook keep a record of your domain’s behavior. If your domain has ever been used to send spammy content—or lacks basic authentication like SPF, DKIM, and DMARC—it could be flagged as untrustworthy.
And when that happens, your messages don’t stand a chance.
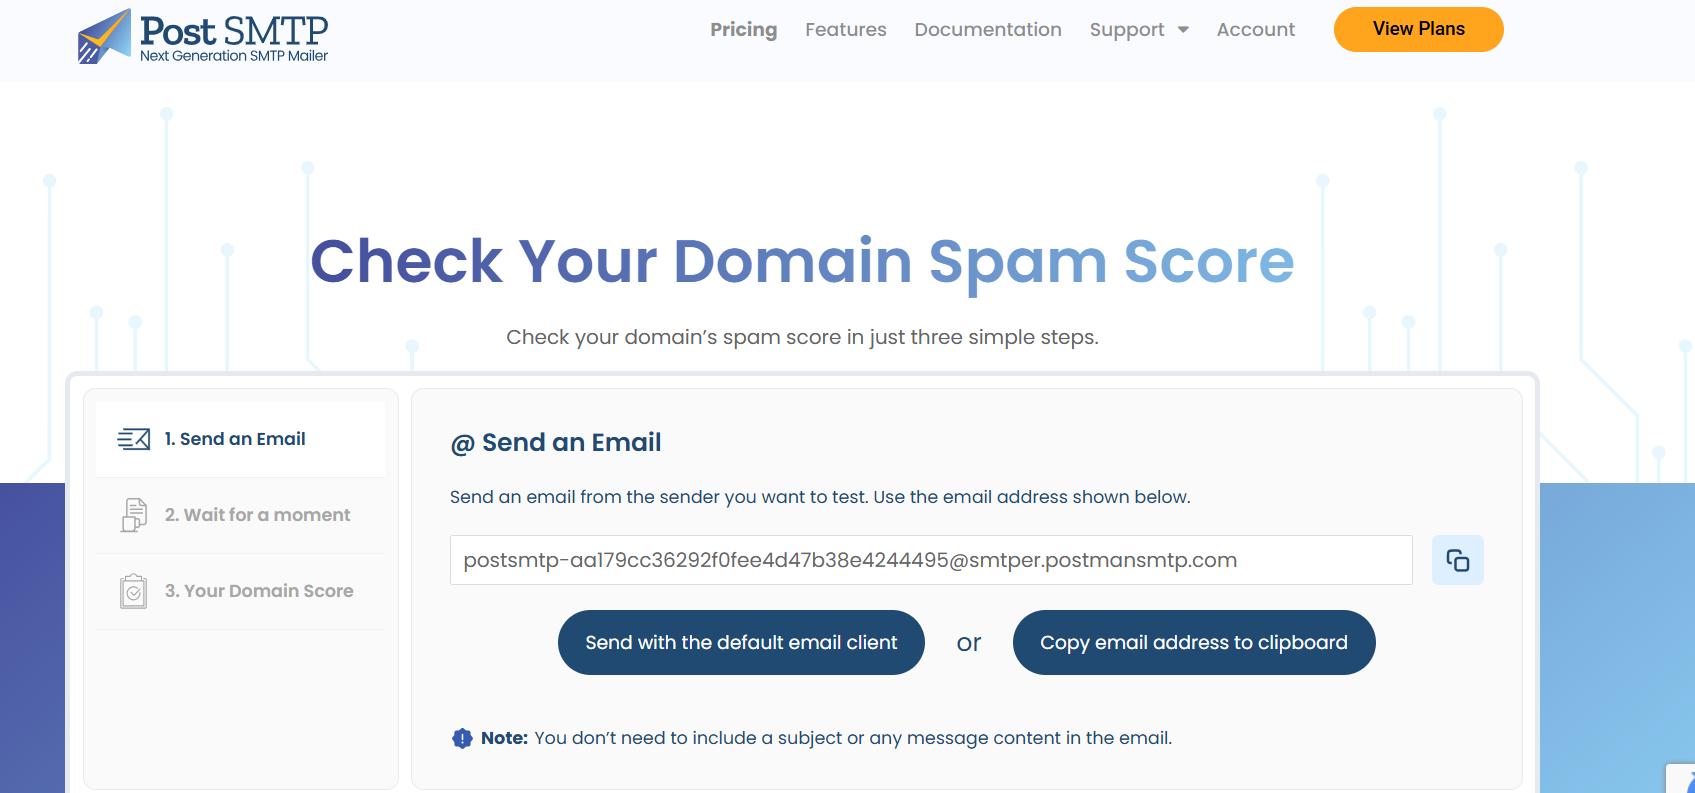
How to Check Your Domain’s Spam Score
You can quickly get a diagnosis using a Spam Score Checker. Here’s how:
- Copy the destination address given by your spam score tool.
- Send a test email from your domain to the given address.
- After the test message is sent, click ‘Check Spam Score’ in the tool.
- Wait a few seconds, and you’ll receive a spam score for your domain.
If you see a high spam score, then the possible red flags can be:
- Missing or misconfigured SPF, DKIM, or DMARC
- Use of blacklisted IPs or domains
- Spammy words in your subject or body
Here’s How to Fix a Bad Spam Score
If your domain reputation needs a rescue mission, here’s what to do:
1: Add SPF, DKIM, and DMARC Records to Your DNS
- Go to your DNS provider (like Cloudflare or your domain registrar).
- Add or fix your SPF, DKIM, and DMARC records according to your SMTP provider’s guide.
2: Stick to a Domain-Based Sender Email
- Always send emails from an address like yourname@yourdomain.com.
3: Avoid Spam Trigger Words
- Ditch aggressive subject lines. Instead of “FREE BONUS NOW!!!” use something clear like “Your download is ready.”
4: Use a Blacklist Checker
- Tools like MXToolbox or BlacklistAlert can tell you if your domain or server IP is on any blocklists. If you are, you’ll need to request delisting.
Need Expert Help? Let Post SMTP Handle It For You
Sometimes, even after following all the steps, email issues can persist. Email deliverability can get tricky with DNS configurations, hosting restrictions, or specific platform quirks like Cloudflare or GoDaddy managed hosting.
If you’re still facing problems like WordPress emails not sending, or you want to make sure your SMTP and DNS settings are 100% correct, don’t worry—you’re not alone. Post SMTP offers expert support to guide you through every step.
What Can Post SMTP Experts Help You With?
- SMTP Setup: They’ll configure Post SMTP with your chosen SMTP provider, making sure your emails route correctly.
- DNS Records Configuration: They’ll help you set up or fix SPF, DKIM, and DMARC records in your DNS provider (including Cloudflare) to build a strong email reputation.
- Spam Score Troubleshooting: If your domain has a high spam score, they’ll work with you to clean it up and get your emails delivered.
- Ongoing Support: Whether you hit an unexpected snag or want help with email logging, retries, or alerts, their team is ready to assist.
How to Get Expert Support
You can book a 30-minute session with a Post SMTP email specialist who will walk you through your setup and fix any issues. Or, if you prefer, reach out directly via a support ticket for quick response.


