
Is HappyForms failing to send email notifications after a user submits a contact form on your WordPress site? You are not alone. Many WordPress users report issues with HappyForms email alerts not reaching their inboxes, but fortunately, there’s a reliable fix.
In this guide, we’ll walk you through how to troubleshoot and solve the “HappyForms not sending email” issue and show you how to use the Post SMTP plugin to ensure reliable email delivery from your site.
Ready? Let’s get started!
Why Is HappyForms Not Sending Email Alerts?
If HappyForms email notifications are not working, it’s often due to configuration issues or limitations with WordPress’s default email function. Here, we’ll explain the main reasons why HappyForms notifications fail and what you can do to fix each one.
Reason #1: HappyForms Email Alert Settings
A common reason behind “HappyForms not sending email” is misconfigured notification settings. Each form in HappyForms has its own notification settings that determine where the emails get sent.
If the recipient’s email address is incorrect, or if you’re using a public email service like Gmail instead of a custom domain (i.e., example@yourdomain.com), HappyForms notifications might not reach your inbox.
Reason #2: WordPress Default Mail Function
By default, WordPress relies on the wp_mail() function to send emails, which is one of the main reasons behind the “WordPress not sending emails” issue. Many hosting servers block this function due to security policies, which can lead to delivery issues, including “HappyForms email not working.”
Additionally, the default WordPress mail function can appear suspicious to email providers, which often results in the emails being marked as spam or blocked entirely.
To solve this, you need to connect your WordPress site to an SMTP server using the Post SMTP, which we will discuss later in the article.
3 Easy Steps to Fix HappyForms Not Sending Email Issue
In the following section, we will show you how to fix the “HappyForms not sending email” issue in three easy steps.
First, we’ll check the HappyForms email alert settings. After that, we will set up the Post SMTP plugin to ensure reliable email deliverability.
Step #1: Configure HappyForms Email Alert Settings
To receive email notifications, make sure your HappyForms notification settings are configured correctly. Any misconfigurations here can prevent emails from reaching you and the subscriber.
To make sure you’ve set up everything correctly, follow these steps:
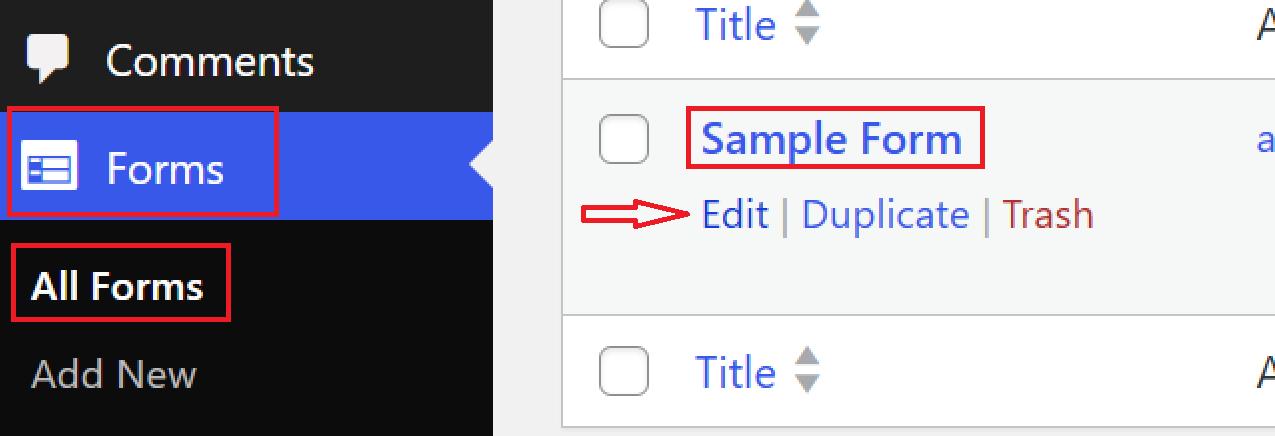
- Access Form Settings: Go to your WordPress dashboard, navigate to Forms » All Forms, and select the contact form with email issues.
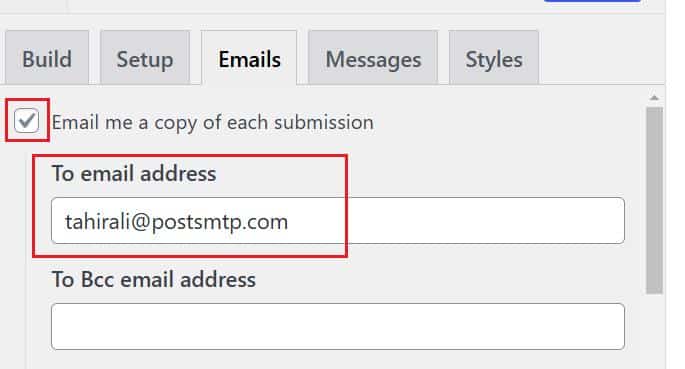
- Open Email Tab: In the form settings, switch to the Email tab. This is where you control who receives form submissions. Ensure the “Email me a copy of each submission” is enabled.
- Set Recipient Email: Check that the recipient’s email address is correct and accessible. If you’re using a public email provider like Gmail, consider switching to an address with your domain (e.g., contact@yourdomain.com) for better delivery.
📕 If you don’t have a custom email domain, check out our guide on How to Get an Email Domain for Your Business – 100% Free
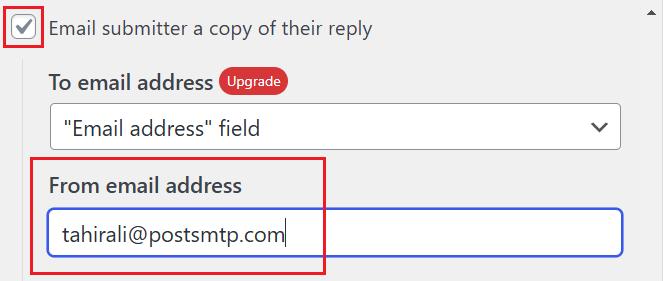
- Enable Visitor Copy: To send a copy of the email to the visitor, enable the option that says, “Email the submitter a copy of their reply.” Also, you’ll see fields to customize the “From email address.” Use an email address that matches your domain to prevent deliverability issues.
- Save Changes: Double-check that each setting is correct, then click the “Update” button at the top to save the changes.
Now that your notification settings are set let’s proceed to install and configure the Post SMTP plugin for a reliable email setup.
Step #2: Install and Set Up Post SMTP Plugin
Post SMTP is the #1 WordPress SMTP plugin. It doesn’t just let you connect to an SMTP server; it also provides many other useful features that help you optimize your email deliverability.
Post SMTP supports all popular SMTP service providers such as Gmail API, Microsoft 365 SMTP, Brevo, Mailgun, SendGrid, SendPulse, Mandrill SMTP, etc.
Additionally, using Post SMTP, you can:
- Track every email sent from your WordPress site
- Securely authenticate your SMTP mailer using OAuth 2.0
- Set up a secondary SMTP mailer to ensure email delivery
- Automatically retry sending any failed emails.
- Receive daily, weekly, or monthly email health reports.
- View and resend emails with attachments directly from the log screen.
- Get failure alerts on admin email, SMS, or Slack.
- Track emails from anywhere using the Post SMTP mobile app.
- Email open tracking to optimize your email campaigns
- Stay informed about email delivery failures through the Chrome Extension.
To set up the Post SMTP plugin, follow the steps below:
- Install Post SMTP: In the WordPress dashboard, go to Plugins » Add New Plugin, search for “Post SMTP,” then click Install and Activate the plugin.
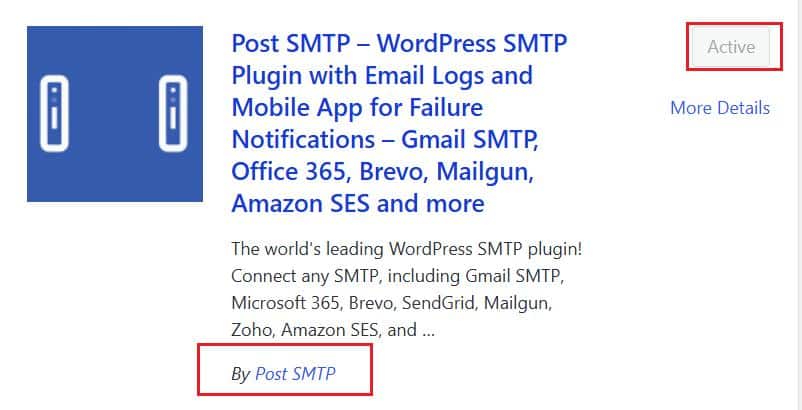
- Start the Setup Wizard: After activation, you’ll see the following screen. If not, then go to Post SMTP » Dashboard and click Start the Wizard to configure your email settings.
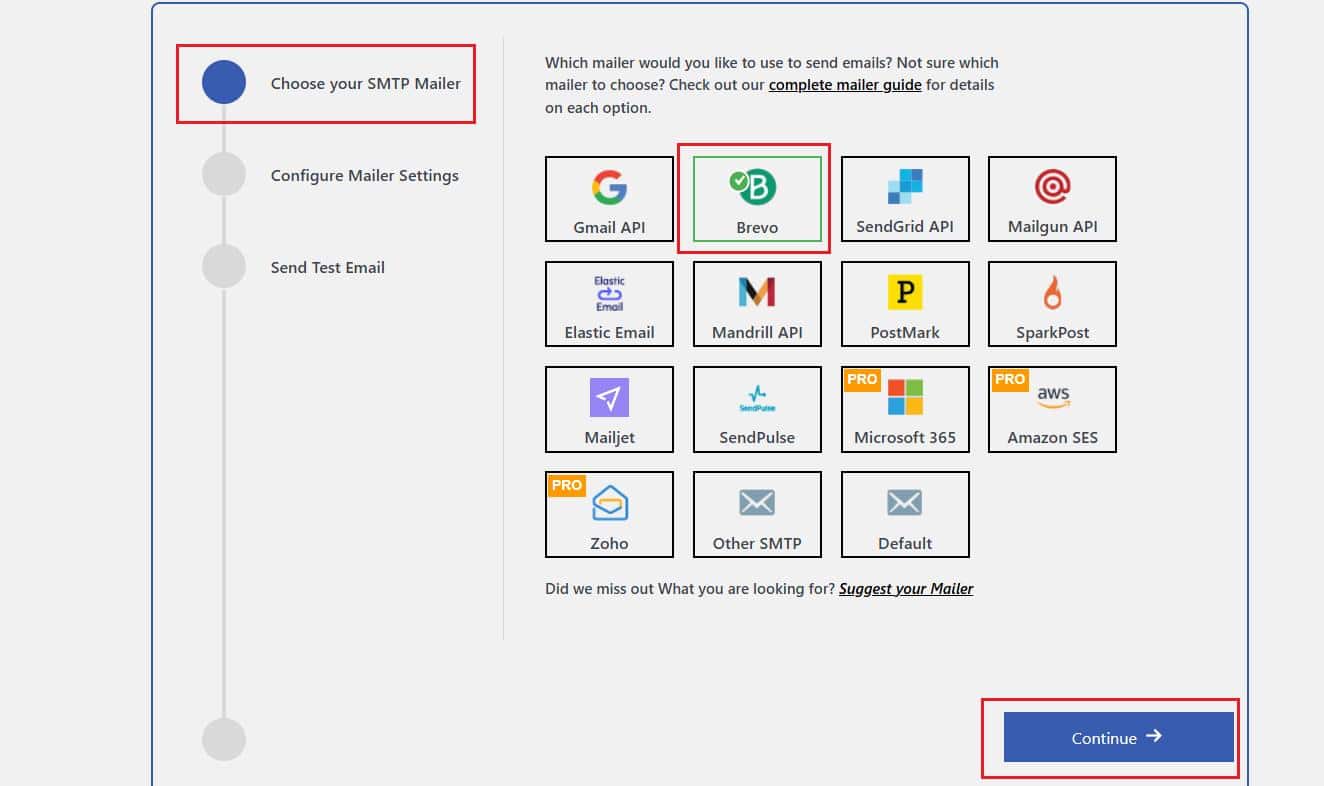
- Choose an Email Provider: Select your preferred email provider and hit “Continue”. Post SMTP supports popular providers like Gmail SMTP Server, SendGrid, Brevo, Zoho Mail, Amazon SES, Mailgun SMTP, Microsoft 365, etc.
For this guide, we’ve chosen Brevo.
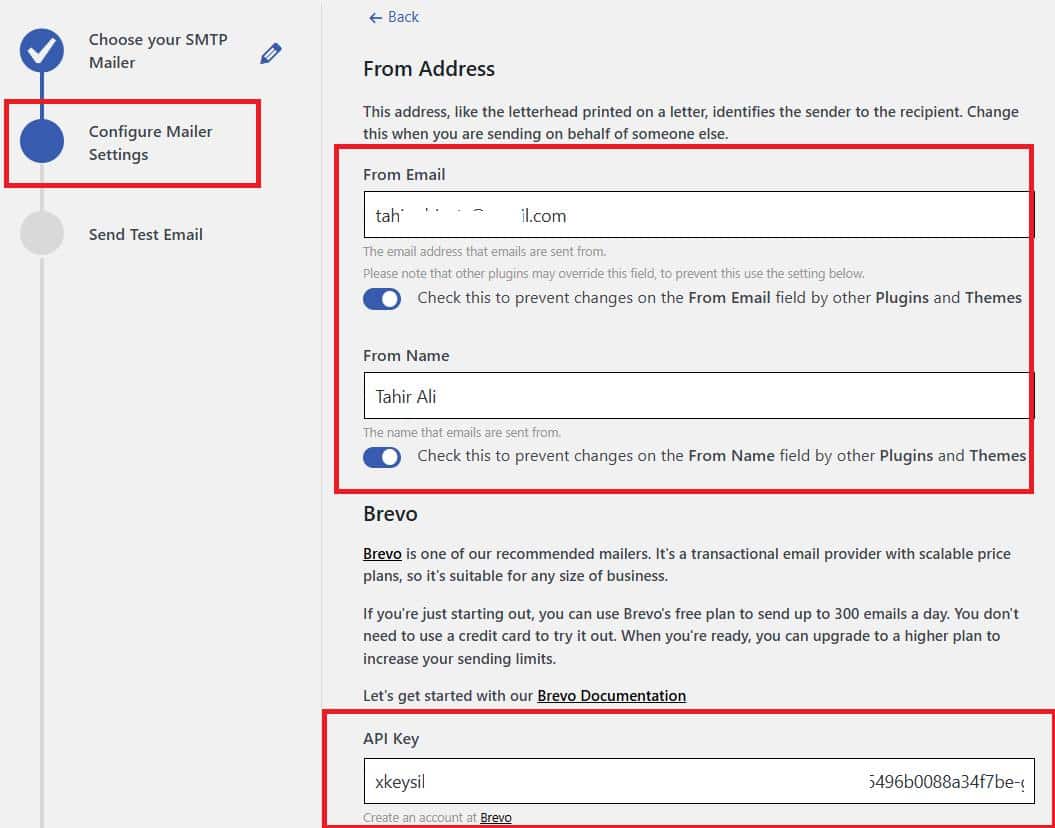
- Configure SMTP Details: You’ll need to enter the From Email and From Name fields. Then, fill in your SMTP server details and API Key provided by your email service provider and click “Save and Continue.”
- Test Email Functionality: Send a test email to make sure everything works correctly. Enter a test email address that you’ve access to and click Send Test Email. Make sure to verify that the email reaches your inbox successfully.
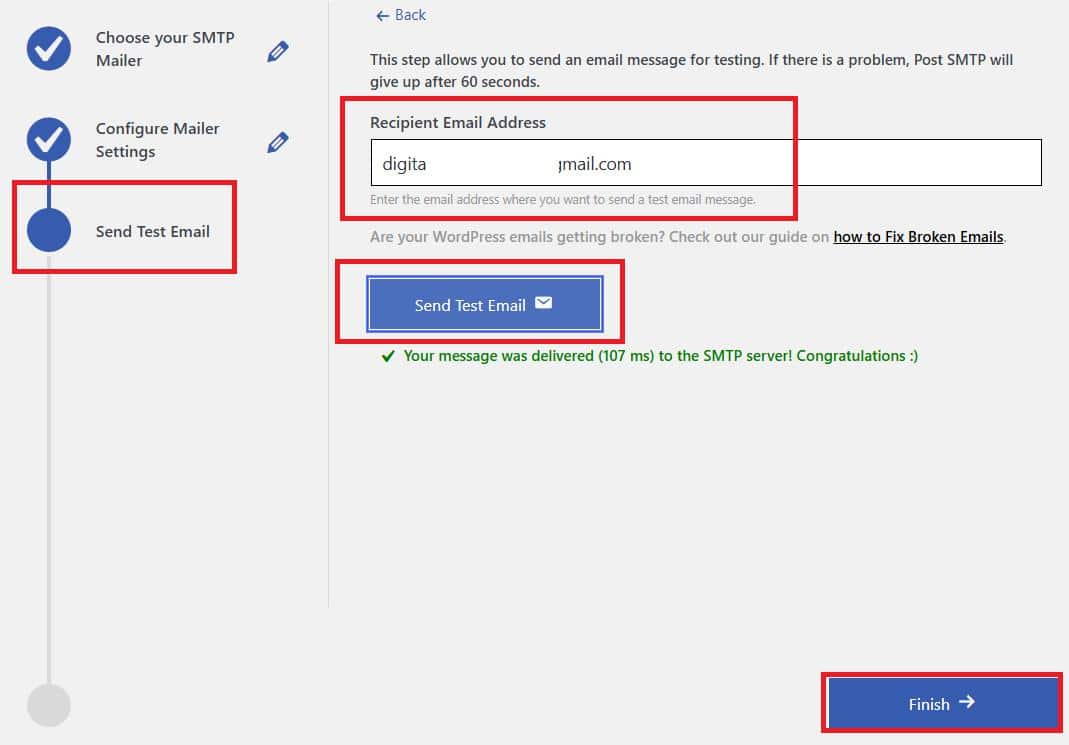
- Save Configuration: Once your test email is sent successfully, click Finish to complete the setup.
Now, your HappyForms notifications should start sending through your new SMTP settings.
Resend Failed Email Deliveries (Optional)
If you missed important HappyForms notifications before setting up Post SMTP, you can resend them directly from the email logs screen. Resending failed emails allows you to recover missed notifications, ensuring no user inquiries or form submissions are overlooked.
Here’s how you can do it:
- Access Email Log: Go to Post SMTP » Email Log in your WordPress dashboard to view all sent emails.
- Identify Failed Emails: Review the log for any emails marked as failed. Each entry displays the email status, letting you see which emails didn’t go through.
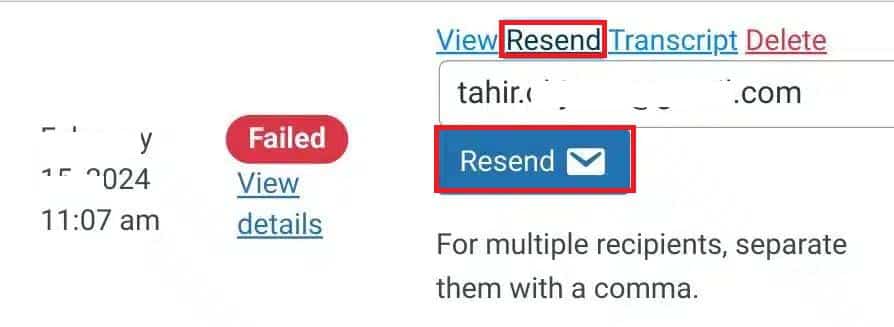
- Resend Emails: For each failed email, click the Resend button. This option will reattempt sending the email using your new SMTP settings to ensure it reaches your inbox.
Step #3: Force “From” Email Address
To prevent conflicts between different plugins, you can force a consistent “From” email address for all email deliveries from your website, including the HappyForms notifications.
Luckily, you can do it easily using the Post SMTP plugin:
- Navigate to Post SMTP Settings: Go to Post SMTP » Settings from your dashboard and open the Message tab.
- Set “From” Email Address: In the “Email Address” field, enter the email address you want all outgoing emails to use. This is usually the same address you configured in previous steps.
- Prevent Overrides: Check the box labeled “Prevent plugins and themes from changing this.” This ensures that no other plugin or theme can alter this address.
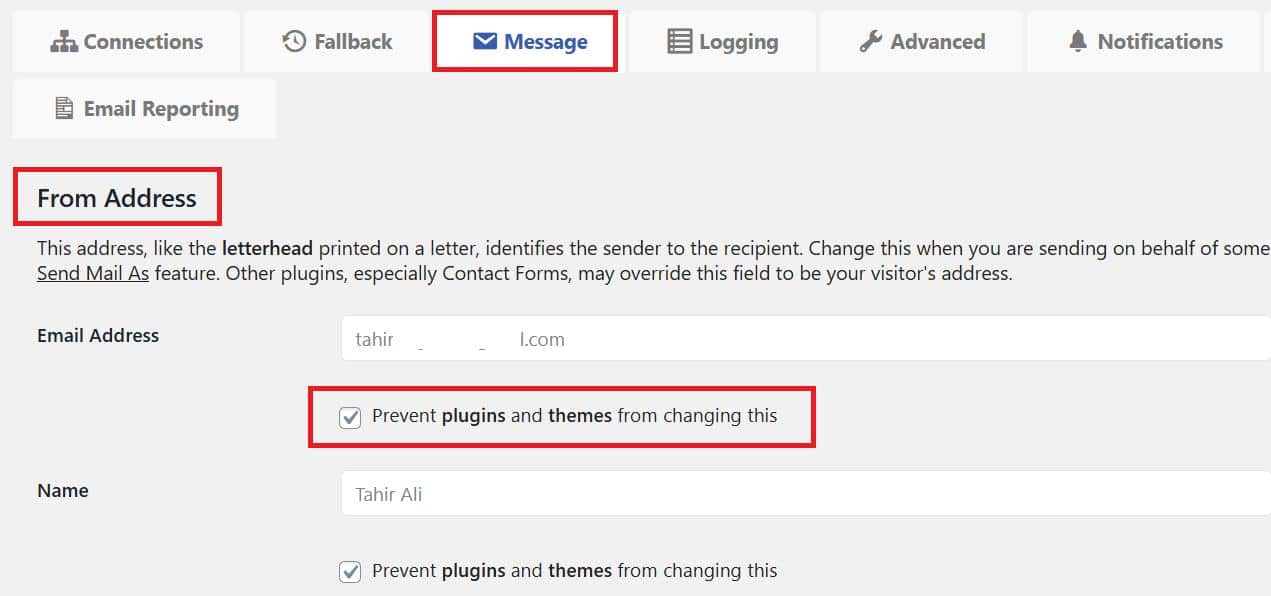
- Save Changes: Click Save Changes to apply your settings.
From now on, every email sent from your site, including the HappyForm notifications, will be sent from the single email address you entered above. This reduces the chances of your emails being blocked or marked as spam by email providers.
Don’t Forget to Check the Spam Score for Your Email Domain
If you are still facing the HappyForms not sending emails issue, then there is a chance that your email domain has a high spam score.
A high spam score indicates that email servers might classify your emails as spam, which is often due to the absence of essential email domain authentication protocols, i.e., SPF, DKIM, or DMARC.
To clear any doubt, simply check your email domain spam score using our Spam Score Checker tool. This tool assesses your domain’s score and provides insights on how to lower it, ensuring your emails are less likely to land in spam folders.
On top of that, if you need any help regarding DNS records (SPF, DKIM, or DMARC) configuration or email related issues, feel free to reach out to us for expert assistance.
Final Remarks on HappyForms Not Sending Email
When a user submits a form on your website, you should receive an email notification instantly. But when HappyForms email notifications aren’t working, it can lead to missed leads and lost communication. By following this guide, you can solve the problem quickly.
To recap:
- Start by double-checking your HappyForms email alert settings.
- Set up Post SMTP for authenticated and dependable email delivery.
- Force a consistent “From” email address and monitor your spam score.
With these configurations, you should experience smooth, reliable HappyForms email notifications for your WordPress site.
If you’re still facing email delivery issues, contact us to get expert support for all your email delivery issues.

 OpenAI
 Perplexity

