
 OpenAI
 Perplexity
If you are experiencing the Wordfence not sending emails issue, it’s not just you. Most WordPress users face the same problem.
Generally, Wordfence sends you email alerts when it detects specific activity on your website, such as when a user gets locked out or fills out the ‘lost password’ form, etc.
But if you are facing the ‘Wordfence not sending emails’ issue, then it is frustrating and potentially harmful to your business. Additionally, it can negatively affect the security of your website.
Don’t worry! Fortunately, we have the perfect solution to this problem.
In this article, we will show you how to fix the Wordfence email alerts issue in three easy steps.
Ready? Let’s get started!
Why Is Wordfence Not Sending Emails?
Before we talk about the solution, it’s important to understand why Wordfence is not sending emails. In general, there are two reasons:
- WordPress Default Mail Function
- Incorrect Wordfence Email Alerts Settings
To better understand how these issues can lead to Wordfence email alert failure, let’s examine each in more detail.
Reason #1: WordPress Default Mail Function
WordPress relies on the PHP mail (wp_mail) function to send emails by default. However, this function is often unreliable because many web hosting companies block emails sent via the PHP mail function to prevent spam and fraud.
Additionally, the ‘wp_mail’ function lacks proper email domain authentication, which leads to the recipient server marking these emails as suspicious. As a result, emails might end up in the junk or spam folder.
So, relying solely on WordPress’s default email functionality can cause email notifications from Wordfence to get blocked or marked as spam.
Reason #2: Incorrect Wordfence Email Alerts Settings
When you install and set up Wordfence, it automatically configures the email notification settings. These settings include:
- Email Alert Preferences: Determines the types of events for which Wordfence sends email alerts.
- Scan Alert Severity: Specifies the severity levels (critical, high, medium, low) of alerts that trigger email notifications.
If these settings are not configured correctly, you may not receive the expected email alerts from Wordfence.
3 Easy Steps to Wordfence Not Sending Emails
We have now explained the reasons why Wordfence is not sending emails. It’s time to discuss how to resolve this problem.
Let’s dive right in!
Step #1: Test Your Wordfence Email Alerts
First, you need to send a basic test email to check if wp_mail() is functioning correctly. This step will help you determine whether your hosting provider is configured for email delivery.
To send a test email alert, follow the steps below:
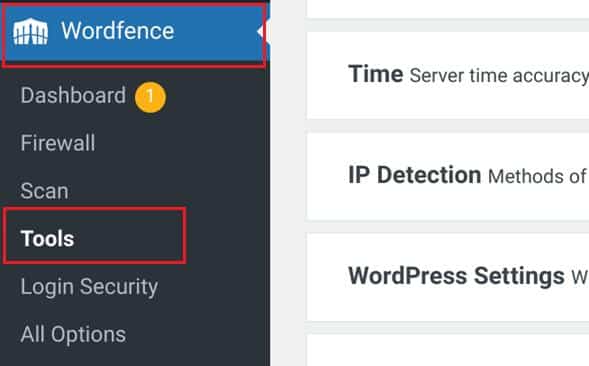
- In your WordPress dashboard, navigate to Wordfence → Tools.
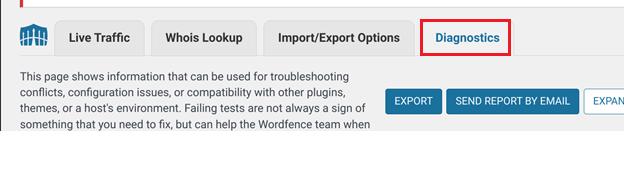
- On the tools screen, select the Diagnostics tab.
- Scroll to the bottom and expand the “Other Tests” section. You will find two options for testing your Wordfence emails:
- Send a test email from this WordPress server to an email address
- Send a test activity report email
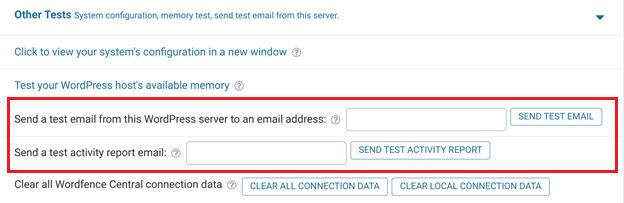
- Choose option one, “Send a test email from this WordPress server.”
- Enter your email address and click the Send Test Email button.
- Wordfence will display a result of “True” or “False” after sending the email.
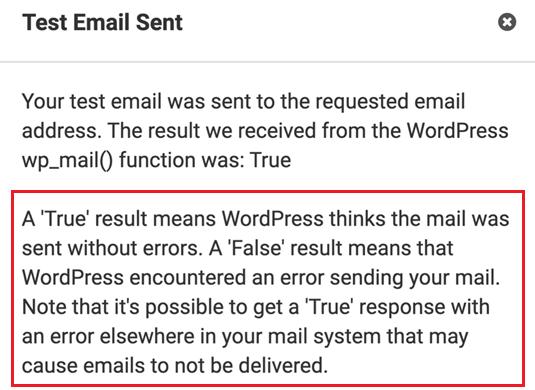
This test only verifies whether the wp_mail() function generated the email. It confirms that your server can send an email but doesn’t provide information on what happens after the email goes out.
As discussed earlier, the wp_mail function does not authenticate messages, so recipient servers might discard these emails or mark them as spam. Therefore, we recommend using the Post SMTP plugin to send emails for improved email delivery.
Step #2: Install and Configure Post SMTP Plugin
To fix the email deliverability (spam flagging by email servers) or WordPress not sending emails issue, you need to switch from WordPress’s default wp_mail function to SMTP (Simple Mail Transfer Protocol) for sending emails.
For this, simply install and set up the Post SMTP plugin, which allows you to connect your WordPress site to all popular SMTP service providers, such as Gmail SMTP Server, Amazon SES, Brevo, Microsoft 365, Zoho Mail, SendPulse, Mailgun, SendGrid, and others.
The following steps explain how to install and configure Post SMTP:
- Login to your WordPress dashboard.
- Go to “Plugins” and click “Add New Plugin.”
- Type Post SMTP into the search bar and search for the plugin that says “Post SMTP—WordPress SMTP Plugin with Email…”
- Next, click “Install Now” and then “Activate.”

Once activated, the 3-Step Setup Wizard will appear:
- Here, choose the SMTP service of your choice and click Continue.
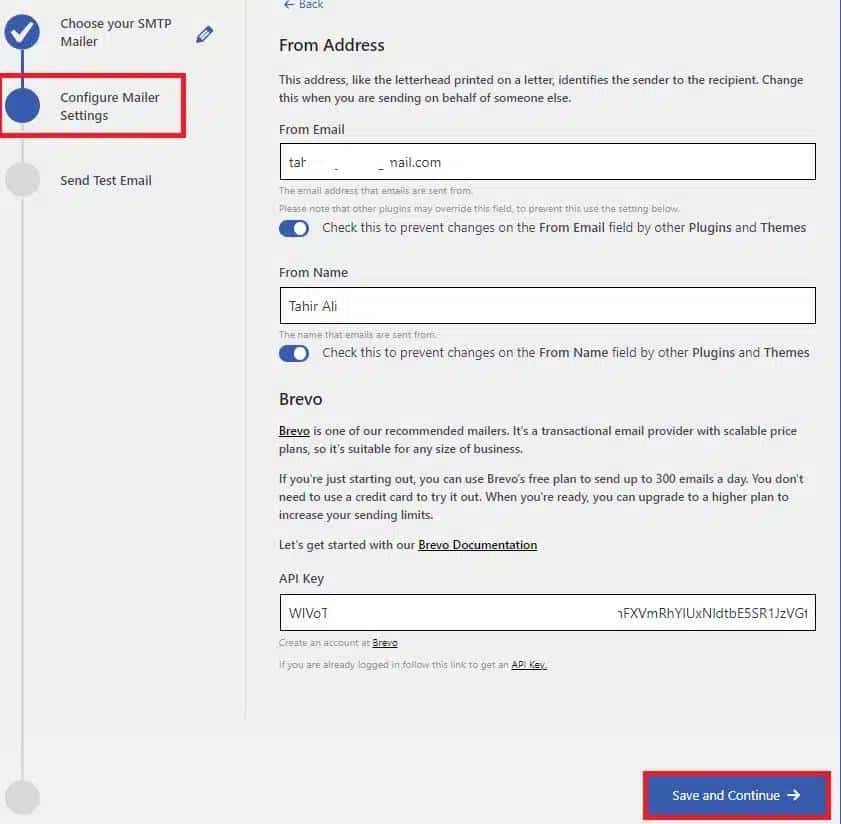
For this guide, we’ll use “Brevo” as an example.

- On the subsequent screen, enter your From Email and From Name. Then, input the API Key to authenticate your SMTP service (you can find the API Key by logging into your Brevo account). Click Save and Continue.
The final step is to verify your SMTP configuration:
- Enter a valid email address in the Recipient Email Address field and click Send Test Email.
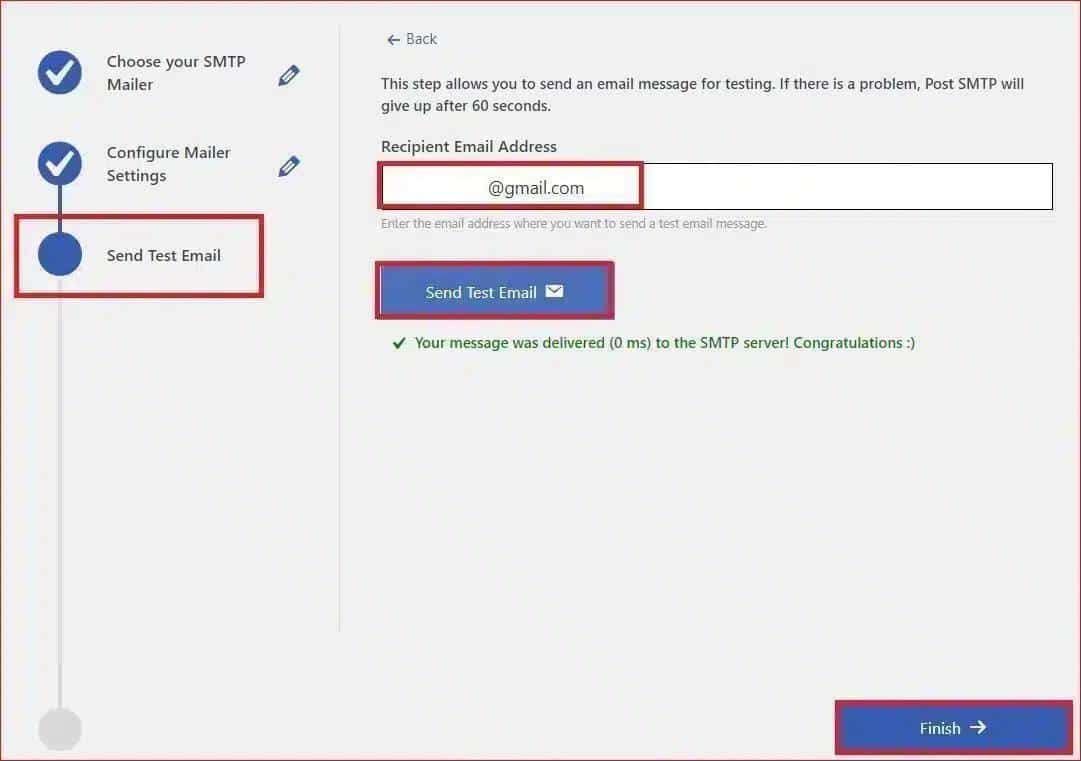
If the test email is delivered successfully, a green Congratulations 🙂 status will appear.
- Click the Finish button to complete the setup.
You have now successfully configured Post SMTP, which should resolve the issue of Wordfence not sending emails.
If the problem still persists, then review your WordPress email alert settings and make changes accordingly.
Step #3: Review Wordfence Email Alert Settings
In this step, we’ll check and adjust the email alert settings in Wordfence. Reviewing these settings is essential if you’re not receiving notifications or receiving too many.
Here’s how to check and adjust your email alert settings:
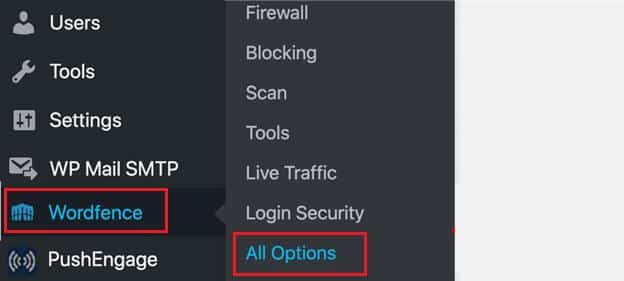
- Access Wordfence Options:
- Go to your WordPress dashboard and navigate to Wordfence → All Options.
- Review Email Alert Preferences:
- Locate the “Email Alert Preferences” section within the plugin settings.
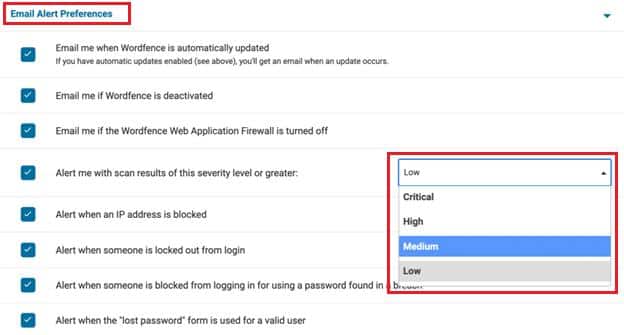
- Check Important Alerts:
- Make sure that critical alerts are enabled. For example, it’s crucial to be notified if the Wordfence Web Application Firewall is turned off. Check that the option “Email me if the Wordfence Web Application Firewall is turned off” is selected.
- Adjust Less Critical Alerts:
- If you find that you’re receiving too many emails, you can disable some alerts. Particularly if you manage multiple sites, reducing unnecessary notifications can help manage your inbox.
- Set Scan Alert Severity:
- Use the dropdown menu to select the level of scan results you want to receive. The severity levels include;
- Critical: Alerts for severe issues like malware detection, disabled firewall, or publicly accessible configuration files.
- High: Alerts for significant issues like suspicious content or modifications to plugins/themes.
- Medium: Alerts for moderate issues such as outdated plugins or versions of PHP.
- Low: Alerts for minor issues, such as blocked URLs in comments.
- Use the dropdown menu to select the level of scan results you want to receive. The severity levels include;
- Save Your Settings:
- After adjusting your preferences, click the “Save” button to apply your changes.
By reviewing and configuring these settings, you can be sure that you receive the right level of alerts from Wordfence. This helps maintain your website’s security without overwhelming you with unnecessary notifications.
Don’t Forget to Set Up DNS Records for Your Domain
If you are still not receiving Wordfence email alerts, you need to set up DNS records for your domain.
DNS records like SPF, DKIM, and DMARC are crucial for email delivery. They help confirm that your emails are genuine and not flagged as spam.
- SPF (Sender Policy Framework) records specify which mail servers can send emails on your domain’s behalf. Adding this record helps prevent unauthorized sources from sending emails using your domain.
- DKIM (DomainKeys Identified Mail) adds a digital signature to your emails. This helps email providers verify that the email content has not been tampered with and that it comes from a legitimate source.
- DMARC (Domain-based Message Authentication, Reporting, and Conformance) works with SPF and DKIM to provide an additional layer of protection. It helps you control how your domain handles email authentication failures and provides reports on email deliverability.
For detailed instructions on setting up these records, refer to our in-depth guide on SPF, DKIM, and DMARC.
If you are having difficulty, feel free to contact us for expert assistance. Let our team of experts help you configure these DNS records so that Wordfence email alerts reach your inbox.
Final Thoughts on Wordfence Not Sending Emails
If Wordfence is not sending email alerts, you should address the issue immediately to maintain your site’s security. There are two main reasons that might be causing the problem:
- Default WordPress Email Function: WordPress uses the wp_mail() function by default, which might be blocked or marked as spam by email providers.
- Incorrect Email Alert Settings: The email notification settings within Wordfence might be incorrect, which is causing the delivery of email notifications.
To resolve these issues, follow the three simple steps outlined in this guide. Remember that setting up the Post SMTP plugin is particularly important, as it significantly improves email deliverability by replacing the default wp_mail() function with SMTP.
If you continue to experience difficulties with Wordfence email alerts, please reach out through our support channels. We’re here to assist you with all types of WordPRess email related issues.


